HP Photosmart 7345 HP Photosmart 7350 and 7345 printers - (English) Basic Guid - Page 12
load photo paper in the photo tray, side to be printed facing down, side to be printed, facing down
 |
View all HP Photosmart 7345 manuals
Add to My Manuals
Save this manual to your list of manuals |
Page 12 highlights
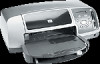
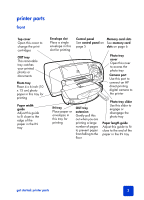
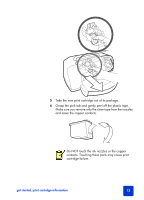
load photo paper in the photo tray 8 3 Place a stack of paper into the IN tray. • Load the paper with the side to be printed facing down. The printer pulls the paper in, flips it over, and then prints on the paper; the finished document faces up in the OUT tray. • Always load paper in the portrait direction, with the shortest edge toward you. • Be careful not to use too much or too little paper. See the specifications section of the HP Photosmart Printer Help for more information on paper types. It may be difficult for the printer to pick up a sheet of paper when there are only one or two sheets in the IN tray. Check that the stack of paper contains several sheets but is no higher than the top of the paper length guide. • Use one type and size of paper at a time. Do not mix paper types or sizes in the IN tray. 4 Move the photo tray slider toward you until it stops. This disengages the photo tray. 5 Adjust the paper width guide and paper length guide to fit close to the edges of the paper without bending the paper. This helps the paper feed straight into the printer. 6 Lower the OUT tray. When you use the photo tray you can leave paper in the IN tray. If you run out of photo paper in the photo tray, the printer continues to print using paper from the IN tray. 1 Move the photo tray slider toward you until it stops. This disengages the photo tray. 2 Lift the photo tray cover. 3 Load paper in the photo tray with the side to be printed facing down. If you are using tabbed paper, insert the paper so the tab feeds in last. The printer pulls the paper in, flips it over, then prints on the paper; the finished document faces up in the OUT tray. • You can load up to 20 sheets of paper in the photo tray. basics guide
-
 1
1 -
2
-
3
-
4
-
5
-
6
-
 7
7 -
 8
8 -
 9
9 -
 10
10 -
 11
11 -
 12
12 -
 13
13 -
 14
14 -
 15
15 -
 16
16 -
 17
17 -
18
-
19
-
20
-
21
-
22
-
23
-
24
-
25
-
26
-
27
-
28
-
29
-
30
-
31
-
32
-
33
-
34
-
35
-
36
-
37
-
38
-
39
-
40
-
41
-
42
-
43
-
44
-
45
-
46
-
47
-
48
-
49
-
50
-
51
-
52
-
53
-
54
-
55
-
56
-
57
-
58
-
59
-
60
-
61
-
62
-
63
-
64
 |
 |