HP Pro Tower 400 G9 PCI Desktop PC Maintenance and Service Guide - Page 37
Hard drive
 |
View all HP Pro Tower 400 G9 PCI Desktop PC manuals
Add to My Manuals
Save this manual to your list of manuals |
Page 37 highlights
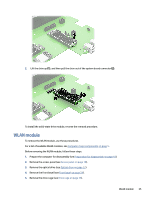
from the socket. Lift the card straight up (2) and then away from the inside of the chassis to remove it (3). 5. Store a removed card in antistatic packaging. 6. If you are not installing a new expansion card, install an expansion slot cover to close the open slot. CAUTION: After removing an expansion card, you must replace it with a new card or expansion slot cover to properly cool internal components during operation. 7. Reverse the removal procedures to install a new expansion card. Be sure to rotate the slot cover retention latch down into place after installation. 8. After installing an expansion card, connect external cables to the installed card and internal cables to the system board, if needed. 9. Reassemble and reconfigure the computer, if necessary. Hard drive To remove a hard drive, use these procedures. ● The primary Serial ATA (SATA) hard drive must be connected to the dark-blue primary SATA connector labeled SATA0 on the system board. ● Connect secondary hard drives and optical drives to any of the light-blue SATA connectors on the system board. The connectors are labeled SATA1 and SATA2. IMPORTANT: To prevent loss of work and damage to the computer or drive: If you are inserting or removing a drive, shut down the operating system properly, turn off the computer, and unplug the power cord. Do not remove a drive while the computer is on or in standby mode. 30 Chapter 4 Removal and replacement procedures
-
 1
1 -
2
-
3
-
4
-
5
-
6
-
7
-
8
-
9
-
10
-
11
-
12
-
13
-
14
-
15
-
16
-
17
-
18
-
19
-
20
-
21
-
22
-
23
-
24
-
25
-
26
-
27
-
28
-
29
-
30
-
31
-
 32
32 -
 33
33 -
 34
34 -
 35
35 -
 36
36 -
 37
37 -
 38
38 -
 39
39 -
 40
40 -
 41
41 -
 42
42 -
43
-
44
-
45
-
46
-
47
-
48
-
49
-
50
-
51
-
52
-
53
-
54
-
55
-
56
-
57
-
58
-
59
-
60
-
61
-
62
-
63
-
64
-
65
-
66
-
67
-
68
-
69
-
70
-
71
-
72
-
73
-
74
-
75
-
76
-
77
-
78
-
79
-
80
-
81
-
82
-
83
-
84
-
85
-
86
-
87
-
88
-
89
-
90
-
91
-
92
-
93
-
94
-
95
-
96
-
97
-
98
-
99
-
100
-
101
-
102
-
103
-
104
-
105
-
106
-
107
-
108
-
109
-
110
-
111
-
112
-
113
-
114
-
115
-
116
-
117
-
118
-
119
-
120
-
121
-
122
 |
 |
