HP ProBook 4525s HP ProBook Notebook PC User Guide - Linux - Page 53
Using optional external devices, Replacing the hard drive
 |
View all HP ProBook 4525s manuals
Add to My Manuals
Save this manual to your list of manuals |
Page 53 highlights
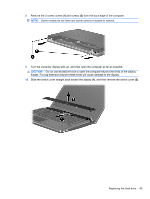
● DVD-ROM Drive ● DVD+/-RW SuperMulti Double-Layer LightScribe Drive ● Blu-ray ROM DVD+/-RW SuperMulti Double-Layer LightScribe Drive Using optional external devices NOTE: For more information about required software and drivers, or to learn which computer port to use, refer to the manufacturer's instructions. To connect an external device to the computer: CAUTION: To reduce the risk of damage to the equipment when connecting a powered device, be sure that the device is turned off and the AC power cord is unplugged. 1. Connect the device to the computer. 2. If you are connecting a powered device, plug the device power cord into a grounded AC outlet. 3. Turn on the device. To disconnect an unpowered external device, turn off the device, and then disconnect it from the computer. To disconnect a powered external device, turn off the device, disconnect it from the computer, and then unplug the AC power cord. Replacing the hard drive CAUTION: To prevent information loss or an unresponsive system: Shut down the computer before removing the hard drive from the hard drive bay. Do not remove the hard drive while the computer is on, in Suspend, or in Hibernation. If you are not sure whether the computer is off or in Hibernation, turn the computer on by pressing the power button. Then, shut down the computer through the operating system. To remove a hard drive: 1. Save your work. 2. Shut down the computer and close the display. 3. Disconnect all external devices connected to the computer. 4. Unplug the power cord. 5. Turn the computer upside down on a flat surface, with the battery bay toward you. 6. Remove the battery from the computer. Replacing the hard drive 43
-
 1
1 -
2
-
3
-
4
-
5
-
6
-
7
-
8
-
9
-
10
-
11
-
12
-
13
-
14
-
15
-
16
-
17
-
18
-
19
-
20
-
21
-
22
-
23
-
24
-
25
-
26
-
27
-
28
-
29
-
30
-
31
-
32
-
33
-
34
-
35
-
36
-
37
-
38
-
39
-
40
-
41
-
42
-
43
-
44
-
45
-
46
-
47
-
 48
48 -
 49
49 -
 50
50 -
 51
51 -
 52
52 -
 53
53 -
 54
54 -
 55
55 -
 56
56 -
 57
57 -
 58
58 -
59
-
60
-
61
-
62
-
63
-
64
-
65
-
66
-
67
-
68
-
69
-
70
-
71
-
72
-
73
-
74
-
75
-
76
-
77
-
78
-
79
-
80
-
81
-
82
-
83
-
84
-
85
-
86
-
87
-
88
-
89
-
90
-
91
-
92
-
93
-
94
-
95
-
96
-
97
-
98
-
99
-
100
-
101
-
102
 |
 |
