HP ProLiant SL390s HP ProLiant SL390s G7 1U half width Server Maintenance and - Page 48
Battery-backed write cache procedures, Align the BBWC bracket to the tray and fasten the screws.
 |
View all HP ProLiant SL390s manuals
Add to My Manuals
Save this manual to your list of manuals |
Page 48 highlights
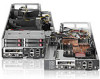
Figure 27 Installing the front PCIe card 3. Install the front PCIe assembly to the server and fasten the screws. Figure 28 Installing the front PCIe assembly NOTE: Reverse the above steps for removal procedures. Battery-backed write cache procedures 1. Align the BBWC bracket to the tray and fasten the screws. Removal and Replacement Procedures 48
-
 1
1 -
2
-
3
-
4
-
5
-
6
-
7
-
8
-
9
-
10
-
11
-
12
-
13
-
14
-
15
-
16
-
17
-
18
-
19
-
20
-
21
-
22
-
23
-
24
-
25
-
26
-
27
-
28
-
29
-
30
-
31
-
32
-
33
-
34
-
35
-
36
-
37
-
38
-
39
-
40
-
41
-
42
-
 43
43 -
 44
44 -
 45
45 -
 46
46 -
 47
47 -
 48
48 -
 49
49 -
 50
50 -
 51
51 -
 52
52 -
 53
53 -
54
-
55
-
56
-
57
-
58
-
59
-
60
-
61
-
62
-
63
-
64
-
65
-
66
-
67
-
68
-
69
-
70
-
71
-
72
-
73
-
74
-
75
-
76
-
77
-
78
 |
 |

Removal and Replacement Procedures 48
Figure 27
Installing the front PCIe card
3.
Install the front PCIe assembly to the server and fasten the screws.
Figure 28
Installing the front PCIe assembly
NOTE:
Reverse the above steps for removal procedures.
Battery-backed write cache procedures
1.
Align the BBWC bracket to the tray and fasten the screws.