HP ProLiant SL390s HP ProLiant SL390s G7 1U half width Server Maintenance and - Page 55
Install the PSU Backplane., Reinstall the top cover to the power supply cage.
 |
View all HP ProLiant SL390s manuals
Add to My Manuals
Save this manual to your list of manuals |
Page 55 highlights
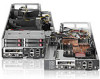
2. Slide the power supply out of the power supply bay. Figure 40 Removing the Power supply To replace the PSU Backplane: 1. Remove the top cover from the power supply cage. 2. Install the PSU Backplane. 3. Reinstall the top cover to the power supply cage. Figure 41 Installing the PSU Backplane To replace the power supply: 1. Align the power supply edge card connector with the open slot of power supply cage. 2. Slide the power supply into the power supply bay until it snaps into place. Removal and Replacement Procedures 55
-
 1
1 -
2
-
3
-
4
-
5
-
6
-
7
-
8
-
9
-
10
-
11
-
12
-
13
-
14
-
15
-
16
-
17
-
18
-
19
-
20
-
21
-
22
-
23
-
24
-
25
-
26
-
27
-
28
-
29
-
30
-
31
-
32
-
33
-
34
-
35
-
36
-
37
-
38
-
39
-
40
-
41
-
42
-
43
-
44
-
45
-
46
-
47
-
48
-
49
-
 50
50 -
 51
51 -
 52
52 -
 53
53 -
 54
54 -
 55
55 -
 56
56 -
 57
57 -
 58
58 -
 59
59 -
 60
60 -
61
-
62
-
63
-
64
-
65
-
66
-
67
-
68
-
69
-
70
-
71
-
72
-
73
-
74
-
75
-
76
-
77
-
78
 |
 |

Removal and Replacement Procedures 55
2.
Slide the power supply out of the power supply bay.
Figure 40
Removing the Power supply
To replace the PSU Backplane:
1.
Remove the top cover from the power supply cage.
2.
Install the PSU Backplane.
3.
Reinstall the top cover to the power supply cage.
Figure 41
Installing the PSU Backplane
To replace the power supply:
1.
Align the power supply edge card connector with the open slot of power supply cage.
2.
Slide the power supply into the power supply bay until it snaps into place.