HP ProLiant SL390s HP ProLiant SL390s G7 1U half width Server Maintenance and - Page 49
Install the BBWC into the tray and slide it in the direction of the arrow.
 |
View all HP ProLiant SL390s manuals
Add to My Manuals
Save this manual to your list of manuals |
Page 49 highlights
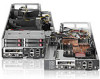
Figure 29 Installing the BBWC bracket 2. Install the BBWC into the tray and slide it in the direction of the arrow. Figure 30 Installing the BBWC 3. Connecting the BBWC cable with the smart array controllers. Removal and Replacement Procedures 49
-
 1
1 -
2
-
3
-
4
-
5
-
6
-
7
-
8
-
9
-
10
-
11
-
12
-
13
-
14
-
15
-
16
-
17
-
18
-
19
-
20
-
21
-
22
-
23
-
24
-
25
-
26
-
27
-
28
-
29
-
30
-
31
-
32
-
33
-
34
-
35
-
36
-
37
-
38
-
39
-
40
-
41
-
42
-
43
-
 44
44 -
 45
45 -
 46
46 -
 47
47 -
 48
48 -
 49
49 -
 50
50 -
 51
51 -
 52
52 -
 53
53 -
 54
54 -
55
-
56
-
57
-
58
-
59
-
60
-
61
-
62
-
63
-
64
-
65
-
66
-
67
-
68
-
69
-
70
-
71
-
72
-
73
-
74
-
75
-
76
-
77
-
78
 |
 |

Removal and Replacement Procedures 49
Figure 29
Installing the BBWC bracket
2.
Install the BBWC into the tray and slide it in the direction of the arrow.
Figure 30
Installing the BBWC
3.
Connecting the BBWC cable with the smart array controllers.