HP Smart Tank 6000 User Guide - Page 76
To clean printhead contacts, nozzles on any surface.
 |
View all HP Smart Tank 6000 manuals
Add to My Manuals
Save this manual to your list of manuals |
Page 76 highlights
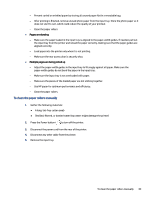
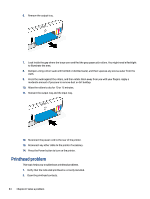
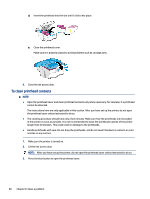
d. Insert the printhead into the slot until it clicks into place. e. Close the printhead cover. Make sure it is properly closed to avoid problems such as carriage jams. 4. Close the ink access door. To clean printhead contacts NOTE: ● Open the printhead cover and clean printhead contacts only when necessary; for example, if a printhead cannot be detected. The instructions here are only applicable in this section. After you have set up the printer, do not open the printhead cover unless instructed to do so. ● The cleaning procedure should take only a few minutes. Make sure that the printheads are reinstalled in the printer as soon as possible. It is not recommended to leave the printheads outside of the printer longer than 30 minutes. This could result in damage to the printheads. ● Handle printheads with care. Do not drop the printheads, and do not touch the electric contacts or print nozzles on any surface. 1. Make sure the printer is turned on. 2. Lift the ink access door. NOTE: After you have set up the printer, do not open the printhead cover unless instructed to do so. 3. Press the blue button to open the printhead cover. 66 Chapter 8 Solve a problem
-
 1
1 -
2
-
3
-
4
-
5
-
6
-
7
-
8
-
9
-
10
-
11
-
12
-
13
-
14
-
15
-
16
-
17
-
18
-
19
-
20
-
21
-
22
-
23
-
24
-
25
-
26
-
27
-
28
-
29
-
30
-
31
-
32
-
33
-
34
-
35
-
36
-
37
-
38
-
39
-
40
-
41
-
42
-
43
-
44
-
45
-
46
-
47
-
48
-
49
-
50
-
51
-
52
-
53
-
54
-
55
-
56
-
57
-
58
-
59
-
60
-
61
-
62
-
63
-
64
-
65
-
66
-
67
-
68
-
69
-
70
-
 71
71 -
 72
72 -
 73
73 -
 74
74 -
 75
75 -
 76
76 -
 77
77 -
 78
78 -
 79
79 -
 80
80 -
 81
81 -
82
-
83
-
84
-
85
-
86
-
87
-
88
-
89
-
90
-
91
-
92
-
93
-
94
-
95
-
96
-
97
-
98
-
99
-
100
-
101
-
102
-
103
-
104
 |
 |
