HP rp5800 Hardware Reference Guide HP rp5800 - Page 63
B-5, Securing Peripheral Devices Printer Shown
 |
View all HP rp5800 manuals
Add to My Manuals
Save this manual to your list of manuals |
Page 63 highlights
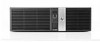
3. Slide the security cable through the hole in the Kensington lock on the rear of the monitor. Figure B-5 Securing the Monitor 4. Use the bracket provided in the kit to secure other peripheral devices by laying the device cable across the center of the bracket (1) and inserting the security cable through one of the two holes in the bracket (2). Use the hole in the bracket that best secures the peripheral device cable. Figure B-6 Securing Peripheral Devices (Printer Shown) ENWW Installing a Security Lock 57
-
 1
1 -
2
-
3
-
4
-
5
-
6
-
7
-
8
-
9
-
10
-
11
-
12
-
13
-
14
-
15
-
16
-
17
-
18
-
19
-
20
-
21
-
22
-
23
-
24
-
25
-
26
-
27
-
28
-
29
-
30
-
31
-
32
-
33
-
34
-
35
-
36
-
37
-
38
-
39
-
40
-
41
-
42
-
43
-
44
-
45
-
46
-
47
-
48
-
49
-
50
-
51
-
52
-
53
-
54
-
55
-
56
-
57
-
 58
58 -
 59
59 -
 60
60 -
 61
61 -
 62
62 -
 63
63 -
 64
64 -
 65
65 -
 66
66 -
 67
67 -
 68
68 -
69
-
70
-
71
-
72
-
73
-
74
 |
 |

3.
Slide the security cable through the hole in the Kensington lock on the rear of the monitor.
Figure B-5
Securing the Monitor
4.
Use the bracket provided in the kit to secure other peripheral devices by laying the device cable
across the center of the bracket (1) and inserting the security cable through one of the two holes
in the bracket (2). Use the hole in the bracket that best secures the peripheral device cable.
Figure B-6
Securing Peripheral Devices (Printer Shown)
ENWW
Installing a Security Lock
57