HP t505 ThinPro 4.2 Administrator s Guide - Page 26
XDMCP, Connections, Connect, Protocols, PCoIP, VMware View Manager, Finish
 |
View all HP t505 manuals
Add to My Manuals
Save this manual to your list of manuals |
Page 26 highlights
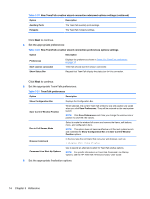
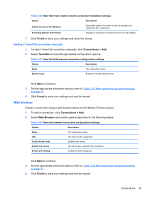
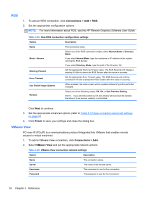
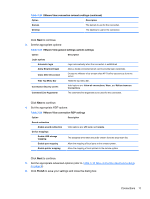
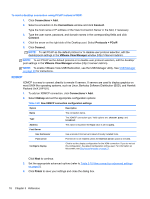
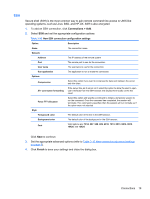
To start a desktop connection using PCoIP instead of RDP: 1. Click Connections > Add. 2. Select a connection in the Connections window and click Connect. Type the host name or IP address of the View Connection Server in the field, if necessary. 3. Type the user name, password, and domain names in the corresponding fields and click Connect. 4. Click the arrow on the right side of the Desktop pool. Select Protocols > PCoIP. 5. Click Connect. NOTE: To set PCoIP as the default protocol or to disable user protocol selection, edit the desktop/pool settings in the VMware View Manager window (http:///admin). NOTE: To set PCoIP as the default protocol or to disable user protocol selection, edit the desktop/ pool settings in the VMware View Manager window (http:///admin). NOTE: To enable VMware View USB Redirection, use the USB Manager utility. See USB Manager on page 29 for instructions. XDMCP XDMCP is a way to connect directly to remote X servers. X servers are used to display graphics on most UNIX-like operating systems, such as Linux, Berkeley Software Distribution (BSD), and Hewlett Packard UniX (HP-UX). 1. To add an XDMCP connection, click Connections > Add. 2. Select Xdmcp and set the appropriate configuration options: Table 3-29 New XDMCP connection configuration settings Option Description Name The connection name. Type The XDMCP connection type. Valid options are: chooser, query, and broadcast. Address This value is required if the Type value is set to query. Font Server Use font server Use a remote X font server instead of locally installed fonts. Font server Font server is not enabled unless the Use font server option is checked. Configure display Click to set the display configuration for the XDM connection. If you do not set this configuration, the default configuration will be used. For information on this screen, see Display preferences on page 27. Click Next to continue. 3. Set the appropriate advanced options (refer to Table 3-10 New connection advanced settings on page 9). 4. Click Finish to save your settings and close the dialog box. 18 Chapter 3 Reference
-
 1
1 -
2
-
3
-
4
-
5
-
6
-
7
-
8
-
9
-
10
-
11
-
12
-
13
-
14
-
15
-
16
-
17
-
18
-
19
-
20
-
 21
21 -
 22
22 -
 23
23 -
 24
24 -
 25
25 -
 26
26 -
 27
27 -
 28
28 -
 29
29 -
 30
30 -
 31
31 -
32
-
33
-
34
-
35
-
36
-
37
-
38
-
39
-
40
-
41
-
42
-
43
-
44
-
45
-
46
-
47
-
48
-
49
-
50
-
51
-
52
-
53
-
54
-
55
-
56
-
57
-
58
 |
 |