HP t505 ThinPro 4.2 Administrator s Guide - Page 35
Disabling client aggregation, Display preferences, Adding a profile, Primary Display Profile
 |
View all HP t505 manuals
Add to My Manuals
Save this manual to your list of manuals |
Page 35 highlights
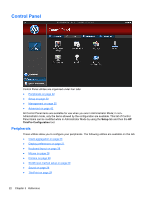
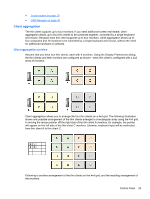
Disabling client aggregation To disable client aggregation: 1. Double-click Client Aggregation. 2. Select Disabled. 3. Click Apply and Closed. Display preferences This utility allows you to add, edit, and delete profiles. A profile is a display specification, which includes resolution, refresh rate, bit depth, and whether or not the display should be rotated. Most administrators use the default profile, which: ● Uses Display Data Channel (DDC) to query the resolution and refresh rate from the monitor ● Uses 24- or 32-bit color depth ● Does not rotate the display The administrator may set up different profiles when: ● Using a 16-bit color depth should improve RDP or ICA performance because less data has to be transmitted over the network or sent to the graphics chip ● Some users have to run an application that requires a specific resolution or bit depth in order to function properly ● The administrator wants to standardize on one display profile, even though there are many different monitors across the organization ● One or more users run applications that require their monitor to be rotated (portrait versus landscape mode) NOTE: The Display Preferences window contents are different based on the actual hardware model. Some models allow configuration of up to four monitors, some two, and some only one. Adding a profile To add a profile: 1. Double-click Display Preferences. 2. Click New. 3. Under Profile Settings, type a name in the Profile Name field. 4. Select the appropriate Resolution for your monitor. 5. Select the Depth. 6. Select the appropriate Orientation for your monitor. 7. Click Save to keep your changes or Revert to discard them. 8. Under Display Configuration, select the Primary Display Profile and the Secondary Display Profile. 9. Set the Mode. 10. Click Test Settings to check the profile. 11. Click Apply, and then click Close to save your changes and close the dialog box. Control Panel 27
-
 1
1 -
2
-
3
-
4
-
5
-
6
-
7
-
8
-
9
-
10
-
11
-
12
-
13
-
14
-
15
-
16
-
17
-
18
-
19
-
20
-
21
-
22
-
23
-
24
-
25
-
26
-
27
-
28
-
29
-
 30
30 -
 31
31 -
 32
32 -
 33
33 -
 34
34 -
 35
35 -
 36
36 -
 37
37 -
 38
38 -
 39
39 -
 40
40 -
41
-
42
-
43
-
44
-
45
-
46
-
47
-
48
-
49
-
50
-
51
-
52
-
53
-
54
-
55
-
56
-
57
-
58
 |
 |
