Hitachi 42PD8800 Owners Guide - Page 42
FUNCTION, continued, Multi Picture Mode continued
 |
View all Hitachi 42PD8800 manuals
Add to My Manuals
Save this manual to your list of manuals |
Page 42 highlights
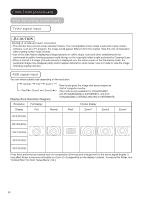
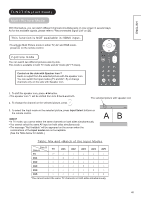
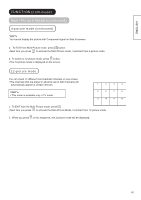
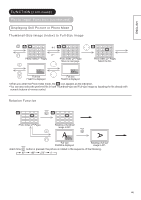
FUNCTION (continued) Multi Picture Mode (continued) 2-picture mode (continued) 4. To switch to 4-picture mode, press once. 2-4-12 The 4-picture mode is displayed on the screen. NOTE AV1 Each time is pressed, the picture mode will be switched by following order. 2-4-12 AV2 2-Picture 2-Picture (1080i)* 4-Picture 12-Picture (TV mode only) * When receiving 1080i format of component signal, there is a mode (2-Picture(1080i)) which sub-screen is displayed inside of the large screen (Main-screen). Please note that you cannot display the picture with component signal on Sub-screen. (Subscreen) [2-Picture (1080i) Mode] 5. To EXIT from the Multi Picture mode, press button. Next time you press to activate the Multi Picture mode, it will start from 2-picture mode. 4-picture mode You can watch 4 different pictures from live broadcasts and/or the external equipments at the same time. NOTE The audio comes out ONLY from side A. You can change the channels or change Input modes on the side with ▼ (red triangle) mark. 1. To switch the ▼ location Press ◄►buttons on the remote control. The ▼ mark will shift to side A and side B back-and -forth. The selected picture with red triangle mark 5 B1 8 2. To change the channel Make sure that ▼mark is located on the side you want to make changes. A B2 6 B3 11 + Side A: Press P to select channels. - Side B: Select the frame (B1~B3) that you want to make changes with ▲▼buttons. The selected frame will be highlighted in green. + Press P buttons to select channels. - 3. To change Input mode Make sure that ▼mark is located on the side you want to make changes. Side A: Press Input Select buttons on the remote control. Side B: Select the frame (B1~B3) that you want to make changes with ▲▼buttons. The selected frame will be highlighted in green. Press Input Select buttons on the remote control. 41
-
 1
1 -
2
-
3
-
4
-
5
-
6
-
7
-
8
-
9
-
10
-
11
-
12
-
13
-
14
-
15
-
16
-
17
-
18
-
19
-
20
-
21
-
22
-
23
-
24
-
25
-
26
-
27
-
28
-
29
-
30
-
31
-
32
-
33
-
34
-
35
-
36
-
 37
37 -
 38
38 -
 39
39 -
 40
40 -
 41
41 -
 42
42 -
 43
43 -
 44
44 -
 45
45 -
 46
46 -
 47
47 -
48
-
49
-
50
-
51
-
52
-
53
-
54
-
55
-
56
-
57
-
58
-
59
-
60
-
61
-
62
 |
 |
