Hitachi DZ-HS903A Owners Guide - Page 128
Software installation
 |
UPC - 050585224117
View all Hitachi DZ-HS903A manuals
Add to My Manuals
Save this manual to your list of manuals |
Page 128 highlights
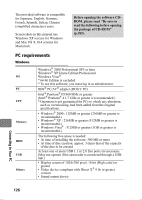
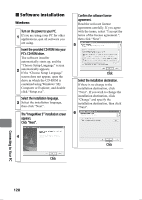
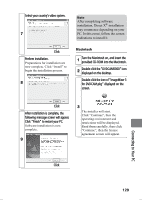
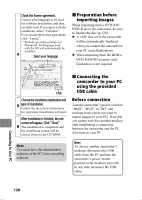
„ Software installation Windows Turn on the power to your PC. 1 If you are using your PC for other applications, quit all software you are using. Insert the provided CD-ROM into your PC's CD-ROM drive. The software installer automatically starts up, and the "Choose Setup Language" screen 2 automatically appears. If the "Choose Setup Language" screen does not appear, open the drive in which the CD-ROM is contained using Windows' My Computer or Explorer, and double click "Setup.exe". Select the installation language. 3 Select the installation language, then click "Next". The "ImageMixer 3" installation screen appears. Click "Next". Confirm the software license agreement. Read the software license agreement carefully. If you agree with the terms, select "I accept the terms of the license agreement.", then click "Next". 5 Click Select the installation destination. If there is no change to the installation destination, click "Next". If you wish to change the installation destination, click "Change" and specify the installation destination, then click "Next". 6 4 Click Click Connecting to Your PC 128
-
 1
1 -
2
-
3
-
4
-
5
-
6
-
7
-
8
-
9
-
10
-
11
-
12
-
13
-
14
-
15
-
16
-
17
-
18
-
19
-
20
-
21
-
22
-
23
-
24
-
25
-
26
-
27
-
28
-
29
-
30
-
31
-
32
-
33
-
34
-
35
-
36
-
37
-
38
-
39
-
40
-
41
-
42
-
43
-
44
-
45
-
46
-
47
-
48
-
49
-
50
-
51
-
52
-
53
-
54
-
55
-
56
-
57
-
58
-
59
-
60
-
61
-
62
-
63
-
64
-
65
-
66
-
67
-
68
-
69
-
70
-
71
-
72
-
73
-
74
-
75
-
76
-
77
-
78
-
79
-
80
-
81
-
82
-
83
-
84
-
85
-
86
-
87
-
88
-
89
-
90
-
91
-
92
-
93
-
94
-
95
-
96
-
97
-
98
-
99
-
100
-
101
-
102
-
103
-
104
-
105
-
106
-
107
-
108
-
109
-
110
-
111
-
112
-
113
-
114
-
115
-
116
-
117
-
118
-
119
-
120
-
121
-
122
-
 123
123 -
 124
124 -
 125
125 -
 126
126 -
 127
127 -
 128
128 -
 129
129 -
 130
130 -
 131
131 -
 132
132 -
 133
133 -
134
-
135
-
136
-
137
-
138
-
139
-
140
-
141
-
142
-
143
-
144
-
145
-
146
-
147
-
148
-
149
-
150
-
151
-
152
-
153
-
154
-
155
-
156
-
157
-
158
-
159
-
160
-
161
-
162
-
163
-
164
-
165
-
166
-
167
-
168
-
169
-
170
-
171
-
172
-
173
-
174
-
175
-
176
-
177
-
178
-
179
-
180
-
181
-
182
-
183
-
184
-
185
-
186
-
187
-
188
-
189
-
190
-
191
 |
 |
