Hitachi DZ-HS903A Owners Guide - Page 74
Turning Off the, Recording Indicator, Beneath the Lens - driver
 |
UPC - 050585224117
View all Hitachi DZ-HS903A manuals
Add to My Manuals
Save this manual to your list of manuals |
Page 74 highlights
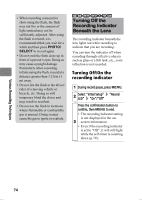
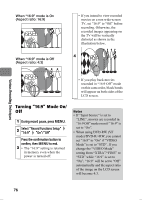
• When recording consecutive shots using the flash, the flash may not fire or the amount of light emitted may not be sufficiently adjusted. After using the flash to record, it is recommended that you wait for a while and then press PHOTO/ SELECT to record again. • Do not emit the flash close up in front of a person's eyes. Doing so may cause eyesight damage. Particularly when recording infants using the flash, record at a distance greater than 3.2 feet (1 m) away. • Do not fire the flash at the driver/ rider of a moving vehicle or bicycle, etc. Doing so will temporary blind the driver and may result in accident. • Do not use the flash in locations where flammable or combustible gas is present. Doing so may cause the gas to ignite or explode. HDD RAM -RW (VR) -RW (VF) R +RW CARD Turning Off the Recording Indicator Beneath the Lens The recording indicator beneath the lens lights red while recording to indicate that you are recording. You can turn the indicator off when recording through reflective objects such as glass or a fish tank, etc., so its reflection is not recorded. Turning Off/On the recording indicator 1 During record pause, press MENU. 2 Select "Initial Setup" LED" "On"/"Off" "Record Press the confirmation button to confirm, then MENU to end. • The recording indicator setting is not displayed in the on- 3 screen information. • Even if the recording indicator is set to "Off", it will still light while the self-timer is counting down (p.79). Various Recording Techniques 74
-
 1
1 -
2
-
3
-
4
-
5
-
6
-
7
-
8
-
9
-
10
-
11
-
12
-
13
-
14
-
15
-
16
-
17
-
18
-
19
-
20
-
21
-
22
-
23
-
24
-
25
-
26
-
27
-
28
-
29
-
30
-
31
-
32
-
33
-
34
-
35
-
36
-
37
-
38
-
39
-
40
-
41
-
42
-
43
-
44
-
45
-
46
-
47
-
48
-
49
-
50
-
51
-
52
-
53
-
54
-
55
-
56
-
57
-
58
-
59
-
60
-
61
-
62
-
63
-
64
-
65
-
66
-
67
-
68
-
 69
69 -
 70
70 -
 71
71 -
 72
72 -
 73
73 -
 74
74 -
 75
75 -
 76
76 -
 77
77 -
 78
78 -
 79
79 -
80
-
81
-
82
-
83
-
84
-
85
-
86
-
87
-
88
-
89
-
90
-
91
-
92
-
93
-
94
-
95
-
96
-
97
-
98
-
99
-
100
-
101
-
102
-
103
-
104
-
105
-
106
-
107
-
108
-
109
-
110
-
111
-
112
-
113
-
114
-
115
-
116
-
117
-
118
-
119
-
120
-
121
-
122
-
123
-
124
-
125
-
126
-
127
-
128
-
129
-
130
-
131
-
132
-
133
-
134
-
135
-
136
-
137
-
138
-
139
-
140
-
141
-
142
-
143
-
144
-
145
-
146
-
147
-
148
-
149
-
150
-
151
-
152
-
153
-
154
-
155
-
156
-
157
-
158
-
159
-
160
-
161
-
162
-
163
-
164
-
165
-
166
-
167
-
168
-
169
-
170
-
171
-
172
-
173
-
174
-
175
-
176
-
177
-
178
-
179
-
180
-
181
-
182
-
183
-
184
-
185
-
186
-
187
-
188
-
189
-
190
-
191
 |
 |
