Hitachi DZ-HS903A Owners Guide - Page 72
Restoring all the, Recording Settings to, Default Full Auto, Using the Flash
 |
UPC - 050585224117
View all Hitachi DZ-HS903A manuals
Add to My Manuals
Save this manual to your list of manuals |
Page 72 highlights
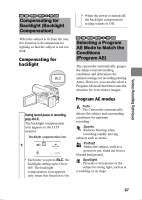
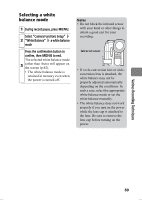
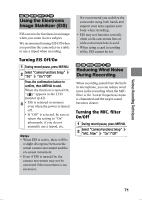
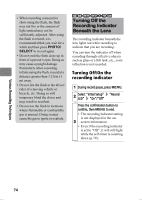
Various Recording Techniques Press the confirmation button to confirm, then MENU to end. When the function is turned On, " " appears in the LCD monitor (p.42). • The MIC. filter setting is 3 retained in memory even when the power is turned off. • If you set this function to "On", it is recommended to set the function to "Off" after recording before turning off the power unless you always intend to use this function. HDD RAM -RW (VR) -RW (VF) R +RW CARD Restoring all the Recording Settings to Default (Full Auto) You can reset the following manually adjusted recording settings to their defaults with the press of a single button. Function Focus Exposure BLC (Backlight) Program AE White Balance EIS (Electronic Image Stabilizer) MIC. Filter Default Auto Auto Off Auto Auto On Off See p.64 p.66 p.67 p.67 p.68 p.71 p.71 Setting the recording settings to full auto During record pause or recording, press FULL AUTO. 1 "FULL AUTO" appears in the LCD monitor for a while and the settings are reset to their default settings. CARD Using the Flash As shutter speed will slow down when still photos are recorded in dim lighting, camera shake may easily occur. We recommend you use a flash in this case. Normally, the flash fires automatically depending on the recording conditions (during Auto). You can also set the flash to On (always fires) or Off (does not fire). 72
-
 1
1 -
2
-
3
-
4
-
5
-
6
-
7
-
8
-
9
-
10
-
11
-
12
-
13
-
14
-
15
-
16
-
17
-
18
-
19
-
20
-
21
-
22
-
23
-
24
-
25
-
26
-
27
-
28
-
29
-
30
-
31
-
32
-
33
-
34
-
35
-
36
-
37
-
38
-
39
-
40
-
41
-
42
-
43
-
44
-
45
-
46
-
47
-
48
-
49
-
50
-
51
-
52
-
53
-
54
-
55
-
56
-
57
-
58
-
59
-
60
-
61
-
62
-
63
-
64
-
65
-
66
-
 67
67 -
 68
68 -
 69
69 -
 70
70 -
 71
71 -
 72
72 -
 73
73 -
 74
74 -
 75
75 -
 76
76 -
 77
77 -
78
-
79
-
80
-
81
-
82
-
83
-
84
-
85
-
86
-
87
-
88
-
89
-
90
-
91
-
92
-
93
-
94
-
95
-
96
-
97
-
98
-
99
-
100
-
101
-
102
-
103
-
104
-
105
-
106
-
107
-
108
-
109
-
110
-
111
-
112
-
113
-
114
-
115
-
116
-
117
-
118
-
119
-
120
-
121
-
122
-
123
-
124
-
125
-
126
-
127
-
128
-
129
-
130
-
131
-
132
-
133
-
134
-
135
-
136
-
137
-
138
-
139
-
140
-
141
-
142
-
143
-
144
-
145
-
146
-
147
-
148
-
149
-
150
-
151
-
152
-
153
-
154
-
155
-
156
-
157
-
158
-
159
-
160
-
161
-
162
-
163
-
164
-
165
-
166
-
167
-
168
-
169
-
170
-
171
-
172
-
173
-
174
-
175
-
176
-
177
-
178
-
179
-
180
-
181
-
182
-
183
-
184
-
185
-
186
-
187
-
188
-
189
-
190
-
191
 |
 |
