Hitachi DZ-HS903A Owners Guide - Page 66
Adjusting the, Brightness of the, Image Exposure
 |
UPC - 050585224117
View all Hitachi DZ-HS903A manuals
Add to My Manuals
Save this manual to your list of manuals |
Page 66 highlights
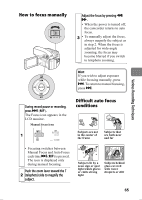
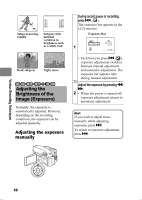
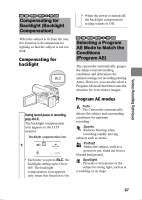
Subjects moving rapidly Subjects with minimal variation in brightness such as a white wall Dark subjects Night views HDD RAM -RW (VR) -RW (VF) R +RW CARD Adjusting the Brightness of the Image (Exposure) Normally, the exposure is automatically adjusted. However, depending on the recording conditions, the exposure can be adjusted manually. Adjusting the exposure manually During record pause or recording, press f ( ). The exposure bar appears in the LCD monitor. Exposure Bar 1 FINE 0:00:00 REM 3 0 MIN 8 : 0 0 AM 1 2 / 1/2008 • Each time you press f ( ), exposure adjustment switches between manual adjustment and automatic adjustment. The exposure bar appears only during manual adjustment. Adjust the exposure by pressing d/ c. 2 • When the power is turned off, exposure adjustment returns to automatic adjustment. Hint If you wish to adjust focus manually while adjusting exposure, press e. To return to exposure adjustment, press f. Various Recording Techniques 66
-
 1
1 -
2
-
3
-
4
-
5
-
6
-
7
-
8
-
9
-
10
-
11
-
12
-
13
-
14
-
15
-
16
-
17
-
18
-
19
-
20
-
21
-
22
-
23
-
24
-
25
-
26
-
27
-
28
-
29
-
30
-
31
-
32
-
33
-
34
-
35
-
36
-
37
-
38
-
39
-
40
-
41
-
42
-
43
-
44
-
45
-
46
-
47
-
48
-
49
-
50
-
51
-
52
-
53
-
54
-
55
-
56
-
57
-
58
-
59
-
60
-
 61
61 -
 62
62 -
 63
63 -
 64
64 -
 65
65 -
 66
66 -
 67
67 -
 68
68 -
 69
69 -
 70
70 -
 71
71 -
72
-
73
-
74
-
75
-
76
-
77
-
78
-
79
-
80
-
81
-
82
-
83
-
84
-
85
-
86
-
87
-
88
-
89
-
90
-
91
-
92
-
93
-
94
-
95
-
96
-
97
-
98
-
99
-
100
-
101
-
102
-
103
-
104
-
105
-
106
-
107
-
108
-
109
-
110
-
111
-
112
-
113
-
114
-
115
-
116
-
117
-
118
-
119
-
120
-
121
-
122
-
123
-
124
-
125
-
126
-
127
-
128
-
129
-
130
-
131
-
132
-
133
-
134
-
135
-
136
-
137
-
138
-
139
-
140
-
141
-
142
-
143
-
144
-
145
-
146
-
147
-
148
-
149
-
150
-
151
-
152
-
153
-
154
-
155
-
156
-
157
-
158
-
159
-
160
-
161
-
162
-
163
-
164
-
165
-
166
-
167
-
168
-
169
-
170
-
171
-
172
-
173
-
174
-
175
-
176
-
177
-
178
-
179
-
180
-
181
-
182
-
183
-
184
-
185
-
186
-
187
-
188
-
189
-
190
-
191
 |
 |
