IBM 43635gu User Guide - Page 55
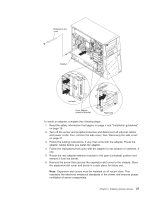
assembly from the drive cage., then, rotate the fan assembly away from the drive cage slightly.
 |
UPC - 883436002950
View all IBM 43635gu manuals
Add to My Manuals
Save this manual to your list of manuals |
Page 55 highlights
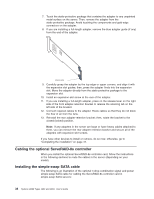
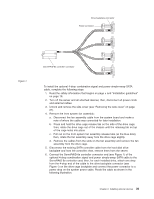
servers: Drive backplane connector Figure 2. ServeRAID-8s controller connector To install the optional single-drop hot-swap SAS/SATA cable, complete the following steps: 1. Read the safety information that begins on page v and "Installation guidelines" on page 18. 2. Turn off the server and all attached devices; then, disconnect all power cords and external cables. 3. Unlock and remove the side cover (see "Removing the side cover" on page 21). 4. Remove the front system fan assembly: a. Disconnect the fan assembly cable from the system board and make a note of where the cable was connected for later installation. b. Press and hold the drive cage release tab on the side of the drive cage; then, rotate the drive cage out of the chassis until the retaining tab on top of the cage locks into place. c. Pull out on the front system fan assembly release tabs (at the blue dots); then, rotate the fan assembly away from the drive cage slightly. d. Remove the cables from the slots on the fan assembly and remove the fan assembly from the drive cage. 5. Disconnect the existing SAS/SATA controller cable from the hard disk drive backplane and from the controller; then, remove them from the server. 6. Connect the ServeRAID-8s controller connector end (see Figure 2 ) of the optional single-drop hot-swap SAS/SATA cable to the ServeRAID-8s controller card; then, attach the other end of the cable to the hard disk drive backplane (see Figure 2 ) on the drive cage. Route the cable as shown in the following illustration. Chapter 2. Installing optional devices 41
-
 1
1 -
2
-
3
-
4
-
5
-
6
-
7
-
8
-
9
-
10
-
11
-
12
-
13
-
14
-
15
-
16
-
17
-
18
-
19
-
20
-
21
-
22
-
23
-
24
-
25
-
26
-
27
-
28
-
29
-
30
-
31
-
32
-
33
-
34
-
35
-
36
-
37
-
38
-
39
-
40
-
41
-
42
-
43
-
44
-
45
-
46
-
47
-
48
-
49
-
 50
50 -
 51
51 -
 52
52 -
 53
53 -
 54
54 -
 55
55 -
 56
56 -
 57
57 -
 58
58 -
 59
59 -
 60
60 -
61
-
62
-
63
-
64
-
65
-
66
-
67
-
68
-
69
-
70
-
71
-
72
-
73
-
74
-
75
-
76
-
77
-
78
-
79
-
80
-
81
-
82
-
83
-
84
-
85
-
86
-
87
-
88
 |
 |
