JVC GZ-E100 User Guide
JVC GZ-E100 Manual
 |
View all JVC GZ-E100 manuals
Add to My Manuals
Save this manual to your list of manuals |
JVC GZ-E100 manual content summary:
- JVC GZ-E100 | User Guide - Page 1
HD MEMORY CAMERA GZ-E100 Detailed User Guide LYT2522-002A - JVC GZ-E100 | User Guide - Page 2
Manual Recording 23 Scene Selection 24 Adjusting Focus Manually Troubleshooting When the unit is not working properly 71 Battery Pack 72 Recording 72 SD Card 73 Playback 73 Editing/Copying 74 Computer 74 Screen/Image 75 Other Problems 75 Error Message 76 Maintenance 77 Specifications - JVC GZ-E100 | User Guide - Page 3
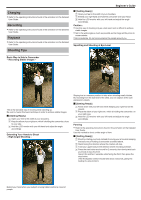
the elbow of your right arm, which is holding the camcorder, on your right knee. C Hold the LCD monitor with your left hand and adjust the angle accordingly. Panning 0 Refer to the operating instructions found in the animation on the Detailed User Guide. Use this method to shoot a wide angle of view - JVC GZ-E100 | User Guide - Page 4
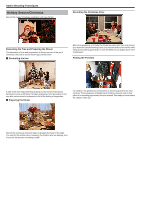
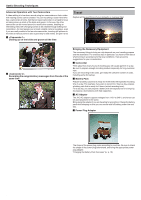
out the mood of Christmas. Simply the scene of all family members engaging in the decorating of a fir tree with various colorful ornaments is full of the feeling of happiness. o Preparing the Dinner For children, the greatest joy of Christmas is receiving presents the next morning. Their expression - JVC GZ-E100 | User Guide - Page 5
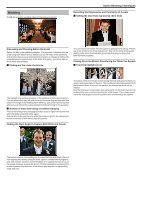
. . .. . Wedding Create an awesome wedding video for the bride and groom! Useful Shooting Techniques Recording the Expressions and Comments of Guests o Setting the shot from eye level to chest level Discussing and Planning Before the Event Before the day of the wedding reception, it is important - JVC GZ-E100 | User Guide - Page 6
for your consideration. o Camcorder Think about how many JVC AC adapter supports voltages from 110 V to 240 V, and hence can be used anywhere in the world. Bring along the adapter if you are traveling for a long time. Charge the battery pack while sleeping so that you can record with full battery - JVC GZ-E100 | User Guide - Page 7
in the "Beginner's Guide" on this website on camcorder for battery charging. You can bring an additional battery charger to charge battery packs if you plan to use the camcorder for recording at night. You can also charge multiple battery packs by using both the battery charger and this camcorder - JVC GZ-E100 | User Guide - Page 8
of hands nor laughter are not only dull when you view them later, but also put the capability of the audio-recording function of the camcorder to a waste. When recording, induce more reactions by enthusiastically waving your hands or shouting out "Is it fun?" and the like. 8 - JVC GZ-E100 | User Guide - Page 9
Key Features Key features of your camcorder 1 Full High Definition (1920×1080 pixels) Video Recording 2 i.AUTO (Intelligent Auto Recording): Detects 12 types of pre-set scenes 3 Digital Image Stabilizer 4 40x Optical Zoom 5 Auto - JVC GZ-E100 | User Guide - Page 10
JVC dealer or the nearest JVC service center. Illustration Description AC Adapter AC-V11U 0 Connects to this unit to charge the battery JVC dealer or the nearest JVC service center when purchasing a new AV cable. USB Cable (Type A - Mini Type B) 0 Connects this unit to a computer. Basic User Guide - JVC GZ-E100 | User Guide - Page 11
shortened under some usage conditions, such as at low temperature. 0 If malfunctions (overvoltage, etc) occur, or if any battery manufactured other than JVC is attempted for battery charge, charging stops. In these cases, the CHARGE lamp blinks quickly for notification. Be sure to use the supplied - JVC GZ-E100 | User Guide - Page 12
release lever to detach the battery from this unit. Approximate Battery Charging Time (Using AC Adapter) Battery Pack Charging Time BN-VG107U (Supplied) 1 h 50 m BN-VG114U 2 h 30 m BN-VG121U 3 h 30 m BN-VG138U 6 h 10 m 0 When the battery life is reached, the recording time becomes - JVC GZ-E100 | User Guide - Page 13
unit is not guaranteed to operate with all SD cards. Some SD cards may not work due to specification changes, etc. 0 To record videos with "VIDEO QUALITY" set to "UXP", use of a cards. UHS Speed Class is not supported. When your computer cannot recognize the SDXC card Confirm and update the OS of - JVC GZ-E100 | User Guide - Page 14
Getting Started Windows XP 0 Make sure that the operating system version is SP2 or higher. 0 Download and install the updating program (KB955704) from the following URL. http://www.microsoft.com/downloads/details.aspx? FamilyID=1cbe3906-ddd1-4ca2-b727c2dff5e30f61&displaylang=en Windows Vista 0 - JVC GZ-E100 | User Guide - Page 15
. "Setting the Clock to Local Time when Traveling" (A p. 19) 0 "SET DATE/TIME!" is displayed when you turn on this unit after it has not been used Connect the AC adapter for more than 24 hours to charge the internal clock battery of this unit before setting the clock. 1 Open the LCD monitor. 0 The - JVC GZ-E100 | User Guide - Page 16
"CLOCK SETTING" and press OK. 0 Press UP/< or DOWN/> to move the cursor. 0 To cancel and return to the previous screen, press MENU. 4 Set the date and time. 0 Press UP/< or DOWN/> to adjust the setting value and press OK to confirm it. The cursor moves to the next item. 0 Repeat - JVC GZ-E100 | User Guide - Page 17
and turn the screws until they are fastened firmly. Caution : 0 To prevent injuries or damages which may result if this unit falls off, read the instruction manual of the tripod (or monopod) to be used and make sure that it is securely attached. Memo : 0 It is recommended to use a tripod or monopod - JVC GZ-E100 | User Guide - Page 18
of the power outlet varies according to countries and regions. To charge the battery pack, you need a converter plug that matches the shape of the outlet. "Charging the Battery Pack Overseas" (A p. 18) Change the date and time display to the local time by selecting your travel destination in "AREA - JVC GZ-E100 | User Guide - Page 19
Getting Started Setting the Clock to Local Time when Traveling Change the date and time display to the local time by selecting your travel destination in "AREA SETTING" of "CLOCK ADJUST". Restore the region settings after you returned - JVC GZ-E100 | User Guide - Page 20
supported in some regions. 0 For more information, refer to the catalog. Approximate Recording Time (Using Battery) Battery Pack . (It is recommended to prepare battery packs ready for three times the expected recording time.) 0 When the battery life is reached, the recording time becomes - JVC GZ-E100 | User Guide - Page 21
be adjusted automatically to suit the shooting conditions. 0 In case of specific shooting scenes such as person etc., its icon is displayed on the Media Battery Indicator Image Stabilizer Description Press the i.AUTO button to switch the recording mode between P (Intelligent Auto) and H (Manual). - JVC GZ-E100 | User Guide - Page 22
it is not operated for 5 minutes. (only when using the battery pack) " AUTO POWER OFF " (A p. 64) 0 When to a DVD or other recording media for storage. JVC will not be responsible for any lost data. Memo for 12 or more consecutive hours according to specifications. (It may take some time to resume - JVC GZ-E100 | User Guide - Page 23
up/left or down/right, press the button UP/< or DOWN/>. 1 Open the lens cover. 2 Open the LCD monitor. 3 Select the Manual recording mode. Manual Recording Menu The following items can be set. Name Description SCENE SELECT 0 Recordings that suit the shooting conditions can be performed easily - JVC GZ-E100 | User Guide - Page 24
gain and brightens the scene automatically using a slow shutter when the surrounding is dark. To prevent camera shake, use a tripod. 1 Select the Manual recording mode. g SPOTLIGHT Prevents the human subject from appearing too bright under light. 0 If the mode is P Intelligent Auto, press the - JVC GZ-E100 | User Guide - Page 25
focusing is desired. Memo : To select/move cursor towards up/left or down/right, press the button UP/< or DOWN/>. Recording 1 Select the Manual recording mode. 0 Press UP/< to focus on a distant subject. If E appears blinking, focus cannot be set any further. 0 Press DOWN/> to focus on a near - JVC GZ-E100 | User Guide - Page 26
your preferred level. Memo : To select/move cursor towards up/left or down/right, press the button UP/< or DOWN/>. 1 Select the Manual recording mode. 0 Compensation range during recording: -2.0 to +2.0 0 Press UP/< to increase the brightness. 0 Press DOWN/> to decrease the brightness. 7 Press OK - JVC GZ-E100 | User Guide - Page 27
natural colors. MWB Use this when the problem of unnatural colors is not resolved. FINE illumination such as a video light. 1 Select the Manual recording mode. Using MWB 1 Hold a sheet of and keep pressing OK. 0 The cursor blinks. 3 Release OK after the menu disappears. 0 If the mode is - JVC GZ-E100 | User Guide - Page 28
the button UP/< or DOWN/>. Taking Close-up Shots You can take close-up shots of an object using the tele macro function. 1 Select the Manual recording mode. *The image is only an impression. Memo : To select/move cursor towards up/left or down/right, press the button UP/< or DOWN - JVC GZ-E100 | User Guide - Page 29
. . . .. . . 0 After setting, the tele macro icon o appears. Setting Details OFF Enables close-up shots up to 1 m at the telephoto (T) end. Enables close-up shots up to 5 cm at the wide angle (W) end. ON Enables close-up shots up to 50 cm at the telephoto (T) end. Enables close-up shots up - JVC GZ-E100 | User Guide - Page 30
to "SPOTLIGHT", it will be switched to "OFF". - If "FOCUS" is set to "MANUAL", it will be switched to "AUTO". - If "BACKLIGHT COMP." is set to "ON", - When "SCENE SELECT" is set to "SPOTLIGHT" - When "FOCUS" is set to "MANUAL" - When "BACKLIGHT COMP." is set to "ON" Memo : 0 The camera is able to - JVC GZ-E100 | User Guide - Page 31
. . . .. . Recording at Intervals (TIME-LAPSE RECORDING) This function enables the changes of a scene that occur slowly over a long period to be shown within a short time by taking frames of it at a certain interval. This is useful for making observations such as the opening of a flower bud. Memo : - JVC GZ-E100 | User Guide - Page 32
there are no more movements of the subject (changes in brightness) within the red frame, recording will stop in 5 seconds. 0 To stop video recording manually, press the START/STOP button. However, as the "AUTO REC" setting remains at "ON" even after the video recording is stopped, recording starts - JVC GZ-E100 | User Guide - Page 33
power. 0 To exit the display, press OK/INFO. 0 Press MENU to return to the remaining recording time display. 0 Remaining battery power will not be displayed when the AC adapter is connected. Memo : 0 You can change the video quality from the remaining recording time display. Select - JVC GZ-E100 | User Guide - Page 34
packs ready for three times the expected recording time.) 0 Recording time may differ depending on the shooting environment and usage. 0 When the battery life is reached, the recording time becomes shorter even if the battery pack is fully charged. (Replace the battery pack with a new one.) 34 - JVC GZ-E100 | User Guide - Page 35
0 You can search for a specific file by the recording date. "Date Search" (A p. 37) 0 X displays the approximate remaining battery power during use. Caution : malfunctions in this unit, cannot be restored. Please be forewarned. - JVC will not be responsible for any lost data. - In order for quality - JVC GZ-E100 | User Guide - Page 36
3 Select "PLAYBACK OTHER FILE" and press OK. Searching for a Specific Video When there is a large number of recorded videos, it is find the file you want. 0 For videos, you can search by "SEARCH DATE". "To search by recording dates" (A p. 37) 4 Select the desired video and press OK or d/e to - JVC GZ-E100 | User Guide - Page 37
instruction manual of the TV in use. "Connecting via the HDMI Mini Connector" (A p. 38) "Connecting via the AV Connector" (A p. 39) Unnatural Displays on TV Trouble on the specifications, even if if the battery becomes exhausted files recorded on the selected date are displayed. 0 To cancel - JVC GZ-E100 | User Guide - Page 38
back in HD quality by connecting to the HDMI mini connector. 0 Use a High Speed HDMI mini cable. 0 Refer also to the instruction manual of the back a file. "Playing Back Videos" (A p. 35) Memo : 0 To play back with date/time display, set "DISPLAY ON TV" in the "CONNECTION SETTINGS" menu to "ON". " - JVC GZ-E100 | User Guide - Page 39
specifications of each HDMI-CEC enabled device, some functions may not work with this unit. (For details, refer to the instruction manual the instruction manual of details, refer to the instruction manual of the TV.) 0 supports 0 To play back with date/time display, set "DISPLAY specifications - JVC GZ-E100 | User Guide - Page 40
. Playback 40 - JVC GZ-E100 | User Guide - Page 41
Selected Files" (A p. 42) "Deleting All Files" (A p. 43) Memo : 0 Deleted files cannot be restored. 0 Files that are protected cannot be deleted. Release protection before deleting the file. "Protecting Files" (A p. 43) 0 Be sure to back up important files on a computer. "Backing Up All Files - JVC GZ-E100 | User Guide - Page 42
"QUIT" and press OK. 0 To return to the previous screen, select "RETURN" and press OK. Memo : 0 Files that are protected cannot be deleted. Release protection before deleting the file. "Protecting Files" (A p. 43) 4 Select "FILE SELECT" and press OK. 5 Select the files to delete and press OK - JVC GZ-E100 | User Guide - Page 43
the protected files will be deleted. Caution : 0 Deleted files cannot be restored. 1 Select the playback mode. Protecting/Releasing Protection of the Currently Displayed File Protects or releases protection of the currently displayed file. Memo : To select/move cursor towards up/left or down/right - JVC GZ-E100 | User Guide - Page 44
index screen, slide along the N/O (zoom) lever. 0 To exit, press MENU, select "YES" and press OK. 6 After selecting all the files to protect or release protection of, press MENU. 7 Select "YES" and press OK. 0 To cancel the protection, select "NO" and press OK. 1 Select the playback mode. 2 Press - JVC GZ-E100 | User Guide - Page 45
All Files Protects all files. Memo : To select/move cursor towards up/left or down/right, press the button UP/< or DOWN/>. Releasing Protection of All Files Releases protection of all files. Memo : To select/move cursor towards up/left or down/right, press the button UP/< or DOWN/>. 1 Select - JVC GZ-E100 | User Guide - Page 46
recorder. 0 Refer also to the instruction manuals of the TV and DVD recorder. 1 Remove the AC adapter and battery pack from this unit. 2 Open the ) Wiring specifications (for video/audio) of the 4-pole mini plug are described in the following. For purchasing, consult your nearest JVC service center. - JVC GZ-E100 | User Guide - Page 47
Operations cannot be performed on this unit until the USB cable is disconnected. 1 Remove the AC adapter and battery pack from this unit. 2 Open the LCD monitor. 3 Connect to a Blu-ray recorder. . . on the Blu-ray recorder. 0 Refer also to the instruction manual of the Blu-ray recorder. 47 - JVC GZ-E100 | User Guide - Page 48
.jp/oem/jvc/mediabrowser/e/ 0 Only the provided software can be used for backing up files to a computer. Backing up of files using other softwares is not supported. Trouble with Using the Provided Software Everio MediaBrowser 4 Consult the customer service center below. 0 Pixela User Support Center - JVC GZ-E100 | User Guide - Page 49
the provided software. Preparations Connect this unit to a computer with a USB cable. 1 Remove the AC adapter and battery pack from this unit. 2 Open the LCD monitor. Copying 0 If "Everio Software Setup" doesn't appear, double-click "JVCCAM_APP" in "My Computer" or "Computer", then double-click - JVC GZ-E100 | User Guide - Page 50
instructions found in the animation on the Detailed User Guide. o Windows XP 0 Refer to the operating instructions found in the animation on the Detailed User Guide , press the button UP/< or DOWN/>. 1 Remove the AC adapter and battery pack from this unit. 2 Open the LCD monitor. 3 Connect the USB - JVC GZ-E100 | User Guide - Page 51
If you encounter any problems with the provided software Everio MediaBrowser 4, please consult the "Pixela User Support Center". Telephone USA and 10800-163-0014 (toll-free) Homepage http://www.pixela.co.jp/oem/jvc/mediabrowser/e/ 0 Delete unwanted videos before making backup. It takes time to - JVC GZ-E100 | User Guide - Page 52
a user list. Memo : 0 If you encounter any problems with the provided software Everio MediaBrowser 4, please consult the "Pixela User Support Center". Homepage http://www.pixela.co.jp/oem/jvc/mediabrowser/e/ . . .. . . 0 A new user list is added to the user list library. 4 Click on the recording - JVC GZ-E100 | User Guide - Page 53
0 If you encounter any problems with the provided software Everio MediaBrowser 4, please consult the "Pixela User Support Center". Telephone USA and 10800-163-0014 (toll-free) Homepage http://www.pixela.co.jp/oem/jvc/mediabrowser/e/ 0 Click "Settings" to select the menu background. 0 After - JVC GZ-E100 | User Guide - Page 54
the AC adapter and battery pack from this unit. 2 Open the LCD monitor. 3 Connect the USB cable and the AC adapter. 0 Close the Everio MediaBrowser 4 program, if only. Memo : 0 To edit/view the files, use a software that supports AVCHD (video) files. 0 The above operations on computer may vary with - JVC GZ-E100 | User Guide - Page 55
List of Files and Folders Folders and files are created in the SD card as shown below. They are created only when necessary. Copying . Caution : 0 When the camera and PC are connected by an USB cable, recorded media are read-only. 55 - JVC GZ-E100 | User Guide - Page 56
down/right, press the button UP/< or DOWN/>. 1 Remove the AC adapter and battery pack from this unit. 2 Open the LCD monitor. 3 Connect the USB cable using iMovie. Memo : 0 To edit/view the files, use a software that supports AVCHD (video) files. 0 When removing this unit from the computer, drag & - JVC GZ-E100 | User Guide - Page 57
.. . . Operating the Menu Use the operation buttons to set the menu. 0 The menu differs according to the mode in use. Memo : To select/move cursor towards up/left or down/right, press the button UP/< or DOWN/>. 1 Press MENU. 2 Select the desired menu and press OK. 3 Select the desired setting and - JVC GZ-E100 | User Guide - Page 58
to take close-up (macro) shots of the subject. "Taking Close-up Shots" (A p. 28) Memo : 0 They are displayed only when recording in the manual mode. FACE PRIORITY AE/AF Detects faces and adjusts the brightness and focus automatically. Setting OFF Deactivates auto adjustment. ON Activates auto - JVC GZ-E100 | User Guide - Page 59
Memo : 0 Although "AUTO SLOW-SHUTTER" brightens the scene more than "ON", movements of the subject may become unnatural. Menu Settings WIND CUT Reduces the noise caused by wind. Setting OFF ON Deactivates the function. Activates the function. Details TIME-LAPSE RECORDING Enables the changes of - JVC GZ-E100 | User Guide - Page 60
. Memo : 0 To read the QR code, a relevant application is required. Enter the URL in the internet browser manually if the QR code cannot be read. 0 The Mobile User Guide is supported by Android devices and iPhone. You can view it on standard browsers such as Google Chrome (Android) and Mobile Safari - JVC GZ-E100 | User Guide - Page 61
specific videos. DISPLAY DATE/TIME Displays the date and time. Setting OFF ON Does not display the date and time. Displays the date and Releases protection of all files. "Releasing Protection of All Files" (A p. 45) SEARCH DATE Refines the index screen of videos according to recording date. "Date - JVC GZ-E100 | User Guide - Page 62
. Memo : 0 To read the QR code, a relevant application is required. Enter the URL in the internet browser manually if the QR code cannot be read. 0 The Mobile User Guide is supported by Android devices and iPhone. You can view it on standard browsers such as Google Chrome (Android) and Mobile Safari - JVC GZ-E100 | User Guide - Page 63
to the next item. 0 Return to "DISPLAY SETTINGS" by pressing OK after setting the time. Items DATE DISPLAY STYLE TIME year.month.day month.day.year day.month.year 12h 24h Setting Value MONITOR BRIGHTNESS surrounding conditions. Sets to dim brightness. Helps to save battery life when selected. 63 - JVC GZ-E100 | User Guide - Page 64
automatically if this unit is not operated for 5 minutes. Memo : 0 When using battery, power is turned off automatically if this unit is not operated for 5 minutes. of this unit to the latest version. For details, refer to the JVC homepage. (When no program to update the software of this unit is - JVC GZ-E100 | User Guide - Page 65
adjust various settings for connecting to a TV or DVD recorder. DISPLAY ON TV Displays icons and date/time on a TV screen. Setting OFF Does not display icons and date/time on TV. ON Displays icons and date/time on TV. Details VIDEO OUTPUT Sets the aspect ratio (16:9 or 4:3) according to the - JVC GZ-E100 | User Guide - Page 66
the SD card will be deleted when it is formatted. Copy all files on the SD card to a computer before formatting. 0 Make sure that the battery pack is fully charged or connect the AC adapter as the formatting process may take some time. 66 - JVC GZ-E100 | User Guide - Page 67
PLAYBACK ON PC 0 Displays videos recorded by this unit by using the Everio MediaBrowser 4. "Installing the Provided Software (Built-in)" (A p. 49) unit on a disc by using the BD/DVD drive on your computer and the Everio MediaBrowser 4. DIRECT DISC Save videos recorded by this unit on a disc by using - JVC GZ-E100 | User Guide - Page 68
screen. 0 During index screen display: Moves to the next or previous page. 2 i.AUTO Button 0 Switches between Intelligent Auto and Manual modes. 3 DC Connector 0 Connects to an AC adapter to charge the battery. 4 ACCESS (Access) Lamp 0 Lights up/blinks during recording or playback. Do not remove the - JVC GZ-E100 | User Guide - Page 69
Inserting an SD Card" (A p. 13) 3 Battery Release Lever "Charging the Battery Pack" (A p. 12) 4 Battery Mount Interior Names of Parts 1 Speaker 0 0 Recording: Displays the remaining time and battery power. 0 Playback: Displays file information such as recording date. 6 AV Connector 0 Connects to - JVC GZ-E100 | User Guide - Page 70
" (A p. 28) 5 Scene Select "Scene Selection" (A p. 24) 6 Date/Time "Clock Setting" (A p. 15) 7 Image Stabilizer "Reducing Camera Shake" p. 21) "Manual Recording" (A p. 23) 10 Wind Cut " WIND CUT " (A p. 59) 11 Remaining Recording Time 12 Scene Counter 13 Focus "Adjusting Focus Manually" (A p. 25 - JVC GZ-E100 | User Guide - Page 71
"Playing Back Videos" (A p. 35) 3 Date/Time "Clock Setting" (A p. 15) 4 Media 5 Playback Time "Playing Back Videos" (A p. 35) Indications on the LCD monitor When the unit is not working properly Turning Off the Power 1 Turning Off the Power 2 Remove the AC adapter and battery pack from this unit - JVC GZ-E100 | User Guide - Page 72
camcorder's temperature has lowered. The remaining battery display is not correct. Remaining battery manually. "Adjusting Focus Manually" (A p. 25) Recording stops automatically. Recording stops automatically as it cannot be performed for 12 or more consecutive hours according to specifications - JVC GZ-E100 | User Guide - Page 73
Troubleshooting of your PC when using Everio MediaBrowser 4 to play back. "Verifying System Requirements (Guideline)" (A p. 48) No date/time display. Set "ON- 38) Cannot find a recorded file. Cancel the date search function. "Searching for a Specific Video" (A p. 36) Select "PLAYBACK OTHER FILE - JVC GZ-E100 | User Guide - Page 74
Troubleshooting Editing/Copying Unable to delete file. Files that are protected cannot be deleted. Release protection before deleting the file. be performed on this unit. Refer to the help file of the provided software Everio MediaBrowser 4 I am using a Mac computer. Copy the files to a Mac - JVC GZ-E100 | User Guide - Page 75
Troubleshooting Screen/Image Other Problems " in the manual settings menu to specifications battery and AC adapter). Then, attach the battery and AC adapter again, and turn on the power by opening the LCD monitor. If these operations won't solve the problem, contact your JVC dealer or the JVC service - JVC GZ-E100 | User Guide - Page 76
Troubleshooting Error Message? CHECK LENS COVER Open the lens cover. SET DATE/TIME! Connect the AC adapter, charge the battery for more than 24 hours and set the clock. (If the message still appears, the clock battery is exhausted. Consult your nearest JVC does not solve the problem, back up your - JVC GZ-E100 | User Guide - Page 77
time. Caution : 0 Be sure to detach the battery pack, AC adapter, and power plug before performing any maintenance. Camcorder 0 Wipe this unit with a dry, soft cloth or cleaner, be sure to observe the warning labels and instructions of the product. 0 Do not leave the device in contact with rubber - JVC GZ-E100 | User Guide - Page 78
Specifications Camera Item Details Power supply Using AC adapter: DC 5.2 V Using battery pack: DC 3.5 V - 3.6 V Power consumption 2.2 W (when "MONITOR BRIGHTNESS" is set to "3" (standard)) 2.4 W (when "MONITOR BRIGHTNESS" is set to "4" (brighter)) Dimensions (mm) 50 x 55 x 111 (2" x 2-3/16" - JVC GZ-E100 | User Guide - Page 79
AC plug) Mass Approx. 71 g (0.15 lbs) Battery Pack (BN-VG107U) Item Power voltage Capacity Dimensions (mm) Mass Details 3.5 V - 3.6 V 700 mAh 31 x 21.5 x 43 (1-1/4" x 7/8" x 1-3/4") (W x H x D) Approx. 26 g (0.06 lbs) Memo : 0 The specifications and appearance of this product are subject to - JVC GZ-E100 | User Guide - Page 80
©2012 JVC KENWOOD Corporation C3A 1212TFR-SW-VM
-
 1
1 -
 2
2 -
 3
3 -
 4
4 -
 5
5 -
 6
6 -
 7
7 -
8
-
9
-
10
-
11
-
12
-
13
-
14
-
15
-
16
-
17
-
18
-
19
-
20
-
21
-
22
-
23
-
24
-
25
-
26
-
27
-
28
-
29
-
30
-
31
-
32
-
33
-
34
-
35
-
36
-
37
-
38
-
39
-
40
-
41
-
42
-
43
-
44
-
45
-
46
-
47
-
48
-
49
-
50
-
51
-
52
-
53
-
54
-
55
-
56
-
57
-
58
-
59
-
60
-
61
-
62
-
63
-
64
-
65
-
66
-
67
-
68
-
69
-
70
-
71
-
72
-
73
-
74
-
75
-
76
-
77
-
78
-
79
-
80
 |
 |
HD MEMORY CAMERA
LYT2522-002A
Detailed User Guide
GZ-E100