JVC GZ-E100 User Guide - Page 23
Manual Recording
 |
View all JVC GZ-E100 manuals
Add to My Manuals
Save this manual to your list of manuals |
Page 23 highlights
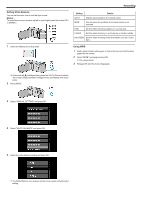
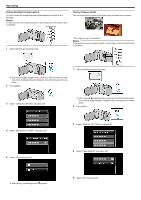
. . . .. Recording Manual Recording You can adjust settings, such as brightness, by using the manual mode. Memo : To select/move cursor towards up/left or down/right, press the button UP/< or DOWN/>. 1 Open the lens cover. 2 Open the LCD monitor. 3 Select the Manual recording mode. Manual Recording Menu The following items can be set. Name Description SCENE SELECT 0 Recordings that suit the shooting conditions can be performed easily. "Scene Selection" (A p. 24) FOCUS 0 Use manual focus if the subject is not focused automatically. "Adjusting Focus Manually" (A p. 25) BRIGHTNESS ADJUST 0 Overall brightness on the screen can be adjusted. 0 Use this when recording in a dark or bright location. "Adjusting Brightness" (A p. 26) WHITE BALANCE 0 Overall color on the screen can be adjusted. 0 Use this when the color on the screen appears differently from the actual color. "Setting White Balance" (A p. 27) BACKLIGHT COMP. 0 Corrects the image when the subject appears dark due to backlight. 0 Use this when shooting against the light. "Setting Backlight Compensation" (A p. 28) TELE MACRO 0 Use this to take close-up (macro) shots of the subject. "Taking Close-up Shots" (A p. 28) 0 If the mode is P Intelligent Auto, press the i.AUTO 2 times to switch. The mode changes between Intelligent Auto and Manual with every press. 4 Start recording. 0 Press again to stop. 0 For details on the various manual settings, refer to "Manual Recording Menu". Memo : 0 The manual settings are displayed only in the manual mode. 23
-
 1
1 -
2
-
3
-
4
-
5
-
6
-
7
-
8
-
9
-
10
-
11
-
12
-
13
-
14
-
15
-
16
-
17
-
 18
18 -
 19
19 -
 20
20 -
 21
21 -
 22
22 -
 23
23 -
 24
24 -
 25
25 -
 26
26 -
 27
27 -
 28
28 -
29
-
30
-
31
-
32
-
33
-
34
-
35
-
36
-
37
-
38
-
39
-
40
-
41
-
42
-
43
-
44
-
45
-
46
-
47
-
48
-
49
-
50
-
51
-
52
-
53
-
54
-
55
-
56
-
57
-
58
-
59
-
60
-
61
-
62
-
63
-
64
-
65
-
66
-
67
-
68
-
69
-
70
-
71
-
72
-
73
-
74
-
75
-
76
-
77
-
78
-
79
-
80
 |
 |
