JVC GZ-E100 User Guide - Page 69
Bottom, Interior
 |
View all JVC GZ-E100 manuals
Add to My Manuals
Save this manual to your list of manuals |
Page 69 highlights
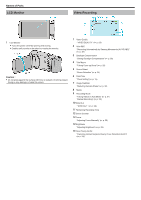
.. Bottom 1 Tripod Mounting Hole "Tripod Mounting" (A p. 17) 2 SD Card Slot 0 Insert an optional SD card. "Inserting an SD Card" (A p. 13) 3 Battery Release Lever "Charging the Battery Pack" (A p. 12) 4 Battery Mount Interior Names of Parts 1 Speaker 0 Outputs audio sound during video playback. 2 L (Play/Record) Button 0 Switches between recording and playback modes. 3 UP/< Button 0 UP: Scrolls/moves cursor on the icons upward 0 Button 0 DOWN: Scrolls/moves cursor on the icons downward 0 >: Forward search 5 OK/INFO Button 0 Confirms the selection. / Displays information as follows. 0 Recording: Displays the remaining time and battery power. 0 Playback: Displays file information such as recording date. 6 AV Connector 0 Connects to a TV, etc. 7 MENU (Menu) Button 8 HDMI mini connector 0 Connects to TV using an HDMI mini cable. 9 USB Connector 0 Connects to computer using a USB cable. 69
-
 1
1 -
2
-
3
-
4
-
5
-
6
-
7
-
8
-
9
-
10
-
11
-
12
-
13
-
14
-
15
-
16
-
17
-
18
-
19
-
20
-
21
-
22
-
23
-
24
-
25
-
26
-
27
-
28
-
29
-
30
-
31
-
32
-
33
-
34
-
35
-
36
-
37
-
38
-
39
-
40
-
41
-
42
-
43
-
44
-
45
-
46
-
47
-
48
-
49
-
50
-
51
-
52
-
53
-
54
-
55
-
56
-
57
-
58
-
59
-
60
-
61
-
62
-
63
-
 64
64 -
 65
65 -
 66
66 -
 67
67 -
 68
68 -
 69
69 -
 70
70 -
 71
71 -
 72
72 -
 73
73 -
 74
74 -
75
-
76
-
77
-
78
-
79
-
80
 |
 |
