JVC KW-R930BTS Instruction Manual America
JVC KW-R930BTS Manual
 |
View all JVC KW-R930BTS manuals
Add to My Manuals
Save this manual to your list of manuals |
JVC KW-R930BTS manual content summary:
- JVC KW-R930BTS | Instruction Manual America - Page 1
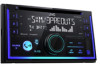
KW-R935BTS / KW-R930BTS CD RECEIVER INSTRUCTION MANUAL RÉCEPTEUR CD MANUEL D'INSTRUCTIONS RECEPTOR CON CD MANUAL DE INSTRUCCIONES KW-X830BTS / KW-SX83BTS DIGITAL MEDIA RECEIVER INSTRUCTION MANUAL RÉCEPTEUR MULTIMÉDIA NUMÉRIQUE MANUEL D'INSTRUCTIONS RECEPTOR DE MEDIOS DIGITALES MANUAL DE - JVC KW-R930BTS | Instruction Manual America - Page 2
KW-R935BTS/KW- interference unless the modifications are expressly approved in the instruction manual. The user could lose the authority to operate this installed and used in accordance with the instructions. However, there is no guarantee that interference will not occur in a particular installation - JVC KW-R930BTS | Instruction Manual America - Page 3
une énergie RF très faible qui est considérée comme conforme sans évaluation de l'exposition maximale autorisée (MPE). Cependant, il est souhaitable qu'il devrait être installé et utilisé en gardant une distance de 20 cm ou plus entre le radiateur et le corps humain. Para cumplimiento de la IFT: "La - JVC KW-R930BTS | Instruction Manual America - Page 4
use the Licensed Software according to the directions described in the operation manual or help file, and is prohibited to use or duplicate any data Licensed Software embedded in the Product (including any related materials, updates and upgrades) on condition that no original, copies or related - JVC KW-R930BTS | Instruction Manual America - Page 5
Article 8 Termination In case the User falls under any of the events described in the following items, the Licensor may immediately terminate this Agreement or claim that the User compensates for the damage incurred by the Licensor due to such event: (1) when the User violated any provision of this - JVC KW-R930BTS | Instruction Manual America - Page 6
TROUBLESHOOTING 33 SPECIFICATIONS 36 INSTALLATION/ CONNECTION 37 2 ENGLISH BEFORE USE IMPORTANT • To ensure proper use, please read through this manual can hear sounds outside the car to prevent accidents. • manual • Operations are explained mainly using buttons on the faceplate of KW-R935BTS - JVC KW-R930BTS | Instruction Manual America - Page 7
out the insulation sheet when using for the first time. How to replace the battery To Turn on the power Adjust the volume Volume knob KW-R935BTS: USB cable from the rear of the unit On the faceplate Press . • Press and hold to turn off the power. Turn the volume knob. Select - JVC KW-R930BTS | Instruction Manual America - Page 8
GETTING STARTED To set the date 7 Turn the volume knob to select [DATE SET], then press the knob. 8 Turn the volume knob to make the settings, then press the knob. Day Month Year 9 Press to exit. To return to the previous setting item, press . 1 Cancel the demonstration When you turn on the - JVC KW-R930BTS | Instruction Manual America - Page 9
details on how to update the firmware, visit . FACTORY RESET YES: selected. RADIO "STEREO" lights up when receiving an FM stereo broadcast with sufficient flashes, then press repeatedly to search for a station manually. Settings in memory You can store up to 18 - JVC KW-R930BTS | Instruction Manual America - Page 10
Repeat step 2 until the desired item is selected/activated or follow the instructions stated on the selected item. 4 Press to exit. To return to tuner selectivity to reduce interference noises from adjacent FM stations. (Stereo effect may be lost.) ; WIDE: Subjects to interference noises from - JVC KW-R930BTS | Instruction Manual America - Page 11
*1 Do not leave the cable inside the car when not using. *2 When connecting an Android device, "Press [VIEW] to install JVC MUSIC PLAY APP" is shown. Follow the instructions to install the application. You can also install the latest version of JVC MUSIC PLAY application on your Android device - JVC KW-R930BTS | Instruction Manual America - Page 12
of a multiple drives device. Settings to use JVC Remote application JVC Remote application is designed to control the JVC car receiver's operations from the iPhone/iPod (via USB input terminal). Preparation: Install the latest version of JVC Remote application on your device before connecting. For - JVC KW-R930BTS | Instruction Manual America - Page 13
Preparation: Install the . USB input terminal Accessory of the iPod/iPhone*1 and/or KW-R935BTS: You can also connect to the USB cable from the rear control Press . Press I. Press . *1 Do not leave the cable inside the car when not using. *2 If thumbs down is selected, the current track is skipped. - JVC KW-R930BTS | Instruction Manual America - Page 14
Install of the iPod/iPhone* and/or KW-R935BTS: You can also connect to the USB cable from the rear of the unit. 3 Press repeatedly to select IHEARTRADIO-F/ IHEARTRADIO-R/IHEARTRADIO. Broadcast starts automatically * Do not leave the cable inside the car - JVC KW-R930BTS | Instruction Manual America - Page 15
Preparation: Install the is skipped. *3 Available for tracks in Playlists only. and/or KW-R935BTS: You can also connect to the USB cable from the rear of Broadcast starts automatically * Do not leave the cable inside the car when not using. Save favorite song information While listening to the - JVC KW-R930BTS | Instruction Manual America - Page 16
Call 1-877-438-9677 4 Press repeatedly to select SIRIUS XM to start updating. Start listening 1 Press repeatedly to select SIRIUS XM. 2 Press . " then press the knob. (or) Press to search for a channel manually. • Pressing and holding changes the channel rapidly. If a locked channel - JVC KW-R930BTS | Instruction Manual America - Page 17
SiriusXM® Radio SiriusXM Replay™ While listening to a channel.... 1 Press the volume knob. " " lights up and the unit memorizes this paused position. 2 Press the volume knob to start Replay. Replay starts from the paused position in step 1. During Replay... To Playback/pause Skip backward/ forward - JVC KW-R930BTS | Instruction Manual America - Page 18
press the knob. 3 Repeat step 2 until the desired item is selected/activated or follow the instructions stated on the selected item. 4 Press to exit. To return to the previous setting item, if the connected SiriusXM Vehicle Tuner is SXV200 or later that supports SmartFavorites. 14 ENGLISH - JVC KW-R930BTS | Instruction Manual America - Page 19
turn on the unit. 2 Search and select "KW-R9 BTS"/"KW-X8 BTS"/"KW-SX8 BTS" on the Bluetooth device. "BT the Bluetooth connection is established. • This unit supports Secure Simple Pairing (SSP). • Up to five manually. • Refer to the instruction manual of the Bluetooth device for more - JVC KW-R930BTS | Instruction Manual America - Page 20
request is activated only if: - Bluetooth function of the connected device is turned on. - [AUTO PAIRING] is set to [ON]. ( 19) - JVC MUSIC PLAY application is installed on the Android device ( 7) and [AUTO MODE] is selected ( 8). Receive a call When there is an incoming call: • The buttons will - JVC KW-R930BTS | Instruction Manual America - Page 21
BLUETOOTH® To On the faceplate While talking on the first incoming call... Answer another incoming Press call and hold the current knob. call or the volume Reject another incoming Press and hold or call the volume knob. While having two active calls... End current call and activate held - JVC KW-R930BTS | Instruction Manual America - Page 22
to call or the voice command to control the phone functions. • Supported Voice Recognition features vary for each phone. Refer to the instruction manual of the connected phone for details. • This unit also supports the intelligent personal assistant function of iPhone. Settings in memory Store - JVC KW-R930BTS | Instruction Manual America - Page 23
the instructions supported profile between the Bluetooth device and the unit. • Make sure there is no Bluetooth device paired. 1 Press and hold . "BLUETOOTH" "CHECK MODE" appears. "SEARCH NOW USING PHONE" "PIN IS 0000" scrolls on the display. 2 Search and select "KW-R9 BTS"/ "KW-X8 BTS"/"KW - JVC KW-R930BTS | Instruction Manual America - Page 24
BLUETOOTH® The connectivity result flashes on the display. "PAIRING OK" and/or "HANDS-FREE OK"*1 and/ or "AUD.STREAM OK"*2 and/or "PBAP OK"*3 : Compatible *1 Compatible with Hands-Free Profile (HFP) *2 Compatible with Advanced Audio Distribution Profile (A2DP) *3 Compatible with Phonebook Access - JVC KW-R930BTS | Instruction Manual America - Page 25
Bluetooth or via USB input terminal) or Android smartphone (via Bluetooth). Preparation: Install the latest version of JVC Remote application on your device before connecting. For more information, visit . 1 Press and hold . 2 Turn the volume knob to select an item - JVC KW-R930BTS | Instruction Manual America - Page 26
BLUETOOTH® Listen to iPhone/iPod via Bluetooth You can listen to the songs on the iPhone/iPod via Bluetooth on this unit. Press repeatedly to select iPod BT. • You can operate the iPod/iPhone in the same way as iPod/iPhone via USB input terminal. ( 7) • If you plug in an iPhone/iPod to the - JVC KW-R930BTS | Instruction Manual America - Page 27
the portable audio player and start playback. Use a 3-core plug head stereo mini plug for optimum audio output. Select a preset equalizer directly Press frequencies in the audio signal to reduce the noise heard from outside the car or running noise of the tyres. Store your own sound settings 1 - JVC KW-R930BTS | Instruction Manual America - Page 28
to select an item (see the following table), then press the knob. 3 Repeat step 2 until the desired item is selected/activated or follow the instructions stated on the selected item. 4 Press to exit. To return to the previous setting item, press . EQ SETTING PRESET EQ EASY EQ Default: XX - JVC KW-R930BTS | Instruction Manual America - Page 29
adjust the sound position heard from the speakers. ; OFF: Cancels. VOL LINK EQ ON: Boosts the frequency to reduce the noise heard from outside the car or running noise of the tyres. ; OFF: Cancels. K2 TECHNOLOGY (Not applicable for TUNER source, SIRIUS XM source and AUX source.) ON: Improve the - JVC KW-R930BTS | Instruction Manual America - Page 30
AUDIO SETTINGS Speaker output settings [SPK/PRE OUT] (Applicable only if [X ' OVER TYPE] is set to [2-WAY]) ( 25) Select the output setting for the speakers [SPK/PRE OUT], based on the speaker connection method. Connection via lineout terminals For connections through an external amplifier. ( 39, - JVC KW-R930BTS | Instruction Manual America - Page 31
AUDIO SETTINGS 2-way crossover setting items SPEAKER SIZE FRONT REAR *1 SUBWOOFER *2 X ' OVER TWEETER FRONT HPF REAR HPF*1 SUBWOOFER LPF *2 SIZE 3.5"/4"/4.75"/5"/6.5"/6.75"/7"/4×6/5×7/ 6×8/6×9/7×10 TWEETER SMALL/MIDDLE/LARGE/NONE (not connected) 3.5"/4"/4.75"/5"/6.5"/6.75 - JVC KW-R930BTS | Instruction Manual America - Page 32
• For more information, Determining the value for [DISTANCE] and [GAIN] of [DTA SETTINGS]. DTA SETTINGS POSITION DISTANCE *1 GAIN*1 DTA RESET CAR SETTINGS CAR TYPE R-SP LOCATION*2 Selects your listening position (reference point). ALL: Not compensating ; FRONT RIGHT: Front right seat ; FRONT LEFT - JVC KW-R930BTS | Instruction Manual America - Page 33
2 until the desired item is selected/ activated or follow the instructions stated on the selected item. 4 Press to exit. To return AUTO: Dimmer turns on and off automatically when you turn off or on the car headlights. *1 BRIGHTNESS Set the brightness for day and night separately. 1 DAY/NIGHT - JVC KW-R930BTS | Instruction Manual America - Page 34
DISPLAY SETTINGS REFERENCES DAY COLOR NIGHT COLOR COLOR GUIDE Store your own day and night illumination colors for different zones. : - Latest firmware updates and latest compatible item list - JVC original application - Any other latest information Visit . General • - JVC KW-R930BTS | Instruction Manual America - Page 35
be operated from this unit. • For issues using the application, please contact Pandora at [email protected]. About iHeartRadio • iHeartRadio® is a third-party service, therefore the specifications are subject to change without prior notice. Accordingly, compatibility may be impaired or - JVC KW-R930BTS | Instruction Manual America - Page 36
(Date/Clock)*1 Station name (PS)/Program type (PTY) (Date) with music synchronisation*2 (back to the beginning) (For CD-DA) (Applicable only for KW-R935BTS/KW-R930BTS) Track title (Artist) Track title (Disc name) Track title (Date/Clock)*1 Playing time (Date/Clock)*1 Track title (Artist) with music - JVC KW-R930BTS | Instruction Manual America - Page 37
TROUBLESHOOTING . "PROTECTING SEND SERVICE" appears. Send the unit to the nearest service center. Source cannot on the recording process earlier. correct. "NOT SUPPORT" appears and track skips. Check whether the USB device. If this does not solve the problem, turn the power off and on (or reset - JVC KW-R930BTS | Instruction Manual America - Page 38
TROUBLESHOOTING Symptom Remedy • Sound cannot be heard during playback. • JVC MUSIC PLAY APP is installed on the Android device. ( 7) • Reconnect the Android device and select the appropriate control mode. ( 8) • If this does not solve the problem, the connected Android device does not support - JVC KW-R930BTS | Instruction Manual America - Page 39
is updated. Press . • Move the car to a place where supports Audio/Video Remote Control Profile (AVRCP). (Refer to the instructions service center. "SWITCHING NG" The connected phones might not support phone switching feature. If you have any troubles, try the following: 1 Check TROUBLESHOOTING - JVC KW-R930BTS | Instruction Manual America - Page 40
DIN S/N = 46 dB) Frequency Response (±3 dB) Signal-to-Noise Ratio (MONO) Stereo Separation (1 kHz) AM Frequency Range Usable Sensitivity (S/N = 20 dB) 87.9 MHz - Audio AAC-LC ".aac" files CD player (for KW-R935BTS/KW-R930BTS) Bluetooth USB USB Standard Compatible Devices File System Maximum - JVC KW-R930BTS | Instruction Manual America - Page 41
× 6-1/4") KW-R935BTS: 1.4 kg (3.1 lbs) KW-R930BTS: 1.3 kg (3.0 lbs) KW-X830BTS/KW-SX83BTS: 0.9 kg (2.1 lbs) Subject to change without notice. INSTALLATION/CONNECTION Warning wiring and mounting to professionals. Consult the car audio dealer. • Install this unit in the console of your vehicle - JVC KW-R930BTS | Instruction Manual America - Page 42
the ignition switch, then disconnect the terminal of the car battery. 2 Connect the wires properly. See Wiring connection. ( 39) 3 Install the unit to your car. See Installing the unit (in-dash mounting). 4 Connect the terminal of the car battery. 5 Press to turn on the power. 6 Reset the - JVC KW-R930BTS | Instruction Manual America - Page 43
installing the unit with a commercially available custom wiring harness specific for your car and leave this job to professionals for your safety. Consult your car Green/black *1 Fuse (10 A) Ignition switch Separate red wire Car fuse block Make this connection if your vehicle factory wiring harness - JVC KW-R930BTS | Instruction Manual America - Page 44
INSTALLATION/CONNECTION Connecting external components MIC (Microphone input terminal) ( 15) KW-R935BTS: USB cable (DC 5 V 1.5 A) (approx. 1.2 m/4 feet) Expansion port (12 V 500 mA) To the optional SiriusXM Vehicle Tuner (commercially available) ( 12) Connecting external amplifiers via output - JVC KW-R930BTS | Instruction Manual America - Page 45
- JVC KW-R930BTS | Instruction Manual America - Page 46
30 Entretien Plus d'informations GUIDE DE DÉPANNAGE 33 SPÉCIFICATIONS 36 INSTALLATION/ RACCORDEMENT 37 AVANT L'UTILISATION outils) dans l'appareil, afin d'éviter tout risque de court-circuit. • Pour KW-R935BTS/KW-R930BTS: Si une erreur de disque se produit à cause de la condensation sur - JVC KW-R930BTS | Instruction Manual America - Page 47
du soleil.) Fenêtre d'affichage Retirez la feuille d'isolant lors de la première utilisation. Comment remplacer la pile Bouton de volume KW-R935BTS: Câble USB à partir de l'arrière de l'appareil Pour Mettez l'appareil sous tension Ajustez le volume Sélectionner la source Changez l'information - JVC KW-R930BTS | Instruction Manual America - Page 48
transition 3 voies est sélectionnée.) ON: Met en service la tonalité des touches. ; OFF: Met hors service la fonction. SOURCE SELECT AM SRC* ON: Met en service AM dans la sélection de la source. ; OFF: Hors service. ( 5) PANDORA SRC* ON: Met en service PANDORA FRONT/PANDORA REAR/PANDORA dans la - JVC KW-R930BTS | Instruction Manual America - Page 49
UPDATE UPDATE SYSTEM F/W UP xxxx YES: Démarrer la mise à niveau du micrologiciel. ; NO: Annulation (la mise à niveau n'est pas activée). Pour en savoir plus sur la mise à niveau du micrologiciel, consultez - JVC KW-R930BTS | Instruction Manual America - Page 50
que l'élément souhaité soit sélectionné/ activé ou suivez les instructions données pour l'élément sélectionné. 4 Appuyez sur pour quitter. la source actuelle. 1 ONCE/DAILY/WEEKLY/OFF: Sélectionnez la fréquence de mise en service de la minuterie. 2 FM/AM/SIRIUS XM*1: Sélectionner la source. 3 01 à - JVC KW-R930BTS | Instruction Manual America - Page 51
PLAY APP"apparaît. Suivez les instructions pour installer l'application. Vous pouvez aussi intaller la dernière version de l'application JVC MUSIC PLAY sur votre périphérique Android avant la connexion. Pour plus d'informations, consultez . *3 Pour ANDROID: Fonctionne - JVC KW-R930BTS | Instruction Manual America - Page 52
riphérique Android à partir de cet appareil via l'application JVC MUSIC PLAY installée sur le périphérique Android. AUDIO MODE: Commandez version de l'application JVC Remote sur votre périphérique avant la connexion. Pour plus d'informations, consultez . Vous pouvez ré - JVC KW-R930BTS | Instruction Manual America - Page 53
numériques (3, 4, 5 ou 6) pour mémoriser. Pour choisir une station mémorisée: Appuyez sur l'une des touches numériques (3, 4, 5 ou 6). et/ou KW-R935BTS: Vous pouvez aussi faire une connexion au câble USB à partir de l'arrière de l'appareil. 3 Appuyez répétitivemenent sur FRONT/PANDORA REAR - JVC KW-R930BTS | Instruction Manual America - Page 54
l'application iHeartAuto sur votre appareil. 2 Connectez votre appareil à la prise d'entrée USB. Prise d'entrée USB Accessoire du iPod/iPhone* et/ou KW-R935BTS: Vous pouvez aussi faire une connexion au câble USB à partir de l'arrière de l'appareil. 3 Appuyez répétitivement sur pour sélectionner - JVC KW-R930BTS | Instruction Manual America - Page 55
Spotify sur votre appareil. 2 Connectez votre appareil à la prise d'entrée USB. Prise d'entrée USB Accessoire du iPod/iPhone* et/ou KW-R935BTS: Vous pouvez aussi faire une connexion au câble USB à partir de l'arrière de l'appareil. 3 Appuyez répétitivemenent sur pour sélectionner SPOTIFY - JVC KW-R930BTS | Instruction Manual America - Page 56
Radio SiriusXM® Seul SiriusXM® vous apporte plus de ce que vous aimez écouter, en un seul endroit. Obtenez plus de 140 canaux, y compris de la musique sans pauses publicitaires, le meilleur du sport, les nouvelles, les discussions, les comédies et de les divertissements. Bienvenue dans le monde de - JVC KW-R930BTS | Instruction Manual America - Page 57
Radio SiriusXM® Relecture SiriusXM™ Lors de l'écoute d'un canal.... 1 Appuyez sur le bouton de volume. " " s'allume et l'appareil mémorise la position de pause. 2 Appuyez sur le bouton de volume pour démarrer la relecture. La relecture démarre à partir de la position de pause de l'étape 1. Pendant - JVC KW-R930BTS | Instruction Manual America - Page 58
le tableau suivant), puis appuyez sur le bouton. 3 Répétez l'étape 2 jusqu'à ce que l'élément souhaité soit sélectionné/ activé ou suivez les instructions données pour l'élément sélectionné. 4 Appuyez sur pour quitter. Pour retourner à l'option de réglage précédente, appuyez sur . SIRIUS XM - JVC KW-R930BTS | Instruction Manual America - Page 59
Appuyez sur pour mettre l'appareil sous tension. 2 Cherchez et sélectionnez "KW-R9 BTS"/"KW-X8 BTS"/"KW-SX8 BTS" sur le périphérique Bluetooth. "BT PAIRING" clignote sur manuellement. • Référez-vous au manuel d'instructions de votre périphérique Bluetooth pour en savoir plus. FRANÇAIS 15 - JVC KW-R930BTS | Instruction Manual America - Page 60
ée uniquement si: - La fonction Bluetooth du périphérique connecté est activée. - [AUTO PAIRING] est réglé sur [ON]. ( 19) - L'application JVC MUSIC PLAY est installée sur le périphérique Android ( 7) et [AUTO MODE] est sélectionné ( 8). BLUETOOTH - Téléphone portable Réception d'un appel Quand il - JVC KW-R930BTS | Instruction Manual America - Page 61
BLUETOOTH® Pour Sur la façade Pendant que vous parlez pour le premier appel entrant... Répondez à un autre appel entrant et mettez en attente l'appel actuel Appuyez sur ou sur le bouton de volume. Refusez un autre appel entrant Maintenez enfoncé ou le bouton de volume. Quand vous avez deux - JVC KW-R930BTS | Instruction Manual America - Page 62
tableau suivant), puis appuyez sur le bouton. 3 Répétez l'étape 2 jusqu'à ce que l'élément souhaité soit sélectionné/activé ou suivez les instructions données pour l'élément sélectionné. Pour retourner à l'option de réglage précédente, appuyez sur . RECENT CALL (Applicable uniquement quand le - JVC KW-R930BTS | Instruction Manual America - Page 63
jusqu'à ce que l'élément souhaité soit sélectionné/activé ou suivez les instructions données pour l'élément sélectionné. 4 Appuyez sur pour quitter. Pour INFORMATION MY BT NAME: Affiche le nom de l'appareil ("KW-R9 BTS"/"KW-X8 BTS"/"KW-SX8 BTS"). ; MY ADDRESS: Affiche l'adresse de cet appareil - JVC KW-R930BTS | Instruction Manual America - Page 64
BLUETOOTH® Le résultat de la connectivité clignote sur l'affichage. "PAIRING OK" et/ou "HANDS-FREE OK"*1 et/ou "AUD.STREAM OK"*2 et/ou "PBAP OK"*3 : Compatible *1 Compatible avec le Profile mains libres (HFP) *2 Compatible avec le Profile de distribution audio avancé (A2DP) *3 Compatible avec le - JVC KW-R930BTS | Instruction Manual America - Page 65
Android (via Bluetooth). Préparation: Installez la dernière version de l'application JVC Remote sur votre périphérique avant la connexion. Pour plus d'informations, consultez . 1 Maintenez enfoncée . 2 Tournez le bouton de volume pour sélectionner un élément (voir - JVC KW-R930BTS | Instruction Manual America - Page 66
BLUETOOTH® Écoute de l'iPhone/iPod via Bluetooth Vous pouvez écouter des morceaux sur l'iPhone/iPod via le Bluetooth de cet appareil. Appuyez répétitivement sur pour sélectionner iPod BT. • Vous pouvez commander iPod/iPhone de la même façon que iPod/iPhone via prise d'entrée USB. ( 7) • Si - JVC KW-R930BTS | Instruction Manual America - Page 67
AUX Utilisation d'un lecteur audio portable 1 Connectez un lecteur audio portable (en vente dans le commerce). Mini fiche stéréo de 3,5 mm (1/8 pouces) avec connecteur en forme de"L"(en vente dans le commerce) RÉGLAGES AUDIO Prise d'entrée auxiliaire Lecteur audio portable 2 Sélectionnez [ON] - JVC KW-R930BTS | Instruction Manual America - Page 68
ce que l'élément souhaité soit sélectionné/ activé ou suivez les instructions données pour l'élément sélectionné. 4 Appuyez sur pour quitter. un ajustement, choisissez la source que vous souhaitez ajuster.) ON: Met en service les graves étendus. ; OFF: Annulation. 100HZ/160HZ/250HZ/400HZ/630HZ - JVC KW-R930BTS | Instruction Manual America - Page 69
2 voies ou transition 3 voies apparaîtront. ( 26, Réglages de transition) Par défaut, le type de transition 2 voies est sélectionné. DTA SETTINGS CAR SETTINGS X ' OVER TYPE 2-WAY 3-WAY Pour les réglages, 28, Réglages de l'alignement temporel numérique. Précautions: Ajustez le volume avant de - JVC KW-R930BTS | Instruction Manual America - Page 70
RÉGLAGES AUDIO Réglages de sortie d'enceinte [SPK/PRE OUT] (Applicable uniquement si [X ' OVER TYPE] est réglé sur [2-WAY]) ( 25) Sélectionnez le réglage de sortie pour les enceintes [SPK/PRE OUT], sur la base de la méthode de connexion des enceintes. Connexion via les prises de sortie de ligne - JVC KW-R930BTS | Instruction Manual America - Page 71
RÉGLAGES AUDIO Options de réglage de la transition 2 voies SPEAKER SIZE FRONT REAR *1 SUBWOOFER *2 X ' OVER TWEETER FRONT HPF REAR HPF*1 SUBWOOFER LPF *2 SIZE 3.5"/4"/4.75"/5"/6.5"/6.75"/7"/4×6/5×7/ 6×8/6×9/7×10 TWEETER SMALL/MIDDLE/LARGE/NONE (non connecté) 3.5"/4"/4.75"/5"/6.5"/6.75 - JVC KW-R930BTS | Instruction Manual America - Page 72
plus d'informations, Déterminez la valeur pour [DISTANCE] et [GAIN] de [DTA SETTINGS]. DTA SETTINGS POSITION DISTANCE *1 GAIN*1 DTA RESET CAR SETTINGS CAR TYPE R-SP LOCATION*2 Sélectionne votre position d'écoute (point de référence). ALL: Sans compensation ; FRONT RIGHT: Siège avant droit ; FRONT - JVC KW-R930BTS | Instruction Manual America - Page 73
ce que l'élément souhaité soit sélectionné/activé ou suivez les instructions données pour l'élément sélectionné. 4 Appuyez sur pour quitter. l'heure de mise en et hors service du gradateur. 1 Tournez le bouton de volume pour régler l'heure de mise en service [ON], puis appuyez sur le bouton - JVC KW-R930BTS | Instruction Manual America - Page 74
RÉGLAGES D'AFFICHAGE DAY COLOR NIGHT COLOR COLOR GUIDE Mémorisez vos propres couleurs d'éclairage du jour la liste de compatibilité la plus récente - Application originale JVC - Autres informations récentes Consultez . Généralités • Cet appareil ne peut lire que les CD - JVC KW-R930BTS | Instruction Manual America - Page 75
de cet appareil. • Pour les problèmes lors de l'utilisation de l'application, veuillez contacter Pandora à [email protected]. À propos de iHeartRadio • iHeartRadio® est un service tiers, et par conséquent les spécifications sont sujettes à changement sans notification préalable. Par cons - JVC KW-R930BTS | Instruction Manual America - Page 76
station (PS)/Type de programme (PTY) (Date) avec la synchronisation de la musique*2 (retour au début) (Pour CD-DA) (Applicable uniquement pour le KW-R935BTS/KW-R930BTS) Titre de plage (Artiste) Titre de plage (Nom du disque) Titre de plage (Date/Horloge)*1 Durée de lecture (Date/Horloge)*1 Titre de - JVC KW-R930BTS | Instruction Manual America - Page 77
GUIDE DE nouveau l'appareil sous tension. "PROTECTING SEND SERVICE" apparaît. Envoyez l'appareil au centre de service le plus proche. Vous ne pouvez pas choisir rique n'est pas défaillant et reconnectez-le. "USB HUB IS NOT SUPPORTED" apparaît. Cet appareil ne peut pas prendre en charge un périph - JVC KW-R930BTS | Instruction Manual America - Page 78
GUIDE DE DÉPANNAGE Pandora ANDROID Symptôme • Aucun son ne peut ê rique Android connecté ne peut pas diriger le signal audio sur l'appareil. ( 31) • Assurez-vous que JVC MUSIC PLAY APP est installé sur le périphérique Android. ( 7) • Reconnectez le périphérique Android et sélectionnez le mode de - JVC KW-R930BTS | Instruction Manual America - Page 79
GUIDE DE DÉPANNAGE Bluetooth® Radio SiriusXM® Symptôme "CH UNAVAIL" "CHECK ANTENNA" "CHECK TUNER" "NO SIGNAL" "SUBSCRIPTION UPDATED "PLEASE WAIT" "NOT SUPPORT" "ERROR" "H/W ERROR aux instructions de votre consultez le centre de service le plus proche. la section GUIDE DE DÉPANNAGE 2 Réinitialisez - JVC KW-R930BTS | Instruction Manual America - Page 80
Lecteur CD (pour KW-R935BTS/KW-R930BTS) Tuner SPÉCIFICATIONS FM Plage de fréquences Sensibilité utilisable (S/B = 26 dB) Seuil de sensibilité (DIN S/N = 46 dB) Réponse en fréquence (±3 dB) Taux - JVC KW-R930BTS | Instruction Manual America - Page 81
KW-R935BTS: 1,4 kg (3,1 livres) KW-R930BTS: 1,3 kg (3,0 livres) KW-X830BTS/KW-SX83BTS: 0,9 kg (2,1 livres) Sujet à changement sans notification. INSTALLATION et hors service avec la clé de contact. • Gardez tous les câbles à l'écart des dissipateurs thermiques. • Après avoir installé l'appareil - JVC KW-R930BTS | Instruction Manual America - Page 82
(A) Faisceau de fils (B) Vis à tête plate M5 × 8 mm (M5 × 3/8 pouces) Installation de l'appareil (montage encastré) Faites l'installation sur un support de voiture en utilisant les vis fournies (B) ou (C). Les trous de vis diffèrent en fonction du modèle de voiture. Réalisez les connexions - JVC KW-R930BTS | Instruction Manual America - Page 83
/RACCORDEMENT Connexions IMPORTANTES Nous recommandons d'installer l'appareil en utilisant un harnais de câblage en vente dans le commerce recommandé spécifiquement pour votre voiture et, pour votre sécurité, de laisser ce - JVC KW-R930BTS | Instruction Manual America - Page 84
INSTALLATION/RACCORDEMENT Connexion d'appareils extérieurs MIC (prise d'entrée microphone) ( 15) KW-R935BTS: Câble USB (CC 5 V 1,5 A) (environ 1,2 m/4 pieds) Port d'extension (12 V 500 mA) Au tuner SiriusXM Vehicle optionnel (en vente dans le commerce) ( 12) Connexion d'amplificateurs extérieurs - JVC KW-R930BTS | Instruction Manual America - Page 85
- JVC KW-R930BTS | Instruction Manual America - Page 86
a una fuente de calor excesiva, como luz solar, fuego o similar. Cómo leer este manual • Las operaciones se explican utilizando principalmente los botones de la placa frontal del KW-R935BTS. • Se utilizan indicaciones en inglés para las explicaciones. Puede seleccionar el idioma de visualizaci - JVC KW-R930BTS | Instruction Manual America - Page 87
solar brillante.) Ventanilla de visualización Retire la hoja aislante cuando se utilice por primera vez. Cómo cambiar la batería Rueda de volumen KW-R935BTS: Cable USB de la parte trasera de la unidad Para Encender la unidad Ajustar el volumen En la placa frontal Pulse . • Pulse y mantenga - JVC KW-R930BTS | Instruction Manual America - Page 88
PROCEDIMIENTOS INICIALES Para ajustar la fecha 7 Gire la rueda de volumen para seleccionar [DATE SET] y, a continuación, pulse la rueda. 8 Gire la rueda de volumen para realizar los ajustes y, a continuación, pulse la rueda. Día Mes Año 9 Pulse para salir. Para volver al elemento de ajuste - JVC KW-R930BTS | Instruction Manual America - Page 89
UPDATE UPDATE SYSTEM F/W UP xxxx YES: Se empieza a actualizar el firmware. ; NO: Se cancela (la actualización no se activa). Para obtener información sobre cómo actualizar el firmware, visite - JVC KW-R930BTS | Instruction Manual America - Page 90
RADIO Seleccione una emisora almacenada Pulse uno de los botones numéricos (1 a 6). (o) 1 Pulse . 2 Gire la rueda de volumen para seleccionar un número de preajuste y, a continuación, pulse la rueda. Otros ajustes 1 Pulse y mantenga pulsado . 2 Gire la rueda de volumen para seleccionar un - JVC KW-R930BTS | Instruction Manual America - Page 91
KW-R930BTS: CD/USB/iPod USB/ ANDROID • KW-X830BTS/KW-SX83BTS: USB/ iPod USB/ANDROID Terminal de entrada USB USB KW-R935BTS mostrará "Press [VIEW] to install JVC MUSIC PLAY APP". Siga las JVC MUSIC PLAY en su dispositivo Android. Para obtener más información, visite - JVC KW-R930BTS | Instruction Manual America - Page 92
/iPod (a través del terminal de entrada USB). Preparativos: Antes de la conexión, instale la versión más reciente de la aplicación JVC Remote en su dispositivo. Para obtener más información, visite . Puede realizar los ajustes de la misma manera que a través de la conexi - JVC KW-R930BTS | Instruction Manual America - Page 93
Pandora® Preparativos: Instale la última versión de la aplicación Pandora en su dispositivo (iPhone/iPod touch) seleccionar una emisora programada: Pulse uno de los botones numéricos (3, 4, 5 o 6). y/o KW-R935BTS: También se puede conectar al cable USB desde la parte trasera de la unidad. 3 - JVC KW-R930BTS | Instruction Manual America - Page 94
iHeartRadio® Preparativos: Instale la última versión de la aplicación iHeartAuto en su dispositivo (iPhone/ iPod touch) y, a al terminal de entrada USB. Terminal de entrada USB Accesorio del iPod/iPhone* y/o KW-R935BTS: También se puede conectar al cable USB desde la parte trasera de la unidad. - JVC KW-R930BTS | Instruction Manual America - Page 95
Spotify Preparativos: Instale la última versión de la aplicación Spotify en su dispositivo (iPhone/iPod touch) y, á la pista actual. *3 Disponible solamente para las pistas en listas de reproducción. y/o KW-R935BTS: También se puede conectar al cable USB desde la parte trasera de la unidad. - JVC KW-R930BTS | Instruction Manual America - Page 96
todos los canales disponibles. 5 Gire la rueda de volumen para seleccionar un canal y, a continuación, pulse la rueda. (o) Pulse para la búsqueda manual de un canal. • Para cambiar rápidamente de canal mantenga pulsado . La pantalla de entrada del código de acceso aparece cuando se selecciona - JVC KW-R930BTS | Instruction Manual America - Page 97
canales SmartFavorites. Inicialmente, todos los canales presintonizados se asignan a SmartFavorites. * • Para los canales SmartFavorites, aparece " " junto al último carácter del nombre de canal. Le permite rebobinar y reproducir hasta 30 minutos de cualquier programa de noticias, charlas, deportes - JVC KW-R930BTS | Instruction Manual America - Page 98
Radio SiriusXM® TuneScan™ Puede obtener una pequeña vista previa de las canciones que se perdió en cada uno de los canales de música SmartFavorites o el canal de música actualmente sintonizado. 1 Pulse . 2 Gire la rueda de volumen para seleccionar TUNE SCAN y, a continuación, pulse la rueda. - JVC KW-R930BTS | Instruction Manual America - Page 99
dispositivo Bluetooth 1 Pulse para encender la unidad. 2 Busque y seleccione "KW-R9 BTS"/"KW-X8 BTS"/"KW-SX8 BTS" en el dispositivo Bluetooth. "BT PAIRING" parpadea en a la unidad manualmente. • Si desea más información, consulte el manual de instrucciones del dispositivo Bluetooth. ESPAÑOL 15 - JVC KW-R930BTS | Instruction Manual America - Page 100
activa únicamente si: - Está activada la función Bluetooth del dispositivo conectado. - [AUTO PAIRING] está ajustado a [ON]. ( 19) - La aplicación JVC MUSIC PLAY está instalada en el dispositivo Android ( 7) y la opción [AUTO MODE] seleccionada ( 8). BLUETOOTH - Teléfono móvil Recibir una llamada - JVC KW-R930BTS | Instruction Manual America - Page 101
BLUETOOTH® Para En la placa frontal Mientras habla con la primera llamada entrante... Responder a otra llamada entrante y dejar en espera la llamada actual Pulse o la rueda de volumen. Rechazar otra llamada entrante Mantenga pulsado o la rueda de volumen. Mientras tiene dos llamadas - JVC KW-R930BTS | Instruction Manual America - Page 102
seleccionar la letra que desee (A a Z, 0 a 9, y OTHERS). • Aparece"OTHERS"si el primer carácter no es una letra (A a Z) ni un número (0 a 9). 2 Gire la rueda de an según el teléfono. Si desea más información, consulte el manual de instrucciones del teléfono conectado. • Esta unidad también es - JVC KW-R930BTS | Instruction Manual America - Page 103
(incluyendo el emparejamiento almacenado, directorio telefónico y etc.). ; NO: Se cancela. INFORMATION MY BT NAME: Muestra el nombre de la unidad ("KW-R9 BTS"/"KW-X8 BTS"/"KW-SX8 BTS"). ; MY ADDRESS: Muestra la dirección de la unidad. * Solo se pueden conectar un máximo de dos teléfonos con - JVC KW-R930BTS | Instruction Manual America - Page 104
BLUETOOTH® El resultado de la conectividad parpadea en la pantalla. "PAIRING OK" y/o "HANDS-FREE OK"*1 y/o "AUD.STREAM OK"*2 y/o "PBAP OK"*3 : Compatible *1 Compatible con el Perfil Manos Libres (HFP, Hands-Free Profile) *2 Compatible con el Perfil Avanzado de Distribución de Audio (A2DP, Advanced - JVC KW-R930BTS | Instruction Manual America - Page 105
USB) o un smartphone Android (a través de Bluetooth). Preparativos: Antes de la conexión, instale la versión más reciente de la aplicación JVC Remote en su dispositivo. Para obtener más información, visite . 1 Pulse y mantenga pulsado . 2 Gire la rueda de volumen para - JVC KW-R930BTS | Instruction Manual America - Page 106
BLUETOOTH® Escuchar el iPhone/iPod a través de Bluetooth Puede escuchar las canciones en el iPhone/iPod a través de la conexión Bluetooth de esta unidad. Pulse repetidamente para seleccionar iPod BT. • Puede operar el iPod/iPhone de la misma forma en que lo hace cuando el iPod/ iPhone está - JVC KW-R930BTS | Instruction Manual America - Page 107
AUX Uso de un reproductor de audio portátil 1 Conecte un reproductor de audio portátil (disponible en el mercado). Miniclavija estéreo de 3,5 mm (1/8 pulgada) con conector en"L"(disponible en el mercado) AJUSTES DE AUDIO Toma de entrada auxiliar Reproductor de audio portátil 2 Seleccione [ON] - JVC KW-R930BTS | Instruction Manual America - Page 108
AJUSTES DE AUDIO Otros ajustes 1 Pulse y mantenga pulsado . 2 Gire la rueda de volumen para seleccionar un elemento (consulte la siguiente tabla), y, a continuación, pulse la rueda. 3 Repita el paso 2 hasta que se seleccione o active el elemento que desee o siga las instrucciones indicadas en - JVC KW-R930BTS | Instruction Manual America - Page 109
tipo de crossover seleccionado ( [X ' OVER TYPE]). ( 26, Ajustes de crossover) Por defecto, se ha seleccionado el tipo crossover de 2 vías. DTA SETTINGS CAR SETTINGS X ' OVER TYPE 2-WAY 3-WAY Para los ajustes, 28, Ajustes de la alineación del tiempo digital. Precaución: Ajuste el volumen antes de - JVC KW-R930BTS | Instruction Manual America - Page 110
AJUSTES DE AUDIO Ajustes salida altavoz [SPK/PRE OUT] (Aplicable solo si [X ' OVER TYPE] está ajustado a [2-WAY]) ( 25) Seleccione la configuración de salida para los altavoces [SPK/PRE OUT], basándose en el método de conexión del altavoz. Conexión a través de los terminales de salida de línea - JVC KW-R930BTS | Instruction Manual America - Page 111
AJUSTES DE AUDIO Elementos de ajuste de crossover de 2 vías SPEAKER SIZE FRONT REAR *1 SUBWOOFER *2 X ' OVER TWEETER FRONT HPF REAR HPF*1 SUBWOOFER LPF *2 SIZE 3.5"/4"/4.75"/5"/6.5"/6.75"/7"/4×6/5×7/ 6×8/6×9/7×10 TWEETER SMALL/MIDDLE/LARGE/NONE (no conectado) 3.5"/4"/4.75"/5"/6.5"/6.75 - JVC KW-R930BTS | Instruction Manual America - Page 112
; NO: Se cancela. Identifica su tipo de automóvil y la ubicación del altavoz trasero para realizar el ajuste de [DTA SETTINGS]. COMPACT/FULL SIZE CAR/WAGON/MINIVAN/SUV/ MINIVAN(LONG): Selecciona el tipo de vehículo. ; OFF: Sin compensación. Selecciona la ubicación de los altavoces traseros en su veh - JVC KW-R930BTS | Instruction Manual America - Page 113
AJUSTES DE VISUALIZACIÓN Identificación de zonas para los ajustes de brillo Identificación de zonas para los ajustes de color 1 Pulse y mantenga pulsado . 2 Gire la rueda de volumen para seleccionar un elemento (consulte la siguiente tabla), y, a continuación, pulse la rueda. 3 Repita el paso - JVC KW-R930BTS | Instruction Manual America - Page 114
AJUSTES DE VISUALIZACIÓN DAY COLOR NIGHT COLOR COLOR GUIDE Guarda sus propios colores de iluminación de día y de noche para las de firmware y lista de los últimos elementos compatibles - Aplicación original JVC - Cualquier otra información más reciente Visite . General - JVC KW-R930BTS | Instruction Manual America - Page 115
Pandora no están disponibles desde esta unidad. • Si tiene alguna duda sobre el uso de esta aplicación, póngase en contacto con [email protected]. Acerca de iHeartRadio • Debido a que iHeartRadio® es un servicio de terceros, las especificaciones se encuentran sujetas a cambios sin previo - JVC KW-R930BTS | Instruction Manual America - Page 116
Nombre de la emisora (PS)/Tipo de programa (PTY) (Fecha) con sincronización de música*2 (vuelta al comienzo) (Para CD-DA) (Aplicable sólo para KW-R935BTS/KW-R930BTS) Título de la pista (Artista) Título de la pista (Nombre del disco) Título de la pista (Fecha/Reloj)*1 Tiempo de reproducción (Fecha - JVC KW-R930BTS | Instruction Manual America - Page 117
. A continuación, vuelva a encender la unidad. Aparece "PROTECTING SEND SERVICE". Lleve la unidad al centro de servicio más cercano. La fuente no escorrecto. Esto depende del proceso de grabación anterior. Aparece"NOT SUPPORT"y se omiten las pistas. Compruebe que la pista sea de un formato - JVC KW-R930BTS | Instruction Manual America - Page 118
no podrá enviar la señal de audio a la unidad. ( 31) ANDROID No se puede reproducir en [AUTO MODE]. • Asegúrese de que JVC MUSIC PLAY APP esté instalado en el dispositivo Android. ( 7) • Vuelva a conectar el dispositivo Android y seleccione el modo de control apropiado. ( 8) • Si con esto - JVC KW-R930BTS | Instruction Manual America - Page 119
que la antena esté montada fuera del vehículo. "SUBSCRIPTION UPDATED - PRESS ENTER TO CONTINUE." Su suscripción ha sido actualizada. el reproductor de audio Bluetooth conectado. "PLEASE WAIT" "NOT SUPPORT" "ERROR" "H/W ERROR" "SWITCHING NG" Solución • ( o ) visite: ESPAÑOL 35 - JVC KW-R930BTS | Instruction Manual America - Page 120
ESPECIFICACIONES Sintonizador Reproductor de CD (para KW-R935BTS/KW-R930BTS) FM Gama de frecuencias 87,9 MHz - 107,9 MHz (pasos de 200 kHz) 87,5 MHz - 108,0 MHz (pasos de 50 kHz) Sensibilidad útil (Relación señ - JVC KW-R930BTS | Instruction Manual America - Page 121
× 3-15/16 pulgada × 6-1/4 pulgada) KW-R935BTS: 1,4 kg (3,1 lbs) KW-R930BTS: 1,3 kg (3,0 lbs) KW-X830BTS/KW-SX83BTS: 0,9 kg (2,1 lbs) INSTALACIÓN/CONEXIÓN Consulte con un distribuidor de productos de audio para automóviles. • Instale esta unidad en la consola de su vehículo. No toque las partes - JVC KW-R930BTS | Instruction Manual America - Page 122
de encendido; después, desconecte el terminal de la batería del automóvil. 2 Conecte los cables correctamente. Consulte Conexión del cableado. ( 39) 3 Instale la unidad en su automóvil. Consulte Instalación de la unidad (montaje en el tablero). 4 Conecte el terminal de la batería del automóvil - JVC KW-R930BTS | Instruction Manual America - Page 123
INSTALACIÓN/CONEXIÓN Conexión del cableado IMPORTANTE Se recomienda instalar la unidad con un mazo de cables disponible en el mercado que sea adecuado para su automóvil y, para fines de seguridad, deje esta tarea en manos de profesionales. Consulte con un distribuidor de productos de audio para - JVC KW-R930BTS | Instruction Manual America - Page 124
de componentes externos MIC (terminal de entrada de micrófono) ( 15) KW-R935BTS: Cable USB (5 V CC 1,5 A) (aproximadamente 1,2 m/4 pies) Puerto los terminales de salida Cable de señal (no suministrado) Amplificador de JVC*2 Cable remoto (no suministrado) Terminales de salida Al cable remoto ( - JVC KW-R930BTS | Instruction Manual America - Page 125
- JVC KW-R930BTS | Instruction Manual America - Page 126
- JVC KW-R930BTS | Instruction Manual America - Page 127
- JVC KW-R930BTS | Instruction Manual America - Page 128
DAMAGES (INCLUDING, BUT NOT LIMITED TO, PROCUREMENT OF SUBSTITUTE GOODS OR SERVICES; LOSS OF USE, DATA, OR PROFITS; OR BUSINESS INTERRUPTION) HOWEVER CAUSED Inc. and any use of such marks by JVC KENWOOD Corporation is under license. Other trademarks and trade names are those of their respective
-
 1
1 -
 2
2 -
 3
3 -
 4
4 -
 5
5 -
 6
6 -
 7
7 -
8
-
9
-
10
-
11
-
12
-
13
-
14
-
15
-
16
-
17
-
18
-
19
-
20
-
21
-
22
-
23
-
24
-
25
-
26
-
27
-
28
-
29
-
30
-
31
-
32
-
33
-
34
-
35
-
36
-
37
-
38
-
39
-
40
-
41
-
42
-
43
-
44
-
45
-
46
-
47
-
48
-
49
-
50
-
51
-
52
-
53
-
54
-
55
-
56
-
57
-
58
-
59
-
60
-
61
-
62
-
63
-
64
-
65
-
66
-
67
-
68
-
69
-
70
-
71
-
72
-
73
-
74
-
75
-
76
-
77
-
78
-
79
-
80
-
81
-
82
-
83
-
84
-
85
-
86
-
87
-
88
-
89
-
90
-
91
-
92
-
93
-
94
-
95
-
96
-
97
-
98
-
99
-
100
-
101
-
102
-
103
-
104
-
105
-
106
-
107
-
108
-
109
-
110
-
111
-
112
-
113
-
114
-
115
-
116
-
117
-
118
-
119
-
120
-
121
-
122
-
123
-
124
-
125
-
126
-
127
-
128
 |
 |

ENGLISH
FRANÇAIS
ESPAÑOL
B5A-2137-20 [K]
KW-R935BTS /
KW-R930BTS
CD RECEIVER
INSTRUCTION MANUAL
RÉCEPTEUR CD
MANUEL D’INSTRUCTIONS
RECEPTOR CON CD
MANUAL DE INSTRUCCIONES
For customer Use:
Enter below the Model No. and Serial No. which are
located on the top or bottom of the cabinet. Retain this
information for future reference.
Model No.
Serial No.
KW-X830BTS /
KW-SX83BTS
DIGITAL MEDIA RECEIVER
INSTRUCTION MANUAL
RÉCEPTEUR MULTIMÉDIA NUMÉRIQUE
MANUEL D’INSTRUCTIONS
RECEPTOR DE MEDIOS DIGITALES
MANUAL DE INSTRUCCIONES