JVC M505 Instructions
JVC M505 - TH Home Theater System Manual
 |
UPC - 046838010606
View all JVC M505 manuals
Add to My Manuals
Save this manual to your list of manuals |
JVC M505 manual content summary:
- JVC M505 | Instructions - Page 1
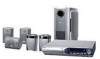
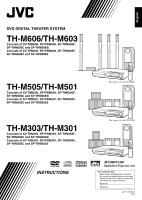
DVD DIGITAL THEATER SYSTEM TH-M606/TH-M603 Consists of XV-THM606, SP-PWM606, SP-THM606F, SP-THM606C and SP-THM606S/ Consists of XV-THM603, SP-PWM603, SP-THM606F, SP-THM606C and SP-THM606S TH-M505/TH-M501 Consists of XV-THM505, SP-PWM505, SP-THM505F, SP-THM505C and SP-THM505S/ Consists of XV - JVC M505 | Instructions - Page 2
CAUTION - F button! (XV-THM606/ XV-THM603/ XV-THM505/ XV-THM501/ XV-THM303/ XV-THM301) Disconnect the mains system is turned on, the STANDBY lamp goes off. The power can be remote controlled. CAUTION (SP-PWM606/ SP-PWM603/ SP-PWM505/ SP-PWM501/ SP-PWM303/ SP-PWM301) The power supply to the subwoofer - JVC M505 | Instructions - Page 3
particular, specifies that the cable ground shall be connected to the grounding system of the building, as close to the point of cable entry as practical. TH-M606: 48.8 kg/108 lbs TH-M603: 42.1 kg/93 lbs TH-M505: 32.0 kg/71 lbs TH-M501: 31.7 kg/70 lbs TH-M303: 26.2 kg/58 lbs TH-M301: 26.2 kg/58 - JVC M505 | Instructions - Page 4
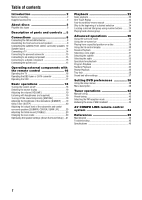
and other settings 37 Setting DVD preferences 38 Using the setup menus 38 Menu description 38 Tuner operations 42 Manual tuning 42 Preset tuning 43 Selecting the FM reception mode 43 Reducing the noise of AM broadcast 43 AV COMPU LINK remote control system 44 References 45 Maintenance 45 - JVC M505 | Instructions - Page 5
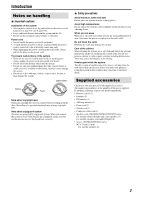
. If anything is missing, contact your dealer immediately. • Remote control (1) • Batteries (2) • FM antenna (1) • AM loop antenna (1) • Power cord (1) • System cord (1) • Composite video cord (1) • Speaker cords (TH-M606/TH-M603/TH-M505 only) For satellite (front left/right) and center speakers - JVC M505 | Instructions - Page 6
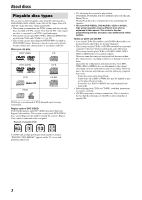
DVD VIDEOs, DVD AUDIOs, VCDs or SVCDs, their actual operation may be different from what is explained in this manual. This is due to the disc programming and disc structure, not a malfunction of this system. Notes on CD-R and CD-RW • User or CD-RWs, read their instructions or cautions carefully. • CD - JVC M505 | Instructions - Page 7
OR 625 PROGRESSIVE SCAN PICTURE PROBLEMS, IT IS RECOMMENDED THAT THE USER SWITCH THE CONNECTION TO THE 'STANDARD DEFINITION' OUTPUT. IF THERE ARE QUESTIONS REGARDING OUR TV SET COMPATIBILITY WITH THIS MODEL 525p AND 625p DVD PLAYER, PLEASE CONTACT OUR CUSTOMER SERVICE CENTER." USE OF THIS PRODUCT - JVC M505 | Instructions - Page 8
Description of parts and controls The illustrations of the center unit and the subwoofer used in this manual are of TH-M606 unless otherwise noted. Front panel ( . 19 Rear panel (center unit) pg. 15 pg. 15 pg. 15 pg. 18 Remote sensor: pg. 18 pg. 7 pg. 22 pg. 8 pg. 24 pg. 19 pg. 14 pg. 15 - JVC M505 | Instructions - Page 9
Description of parts and controls Powered subwoofer SP-PWM606/SP-PWM505/SP-PWM501 Front SP-PWM603/SP-PWM303/SP-PWM301 POWER ON lamp: pg. 18 pg. 15 Rear pg. 10, 12 Power cord: pg. 15 Front * Do not block the ventilation openings. POWER ON lamp: pg. 18 pg. 15 pg. 11, 13 Rear Power cord: pg. - JVC M505 | Instructions - Page 10
Description of parts and controls Remote control Putting batteries in the remote control pg. 16 pg. 16 pg. 22 pg. the remote control decreases, replace both batteries. CAUTION • Do not expose batteries to heat or flame. Operating the system from the remote control Aim the remote control directly - JVC M505 | Instructions - Page 11
. If reception is poor Center unit Outdoor FM antenna (not supplied) Standard type (75 C coaxial) connector Outdoor FM antenna cord (not supplied) NOTE • We recommend that you use coaxial cable for the FM antenna as it is well-shielded against interference. • Turn the loop antenna until you - JVC M505 | Instructions - Page 12
the floor or injury. 1 3 Speaker Stand Black White Screw M5 x 25 mm (1 inch) (supplied) Stand Base plate Completion Speaker cord (supplied) Bottom • You can route the speaker cords through one on the three grooves on the base plate depending on the speaker layout. • Depending on the installing - JVC M505 | Instructions - Page 13
remove. Powered subwoofer SP-PWM606 Speaker cord (supplied) • Connect the silver cords to the black (r) terminals. • Connect the copper cords to the (q) (LEFT) Blue Front speakers SP-THM606F Surround speakers SP-THM606S 4 m (13 feet) 4 m (13 feet) Center speaker SP-THM606C CAUTION • When you - JVC M505 | Instructions - Page 14
; Twist and pull the insulation coat off and remove. Powered subwoofer SP-PWM603 Front speakers SP-THM606F This page is for Speaker cord (supplied) • Connect the silver cords to the black (r) terminals. • Connect the copper cords to the (q) terminals referring to the table below: FRONT SPEAKERS - JVC M505 | Instructions - Page 15
Connections Note that the illustration below is for TH-M505. Before connecting the speaker cords; Twist and pull the insulation coat off and remove. Powered subwoofer ( ) TH-M505: SP-PWM505 TH-M501: SP-PWM501 Front speakers ( ) TH-M505: SP-THM505F*1 TH-M501: SP-THM303F*2 This page is for Speaker - JVC M505 | Instructions - Page 16
. • Connect the copper cords to the (q) terminals referring to the table below: FRONT SPEAKERS (LEFT) FRONT SPEAKERS (RIGHT) CENTER SPEAKER SURROUND SPEAKERS (LEFT) SURROUND SPEAKERS (RIGHT) White Red Green Blue Gray Powered subwoofer ( ) TH-M303: SP-PWM303 TH-M301: SP-PWM301 4 m (13 feet - JVC M505 | Instructions - Page 17
subwoofer TH-M606/TH-M603 only: • Do not lean against the satellite speakers, as the speakers could fall down or break, possibly causing injury. Especially be careful not to let children lean against them. To component video input Component video cord (not supplied) NOTE • If your TV supports - JVC M505 | Instructions - Page 18
have been completed. Center unit Powered subwoofer Power cord (supplied) Power cord Plug into AC outlets. CAUTION • Disconnect the power cord before cleaning or moving the system. • Do not pull on the power cord to unplug the cord. When unplugging the cord, always grasp and pull the plug - JVC M505 | Instructions - Page 19
number buttons (1-9, 0) to enter the manufacturer's code (2 digits). Examples: For a Hitachi TV: Press 1, then 0. For a Toshiba TV: Press 0, then 8. Remote control mode selector (play button) Manufacturer JVC Hitachi Magnavox Mitsubishi Panasonic RCA Code Manufacturer 01 Samsung 10 Sharp 02 Sony - JVC M505 | Instructions - Page 20
Operating external components with the remote control See page 16 for button locations. 5 Press number buttons (1-9, 0) to enter the manufacturer's code (2 digits). Examples: For a GI Jerrold product: Press 0, then 1. For a Sony product: Press 2, then 0. 5 Press number buttons (1-9, 0) to enter - JVC M505 | Instructions - Page 21
ENTER Remote control mode selector • "OPEN"/"CLOSE": Appears when opening or closing the disc tray. • "NOW READING": Appears when the system is reading the disc information. • "REGION CODE ERROR!": Appears when the Region Code of the DVD VIDEO does not match the code the system supports. The - JVC M505 | Instructions - Page 22
remote control: Press one of the source selecting buttons (DVD, FM/AM, VCR or DBS). DVD: To play back a disc (DVD from a component connected to the DIGITAL IN (DBS) jack. (A pg system automatically cancels the surround mode (A pg. 26) currently selected, deactivates the speakers, turn the subwoofer - JVC M505 | Instructions - Page 23
picture when playing back a DVD VIDEO in the progressive scan mode. In such a case, change the scan mode to "INTERLACE". To check the compatibility of your TV, contact your local JVC customer service center. • All JVC progressive TVs and High-Definition TVs are fully compatible with this system. 20 - JVC M505 | Instructions - Page 24
case, follow the instructions that appears on the TV screen. • When the system detects the clapping sound as "FAILED !" three times, set the distance (DISTANCE) and the output level (LEVEL) manually (A pg. 39). To cancel Press SMART S.SETUP. NOTE • You need to set the subwoofer's output level (LEVEL - JVC M505 | Instructions - Page 25
DISC (1-5) 0 on the center unit. • The system turns on and the disc tray comes out. 2 Place a disc. Label side up When placing an 8 cm (3 inches) disc (play button) Remote control mode selector Number buttons Disc lamps (TH-M606/TH-M603/TH-M505/ TH-M501 only) 3 Press DISC (1-5). For MP3/WMA - JVC M505 | Instructions - Page 26
system cannot accept operations even though you press any buttons before the entire picture appears on the TV screen. • If you do not want the on-screen guide icons to appear, see page 40. 7 Playback information on the display window DVD VIDEO Example: When a DVD VIDEO encoded with Dolby Digital - JVC M505 | Instructions - Page 27
TH-M603/TH-M505/ TH-M501) The disc lamps on the center unit also show the disc status. Only the disc lamp currently selected lights. 7 Screen saver A TV screen may burn out if a static picture is displayed for a long time. To prevent this, the system automatically dims the screen if a static picture - JVC M505 | Instructions - Page 28
remote control 7 For DVD VIDEO (title, chapter): While stopped, the title number is selected. During playback, the chapter number is selected. For DVD or group number. The system starts playback from the first work for some discs. See page 22 for button locations. Playing back a bonus group Some DVD - JVC M505 | Instructions - Page 29
remote control for the following operation; 1 Set the remote control mode selector to AUDIO. 2 Press DVD. • There are exceptions in the operation mentioned above. In such a case, follow each instruction DTS" and "DTS Digital Surround" are registered trademarks of Digital Theater Systems, Inc. *3 You - JVC M505 | Instructions - Page 30
system is set up to automatically select the optimal surround mode for input signal from digital multichannel software. When playing back 2 channel source, you can select the desired surround mode manually. IMPORTANT Before using the remote control prohibited DVD AUDIO disc, the system continues - JVC M505 | Instructions - Page 31
below. I Select this for Repeat Playback. (A pg. 35) J Select this for time search function. (A pg. 30) K Select this for chapter (for DVD VIDEO) or track (for DVD AUDIO) search function. (A pg. 29) L Select this to change audio language, channel, or stream. (A pg. 32) M Select this to change - JVC M505 | Instructions - Page 32
a "top" menu which lists the titles. Press TOP MENU to show the title menu. Some DVD VIDEO may also have a different menu which is shown by pressing MENU. See the instructions for each DVD VIDEO regarding its particular menu. 2 Use Cursor 3/2/Y/5 to select a desired item. 3 Press ENTER. • With some - JVC M505 | Instructions - Page 33
ON SCREEN. The on-screen bar disappears. See page 26 for button locations. NOTE • You can specify time in hours/minutes/seconds for DVD VIDEO/ DVD AUDIO and in minutes/seconds for VCD/SVCD/CD. Using the file control display You can search and play desired groups and tracks/files using the file - JVC M505 | Instructions - Page 34
the stored position Press 3 (play button) or DVD. • There may be a case where 3 (play button) does not work after changing the source. To clear the stored position bar disappears. NOTE • During DVD AUDIO playback, this feature is available only for the video part. Selecting the subtitle 7 During - JVC M505 | Instructions - Page 35
. • Some subtitle or audio languages are abbreviated in the pop-up window. See "The language codes list" (A pg. 38). • During DVD AUDIO playback, this feature is available only for the video part. Selecting the audio 7 During playback of a disc containing audio in several languages When using the - JVC M505 | Instructions - Page 36
such a case, press 8 to pause slide-show playback, then zoom in. • During DVD AUDIO playback , this feature is available only for the video part. • During MPEG4 playback, there may be a case where Cursor 3/2/ Y/5 does not work in step 2 above. Changing the VFP setting The VFP (Video Fine Processor - JVC M505 | Instructions - Page 37
for button locations. 2 Follow the instructions that appears on the TV screen type: • DVD VIDEO: Titles and chapters • VCD, SVCD, CD: Tracks • DVD AUDIO, MP3 bonus group on a DVD AUDIO, perform the the program by turning off the system. 3 Press 3 (play button). DVD AUDIO cannot be played. • - JVC M505 | Instructions - Page 38
, or CD, the Repeat mode changes in the same manner. Note that, however, in the " " mode the system repeats all the programmed tracks, instead of all tracks on the disc. • For DVD VIDEO and DVD AUDIO, REPEAT ALL and REPEAT DISC may not be available depending on the disc. When using the on - JVC M505 | Instructions - Page 39
The system turns on and "UNLOCKED" appears on the display window. 6 Press ENTER at the end of the part you want to repeat (point B). A-B Repeat Playback starts. 7 Press ON SCREEN. The on-screen bar disappears. To cancel Select "OFF" in step 4, then press ENTER. NOTE • When playing back a DVD - JVC M505 | Instructions - Page 40
Dolby Digital or DTS Digital Surround, remote control system. (A pg. 44) VIDEO: To watch DVD playback via the VIDEO jack. S: To watch DVD playback via the S-VIDEO jack. COMPNT (component): To watch DVD playback via the COMPONENT VIDEO OUT jacks. • DiscIll (For TH-M606/TH-M603/TH-M505/TH-M501 - JVC M505 | Instructions - Page 41
description" below. Basic operation on the setup menus IMPORTANT Before using the remote control for the following operation; 1 Set the remote control mode selector to AUDIO. 2 Press DVD. Cursor (3/2/Y/5)/ ENTER 7 While stopped 1 Press SET UP. 2 Follow the instructions that appears on the TV screen - JVC M505 | Instructions - Page 42
may become "4:3 LB" with some DVDs. This depends on how DVDs are recorded. 7 PICTURE SOURCE When video and film source materials. This system recognizes the source type (video or to the sound with Dolby Digital. • AUTO Select this when / SURROUND LEFT SPEAKER/SUBWOOFER While monitoring the test - JVC M505 | Instructions - Page 43
can activate or deactivate Resume Playback function. (A pg. 31) 7 ON SCREEN GUIDE You can activate or deactivate the on-screen guide icons. (A pg. 22) 7 Parental lock menu (PARENTAL LOCK) You can restrict playback of a DVD VIDEO containing violent scenes that is not suitable for your other family - JVC M505 | Instructions - Page 44
Setting DVD preferences Country/Area codes list for Parental Lock AD Andorra AE United Republic SZ Swaziland TC Turks and Caicos Islands TD Chad TF French Southern Territories TG Togo TH Thailand Code Language TJ Tajikistan TK Tokelau TM Turkmenistan TN Tunisia TO Tonga TP East Timor TR Turkey - JVC M505 | Instructions - Page 45
selector to AUDIO. 2 Press FM/AM. The buttons described below are used on pages 42 to 43. Remote control mode selector Manual tuning 1 Press FM/AM repeatedly to select the band. Example: When the system is tuned in to 810 kHz. 810k 2 Press TUNING 9/( repeatedly until you find the frequency you want - JVC M505 | Instructions - Page 46
store the FM reception mode for an FM station, select the reception mode you want. See "Selecting the FM reception mode" below. Example: When the system is tuned in to 103.5 MHz. 103 . 5 M 2 Press MEMORY. __ 103 . 5 M While "CH" and "- -" are flashing: 3 Press number button(s) (1-10, +10) to select - JVC M505 | Instructions - Page 47
COMPU LINK-III, which adds a function to operate JVC's video components via the video components terminals. To use this remote control system, you need to connect the video components you want to operate as follows. • Refer also to the manuals supplied with your TV and video components. Connecting - JVC M505 | Instructions - Page 48
power cord and/or system cord is not connected. The remote control does The batteries are exhausted. not work. Sunlight is falling directly on the remote sensor. No sound. The system cord and/or speaker cord is not connected. The audio cord is not connected to AUDIO IN (VCR) and/or DIGITAL IN - JVC M505 | Instructions - Page 49
References Specifications 7 Center unit (XV-THM606/XV-THM603/XV-THM505/XV-THM501/ XV-THM303/XV-THM301) Audio section Total Harmonic Distortion 0.02 % NOTE: This value is measured at System cord CONNECTOR for reference. Digital input*1: DIGITAL IN (DBS): -21 dBm to -15 dBm (OPTICAL) (660 nm - JVC M505 | Instructions - Page 50
67 kg (8.1 lbs) Surround speakers (SP-THM606S) Speakers: 5.5 cm (2-3/16 inches) Satellite Speakers Front speakers (SP-THM505F) Speakers: Woofer: kg (1.6 lbs) Surround speakers (SP-THM505S) Speakers: 8.0 cm (3-3/16 kg (1.2 lbs) Center speaker (SP-THM505C) Speakers: Woofer: 8.0 cm (3-3/ - JVC M505 | Instructions - Page 51
48 - JVC M505 | Instructions - Page 52
TH-M606/TH-M603/ DVD DIGITAL THEATER SYSTEM TH-M505/TH-M501/ TH-M303/TH-M301 0204SKMIDEJEM EN © 2004 VICTOR COMPANY OF JAPAN, LIMITED For the U.S.A.
-
 1
1 -
 2
2 -
 3
3 -
 4
4 -
 5
5 -
 6
6 -
 7
7 -
8
-
9
-
10
-
11
-
12
-
13
-
14
-
15
-
16
-
17
-
18
-
19
-
20
-
21
-
22
-
23
-
24
-
25
-
26
-
27
-
28
-
29
-
30
-
31
-
32
-
33
-
34
-
35
-
36
-
37
-
38
-
39
-
40
-
41
-
42
-
43
-
44
-
45
-
46
-
47
-
48
-
49
-
50
-
51
-
52
 |
 |

TH-M606/TH-M603
TH-M303/TH-M301
For Customer Use:
Enter below the Model No. and Serial
No. which are located either on the rear,
bottom or side of the cabinet. Retain this
information for future reference.
Model No.
Serial No.
LVT1147-001C
[J,C]
TH-M505/TH-M501
English
DVD DIGITAL THEATER SYSTEM
INSTRUCTIONS
Consists of XV-THM606, SP-PWM606, SP-THM606F,
SP-THM606C and SP-THM606S/
Consists of XV-THM603, SP-PWM603, SP-THM606F,
SP-THM606C and SP-THM606S
Consists of XV-THM505, SP-PWM505, SP-THM505F,
SP-THM505C and SP-THM505S/
Consists of XV-THM501, SP-PWM501, SP-THM303F,
SP-THM303C and SP-THM303S
Consists of XV-THM303, SP-PWM303, SP-THM303F,
SP-THM303C and SP-THM303S/
Consists of XV-THM301, SP-PWM301, SP-THM303F,
SP-THM303C and SP-THM303S
The figure is for the TH-M606.
The figure is for the TH-M505.