JVC M505 Instructions - Page 24
Optimizing the speaker settings [Smart Surround Setup], Press and hold SMART S.SETUP. - subwoofer replacement
 |
UPC - 046838010606
View all JVC M505 manuals
Add to My Manuals
Save this manual to your list of manuals |
Page 24 highlights
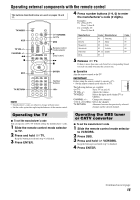
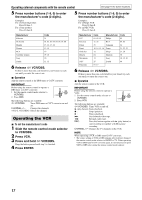
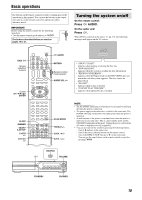
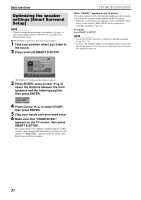
Basic operations Optimizing the speaker settings [Smart Surround Setup] NOTE • When you change the positioning of the speakers or listener, or replace the supplied speakers with other ones, perform Smart Surround Setup again. 7 While DVD is selected as the source and stopped 1 Take your position where you listen to the sound. 2 Press and hold SMART S.SETUP. See page 18 for button locations. When "FAILED !" appears on the TV screen The system could not detect the clapping sound correctly. In such a case, follow the instructions that appears on the TV screen. • When the system detects the clapping sound as "FAILED !" three times, set the distance (DISTANCE) and the output level (LEVEL) manually (A pg. 39). To cancel Press SMART S.SETUP. NOTE • You need to set the subwoofer's output level (LEVEL) manually. (A pg. 20 or 39) • In step 2, "SW ERROR" appears on the display window if the center unit and the powered subwoofer are not connected correctly by using the supplied system cord. "SETTING UP" flashes on the display window. 3 Press ENTER, press Cursor Y/5 to select the distance between the front speakers and the listening position, then press ENTER. 4 Press Cursor Y/5 to select START, then press ENTER. 5 Clap your hands over your head once. 6 Make sure that "COMPLETED !" appears on the TV screen, then press SMART S.SETUP. The system detects your clapping sound through the satellite speakers, then automatically makes the best settings for each speaker. "COMPLETED !" appears on the TV screen when Smart Surround Setup completes. 21
-
 1
1 -
2
-
3
-
4
-
5
-
6
-
7
-
8
-
9
-
10
-
11
-
12
-
13
-
14
-
15
-
16
-
17
-
18
-
 19
19 -
 20
20 -
 21
21 -
 22
22 -
 23
23 -
 24
24 -
 25
25 -
 26
26 -
 27
27 -
 28
28 -
 29
29 -
30
-
31
-
32
-
33
-
34
-
35
-
36
-
37
-
38
-
39
-
40
-
41
-
42
-
43
-
44
-
45
-
46
-
47
-
48
-
49
-
50
-
51
-
52
 |
 |
