JVC M505 Instructions - Page 23
Sleep Timer [SLEEP], Adjusting the output level of the subwoofer and center/surround speakers [SUBWFR - subwoofer shuts off
 |
UPC - 046838010606
View all JVC M505 manuals
Add to My Manuals
Save this manual to your list of manuals |
Page 23 highlights
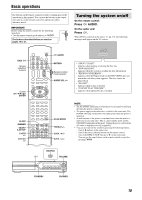
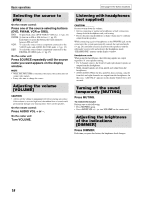
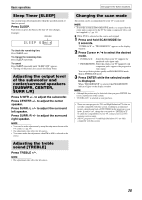
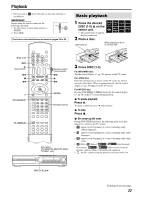
Basic operations See page 18 for button locations. Sleep Timer [SLEEP] The system turns off automatically when the specified period of time has passed. Press SLEEP. Each time you press the button, the shut-off time changes. Example: minutes S L E E P 6 0m i n To check the remaining time Press SLEEP once. To change the remaining time Press SLEEP repeatedly. To cancel Press SLEEP repeatedly until "SLEEP OFF" appears. • Turning off the power also cancels the Sleep Timer. Adjusting the output level of the subwoofer and center/surround speakers [SUBWFR, CENTER, SURR L/R] Press S.WFR +/- to adjust the subwoofer. Press CENTER +/- to adjust the center speaker. Press SURR.-L +/- to adjust the surround left speaker. Press SURR.-R +/- to adjust the surround right speaker. NOTE • You can also make adjustments by using the setup menu shown on the TV screen. (A pg. 39) • The adjustments take effect for all sources. • You cannot make this adjustment when FM or AM is selected as the source. Adjusting the treble sound [TREBLE] Press TREBLE +/-. NOTE • The adjustments take effect for all sources. Changing the scan mode The system can be accommodated to your TV's scan mode. NOTE • To use the system in PROGRESSIVE mode, it is required that the center unit is connected to the TV by using a component video cord (not supplied). (A pg. 14) 7 While DVD is selected as the source and stopped 1 Press and hold SCAN MODE for 2 seconds. "INTERLACE" or "PROGRESSIVE" appears on the display window. 2 Press Cursor 3/2 to select the desired mode. • INTERLACE: Select this when your TV supports the interlaced video input only. • PROGRESSIVE: Select this when your TV equipped with component jacks supports the progressive video input. You can get better picture quality in PROGRESSIVE mode than in INTERLACE mode. 3 Press ENTER while the selected mode is displayed. When "PROGRESSIVE" is selected, the PROGRESSIVE indicator lights on the display window. NOTE • Although the picture may be distorted when you press ENTER, this is not a malfunction of the system. • "INTERLACE" is selected at your purchase. • There are some progressive TVs and High-Definition TVs that are not fully compatible with this system, resulting in an unnatural picture when playing back a DVD VIDEO in the progressive scan mode. In such a case, change the scan mode to "INTERLACE". To check the compatibility of your TV, contact your local JVC customer service center. • All JVC progressive TVs and High-Definition TVs are fully compatible with this system. 20
-
 1
1 -
2
-
3
-
4
-
5
-
6
-
7
-
8
-
9
-
10
-
11
-
12
-
13
-
14
-
15
-
16
-
17
-
 18
18 -
 19
19 -
 20
20 -
 21
21 -
 22
22 -
 23
23 -
 24
24 -
 25
25 -
 26
26 -
 27
27 -
 28
28 -
29
-
30
-
31
-
32
-
33
-
34
-
35
-
36
-
37
-
38
-
39
-
40
-
41
-
42
-
43
-
44
-
45
-
46
-
47
-
48
-
49
-
50
-
51
-
52
 |
 |
