Kenwood BC550DU User Manual - Page 6
Installing The Belt Clip, Installing The Cap Over The Speaker/ Microphone Jacks
 |
View all Kenwood BC550DU manuals
Add to My Manuals
Save this manual to your list of manuals |
Page 6 highlights
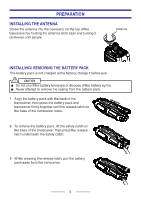
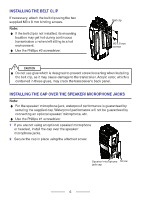
INSTALLING THE BELT CLIP If necessary, attach the belt clip using the two supplied M3 x 8 mm binding screws. Note: ◆ If the belt clip is not installed, its mounting location may get hot during continuous transmission or when left sitting in a hot environment. ◆ Use the Phillips #2 screwdriver. Belt clip M3 x 8 mm screws CAUTION ◆ Do not use glue which is designed to prevent screw loosening when installing the belt clip, as it may cause damage to the transceiver. Acrylic ester, which is contained in these glues, may crack the transceiver's back panel. INSTALLING THE CAP OVER THE SPEAKER/ MICROPHONE JACKS Note: ◆ For the speaker/ microphone jack, waterproof performance is guaranteed by securing the supplied cap. Waterproof performance will not be guaranteed by connecting an optional speaker/ microphone, etc. ◆ Use the Phillips #1 screwdriver. 1 If you are not using an optional speaker/ microphone or headset, install the cap over the speaker/ microphone jacks. 2 Secure the cap in place using the attached screw. Speaker/ microphone Screw jack cap 6
-
 1
1 -
 2
2 -
 3
3 -
 4
4 -
 5
5 -
 6
6 -
 7
7 -
 8
8 -
 9
9 -
 10
10 -
 11
11 -
 12
12 -
13
-
14
-
15
-
16
-
17
-
18
-
19
-
20
-
21
-
22
-
23
-
24
-
25
-
26
-
27
-
28
-
29
-
30
-
31
-
32
-
33
-
34
-
35
-
36
-
37
-
38
-
39
-
40
-
41
-
42
-
43
-
44
-
45
-
46
-
47
-
48
-
49
-
50
-
51
-
52
-
53
-
54
-
55
-
56
-
57
-
58
-
59
-
60
-
61
-
62
-
63
-
64
-
65
-
66
-
67
-
68
-
69
-
70
-
71
-
72
-
73
-
74
-
75
-
76
-
77
-
78
-
79
 |
 |
