Kodak 1783794 User's Guide - Page 9
Installing and removing the color cartridge
 |
UPC - 041771783792
View all Kodak 1783794 manuals
Add to My Manuals
Save this manual to your list of manuals |
Page 9 highlights
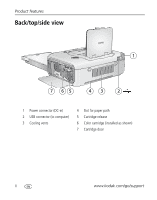
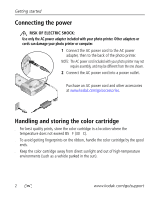
Getting started Installing and removing the color cartridge 1 Open the cartridge door on the side of the photo printer. 2 Check to make sure there is no slack in the color cartridge ribbon. To remove slack, push in on the cartridge spool, then rotate the spool clockwise. IMPORTANT: Be careful not to rotate the spool more than necessary. Doing so could reduce the number of prints you are able to make. 3 Slide the color cartridge in, label side up, with the arrow pointing toward the photo printer. Push the cartridge until it "clicks" into place. 4 Close the cartridge door. ■ To remove the color cartridge, open the color cartridge door, then push up on the green lever and slide the cartridge out. IMPORTANT: The color cartridge may lock in place if there is a paper error. Do not attempt to remove the cartridge without first clearing the paper error. Make sure the Paper light is off before attempting to remove the cartridge (see Paper light, page 45). www.kodak.com/go/support 3
-
 1
1 -
2
-
3
-
 4
4 -
 5
5 -
 6
6 -
 7
7 -
 8
8 -
 9
9 -
 10
10 -
 11
11 -
 12
12 -
 13
13 -
 14
14 -
15
-
16
-
17
-
18
-
19
-
20
-
21
-
22
-
23
-
24
-
25
-
26
-
27
-
28
-
29
-
30
-
31
-
32
-
33
-
34
-
35
-
36
-
37
-
38
-
39
-
40
-
41
-
42
-
43
-
44
-
45
-
46
-
47
-
48
-
49
-
50
-
51
-
52
-
53
-
54
-
55
-
56
-
57
-
58
-
59
-
60
-
61
-
62
-
63
-
64
-
65
-
66
-
67
-
68
-
69
-
70
-
71
 |
 |
