Konica Minolta Fujitsu fi-7160 Operation Guide - Page 105
Press the [Menu] button and confirm that the LCD displays [Do
 |
View all Konica Minolta Fujitsu fi-7160 manuals
Add to My Manuals
Save this manual to your list of manuals |
Page 105 highlights
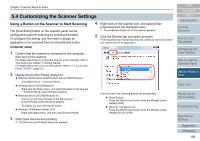
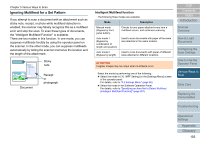
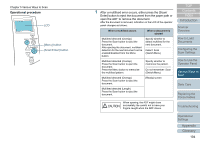
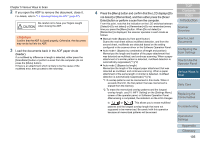
Chapter 5 Various Ways to Scan 2 If you open the ADF to remove the document, close it. For details, refer to "1.4 Opening/Closing the ADF" (page 27). Be careful not to have your fingers caught when closing the ADF. ATTENTION Confirm that the ADF is closed properly. Otherwise, the document may not be fed into the ADF. 3 Load the documents back in the ADF paper chute (feeder). If a multifeed by difference in length is detected, either press the [Scan/Enter] button or perform a scan from the computer (do not press the [Menu] button). If there is an attachment which is likely to be the cause of the multifeed error, then proceed to the next step. 4 Press the [Menu] button and confirm that the LCD displays [Do not detect] or [Remember], and then either press the [Scan/ Enter] button or perform a scan from the computer. From this point, note that the indication on the LCD switches between [Detect][Do not detect] or [Remember][Do not remember] every time you press the [Menu] button. When [Do not detect] or [Remember] is displayed, the scanner operates in each mode as follows: Manual mode (Bypass by front panel button) Scans the next sheet without multifeed detection, and from the second sheet, multifeeds are detected based on the setting configured in the scanner driver or the Software Operation Panel. Auto mode 1 (Bypass by combination of length and position) Memorizes the length and location of the paper attachment that was detected as multifeed, and continues scanning. When a paper attachment of a similar pattern is detected, multifeed detection is automatically suppressed.(*1)(*2) Auto mode 2 (Bypass by length) Memorizes the length of the longest paper attachment that was detected as multifeed, and continues scanning. When a paper attachment of the same length or shorter is detected, multifeed detection is automatically suppressed.(*1)(*2) *1: 8 overlap patterns can be memorized in this mode. When it exceeds this limit, the first pattern that was memorized is erased from the memory. *2: To erase the memorized overlap patterns and the longest overlap length, use [10: iMFF Setting] on the [Settings Menu] screen of the operator panel, or Software Operation Panel. After erasing is completed, the indication on the LCD changes to or . This allows you to erase multifeed patterns and the longest overlap length that were not supposed to be memorized. Be careful with this operation because all memorized patterns will be erased. TOP Contents Index Introduction Scanner Overview How to Load Documents Configuring the Scan Settings How to Use the Operator Panel Various Ways to Scan Daily Care Replacing the Consumables Troubleshooting Operational Settings Appendix Glossary 105
-
 1
1 -
2
-
3
-
4
-
5
-
6
-
7
-
8
-
9
-
10
-
11
-
12
-
13
-
14
-
15
-
16
-
17
-
18
-
19
-
20
-
21
-
22
-
23
-
24
-
25
-
26
-
27
-
28
-
29
-
30
-
31
-
32
-
33
-
34
-
35
-
36
-
37
-
38
-
39
-
40
-
41
-
42
-
43
-
44
-
45
-
46
-
47
-
48
-
49
-
50
-
51
-
52
-
53
-
54
-
55
-
56
-
57
-
58
-
59
-
60
-
61
-
62
-
63
-
64
-
65
-
66
-
67
-
68
-
69
-
70
-
71
-
72
-
73
-
74
-
75
-
76
-
77
-
78
-
79
-
80
-
81
-
82
-
83
-
84
-
85
-
86
-
87
-
88
-
89
-
90
-
91
-
92
-
93
-
94
-
95
-
96
-
97
-
98
-
99
-
 100
100 -
 101
101 -
 102
102 -
 103
103 -
 104
104 -
 105
105 -
 106
106 -
 107
107 -
 108
108 -
 109
109 -
 110
110 -
111
-
112
-
113
-
114
-
115
-
116
-
117
-
118
-
119
-
120
-
121
-
122
-
123
-
124
-
125
-
126
-
127
-
128
-
129
-
130
-
131
-
132
-
133
-
134
-
135
-
136
-
137
-
138
-
139
-
140
-
141
-
142
-
143
-
144
-
145
-
146
-
147
-
148
-
149
-
150
-
151
-
152
-
153
-
154
-
155
-
156
-
157
-
158
-
159
-
160
-
161
-
162
-
163
-
164
-
165
-
166
-
167
-
168
-
169
-
170
-
171
-
172
-
173
-
174
-
175
-
176
-
177
-
178
-
179
-
180
-
181
-
182
-
183
-
184
-
185
-
186
-
187
-
188
-
189
-
190
-
191
-
192
-
193
-
194
-
195
-
196
-
197
-
198
-
199
-
200
-
201
-
202
-
203
-
204
-
205
-
206
-
207
-
208
-
209
-
210
-
211
-
212
-
213
-
214
-
215
-
216
-
217
-
218
-
219
-
220
-
221
-
222
-
223
-
224
-
225
-
226
-
227
-
228
-
229
-
230
 |
 |
