Konica Minolta Kodak i730 User Guide - Page 39
Push the connector firmly into a new ink cartridge carrier.
 |
View all Konica Minolta Kodak i730 manuals
Add to My Manuals
Save this manual to your list of manuals |
Page 39 highlights
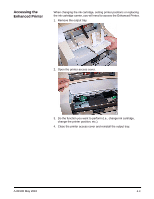
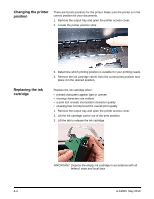
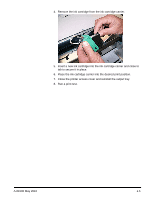
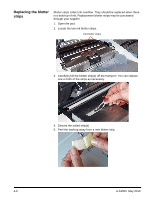
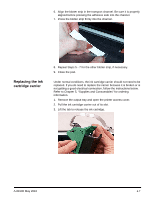
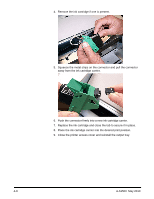
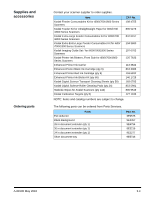
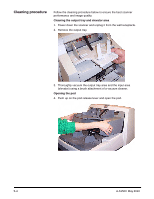
4. Remove the ink cartridge if one is present. 5. Squeeze the metal strips on the connector and pull the connector away from the ink cartridge carrier. 6. Push the connector firmly into a new ink cartridge carrier. 7. Replace the ink cartridge and close the tab to secure it in place. 8. Place the ink cartridge carrier into the desired print position. 9. Close the printer access cover and reinstall the output tray. 4-8 A-61500 May 2010
-
 1
1 -
2
-
3
-
4
-
5
-
6
-
7
-
8
-
9
-
10
-
11
-
12
-
13
-
14
-
15
-
16
-
17
-
18
-
19
-
20
-
21
-
22
-
23
-
24
-
25
-
26
-
27
-
28
-
29
-
30
-
31
-
32
-
33
-
 34
34 -
 35
35 -
 36
36 -
 37
37 -
 38
38 -
 39
39 -
 40
40 -
 41
41 -
 42
42 -
 43
43 -
 44
44 -
45
-
46
-
47
-
48
-
49
-
50
-
51
-
52
-
53
-
54
-
55
-
56
-
57
-
58
-
59
-
60
-
61
-
62
-
63
-
64
-
65
-
66
-
67
-
68
-
69
-
70
-
71
-
72
-
73
-
74
-
75
-
76
-
77
-
78
-
79
-
80
 |
 |
4-8
A-61500
May 2010
4.
Remove the ink cartridge if one is present.
5.
Squeeze the metal strips on the connector and pull the connector
away from the ink cartridge carrier.
6.
Push the connector firmly into a new ink cartridge carrier.
7.
Replace the ink cartridge and close the tab to secure it in place.
8.
Place the ink cartridge carrier into the desired print position.
9.
Close the printer access cover and reinstall the output tray.