Konica Minolta Kodak i730 User Guide - Page 63
Messages, Operator Message, See
 |
View all Konica Minolta Kodak i730 manuals
Add to My Manuals
Save this manual to your list of manuals |
Page 63 highlights
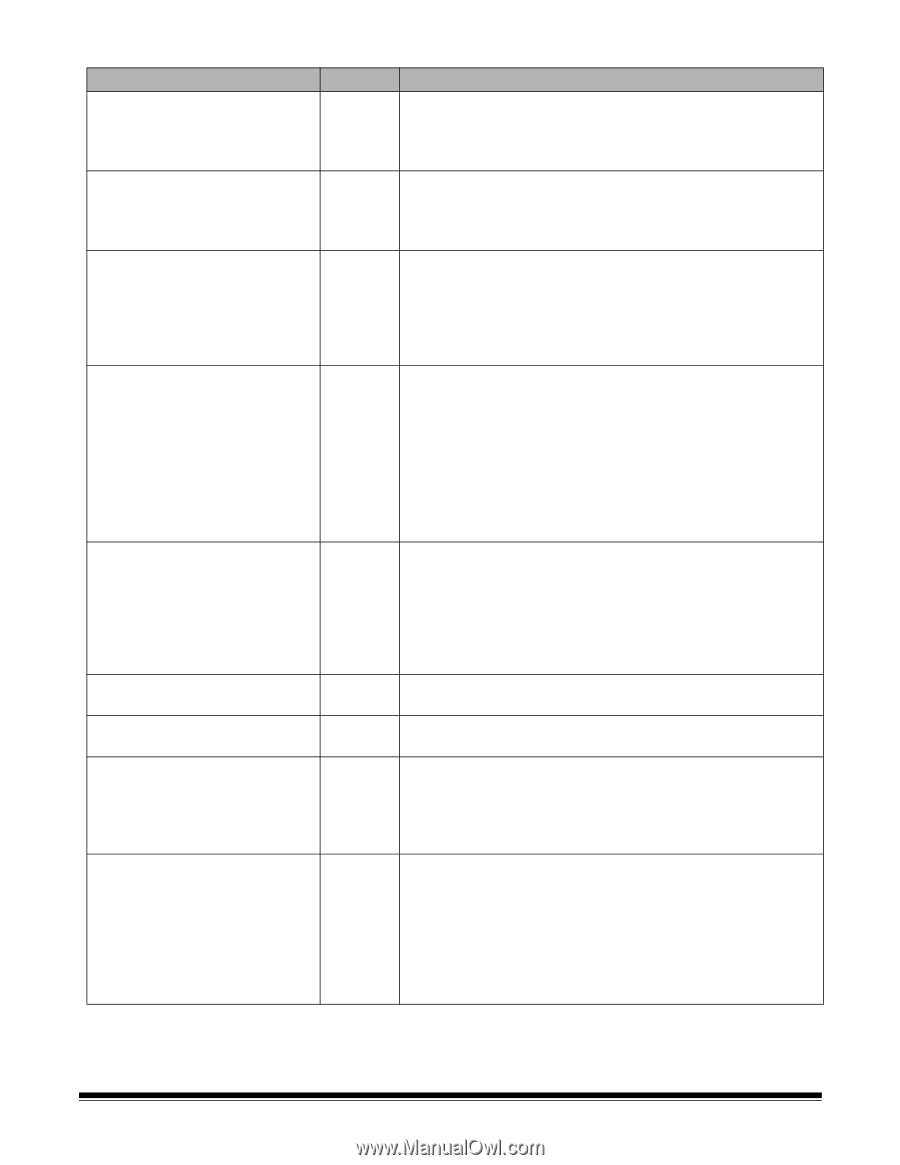
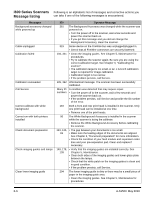
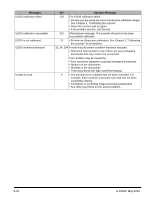
Messages Clean upper imaging guide Document count exceeded maximum value Document too dark to deskew Document too long Front calibration failed Front calibration succeeded Image calibration is suggested Image outside document area Ink cartridge not installed ID# Operator Message 293, 304 The upper imaging guide is dirty or there may be a small piece of paper in the imaging guide area. • Clean the imaging guides. See Chapter 5, Maintenance for procedures. 124 The document counter is larger than the maximum configured value. • Reconfigure the scanner to allow a larger value for the document counter. Refeed the document set. 143 Informational message. The scanner was unable to find the document edges to determine the skew angle. A full-width, nondeskewed image has been created. • The document is too dark. • The image is too large. • Rescan using a fixed-sized cropping window. 35, 36, 183 A document was measured which exceeded the configured maximum allowable length. This may be due to a document overlap. • Check the host monitor to see if there are any overlapped documents that may need to be rescanned. This condition may also be caused by poor document separation. • Replace the separation roller tires and pre-separation pad. See Chapter 5, Maintenance for procedures. 110 The front imaging path calibration failed. • Clean the imaging guides. See Chapter 5, Maintenance for procedures. • Try to calibrate the scanner again. Be sure you are using the correct calibration target. See Chapter 3, "Calibrating the Scanner". • If the problem persists, call Service. 111 Informational message. The front image path has been successfully calibrated. 109 • Calibrate the scanner when the current batch of documents has completed. 177 Based on relative cropping parameters, the image to be generated from this document would be outside the document area. • Make sure the relative cropping offset, width and length are correct and that the correct document is being scanned. 282 An attempt was made to use the Enhanced Printer without a ink cartridge installed. • Be sure the cable is properly connected to the printer carrier and the ink cartridge is installed in the printer carrier. See Chapter 4, The Enhanced Printer and Patch Readers for more information. NOTE:The ink cartridge must be installed before turning on the scanner. A-61500 May 2010 6-7
-
 1
1 -
2
-
3
-
4
-
5
-
6
-
7
-
8
-
9
-
10
-
11
-
12
-
13
-
14
-
15
-
16
-
17
-
18
-
19
-
20
-
21
-
22
-
23
-
24
-
25
-
26
-
27
-
28
-
29
-
30
-
31
-
32
-
33
-
34
-
35
-
36
-
37
-
38
-
39
-
40
-
41
-
42
-
43
-
44
-
45
-
46
-
47
-
48
-
49
-
50
-
51
-
52
-
53
-
54
-
55
-
56
-
57
-
 58
58 -
 59
59 -
 60
60 -
 61
61 -
 62
62 -
 63
63 -
 64
64 -
 65
65 -
 66
66 -
 67
67 -
 68
68 -
69
-
70
-
71
-
72
-
73
-
74
-
75
-
76
-
77
-
78
-
79
-
80
 |
 |