Konica Minolta MS6000 MK II MS6000 MKII MSP3500 User Manual - Page 53
Replacing the Projection Lens, Take hold of the Prism Holder Lever
 |
View all Konica Minolta MS6000 MK II manuals
Add to My Manuals
Save this manual to your list of manuals |
Page 53 highlights
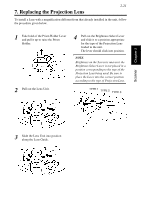
Scanner Chapter 2 2-21 7. Replacing the Projection Lens To install a Lens with a magnification different from that already installed in the unit, follow the procedure given below. 1 Take hold of the Prism Holder Lever and pull it up to raise the Prism Holder. 2 Pull out the Lens Unit. 4 Pull out the Brightness Select Lever and slide it to a position appropriate for the type of the Projection Lens loaded in the unit. The lever should click into position. NOTE Brightness on the Screen is uneven it the Brightness Select Lever is not placed in a position corresponding to the type of the Projection Lens being used. Be sure to place the Lever into the correct position according to the type of Projection Lens. TYPE 1 TYPE 2 TYPE 3 3 Slide the Lens Unit into position along the Lens Guide.
-
 1
1 -
2
-
3
-
4
-
5
-
6
-
7
-
8
-
9
-
10
-
11
-
12
-
13
-
14
-
15
-
16
-
17
-
18
-
19
-
20
-
21
-
22
-
23
-
24
-
25
-
26
-
27
-
28
-
29
-
30
-
31
-
32
-
33
-
34
-
35
-
36
-
37
-
38
-
39
-
40
-
41
-
42
-
43
-
44
-
45
-
46
-
47
-
 48
48 -
 49
49 -
 50
50 -
 51
51 -
 52
52 -
 53
53 -
 54
54 -
 55
55 -
 56
56 -
 57
57 -
 58
58 -
59
-
60
-
61
-
62
-
63
-
64
-
65
-
66
-
67
-
68
-
69
-
70
-
71
-
72
-
73
-
74
-
75
-
76
-
77
-
78
-
79
-
80
-
81
-
82
-
83
-
84
-
85
-
86
-
87
-
88
-
89
-
90
-
91
-
92
-
93
-
94
-
95
-
96
-
97
-
98
-
99
-
100
-
101
-
102
-
103
-
104
-
105
-
106
-
107
-
108
-
109
-
110
-
111
-
112
-
113
-
114
-
115
-
116
-
117
-
118
-
119
-
120
-
121
-
122
-
123
-
124
-
125
-
126
-
127
-
128
-
129
-
130
-
131
-
132
-
133
-
134
-
135
-
136
 |
 |
