Konica Minolta MS6000 MK II MS6000 MKII MSP3500 User Manual - Page 76
Projection Lamp and the Lamp, Turn the Power Switch ON.
 |
View all Konica Minolta MS6000 MK II manuals
Add to My Manuals
Save this manual to your list of manuals |
Page 76 highlights
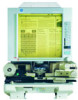
Scanner Chapter 2 2-44 25. Replacing the Projection Lamp 4 Insert a new Projection Lamp so that the mark on its base is facing upwards. Make sure that the new Projection Lamp is inserted securely so that there is no gap between the Projection Lamp and the Lamp Socket. NOTE Do not touch the reflector mirror surface of the Projection Lamp. Fingerprints, smudges or debris should be wiped clean with a soft, dry cloth. 6 Slide the Projection Unit back into the scanner. NOTE If the Projection Unit is not properly installed, power will not be supplied and the scanner will not operate. Mark 7 Turn the Power Switch ON. 5 Insert the new Projection Lamp all the way into the Lamp Holder.
-
 1
1 -
2
-
3
-
4
-
5
-
6
-
7
-
8
-
9
-
10
-
11
-
12
-
13
-
14
-
15
-
16
-
17
-
18
-
19
-
20
-
21
-
22
-
23
-
24
-
25
-
26
-
27
-
28
-
29
-
30
-
31
-
32
-
33
-
34
-
35
-
36
-
37
-
38
-
39
-
40
-
41
-
42
-
43
-
44
-
45
-
46
-
47
-
48
-
49
-
50
-
51
-
52
-
53
-
54
-
55
-
56
-
57
-
58
-
59
-
60
-
61
-
62
-
63
-
64
-
65
-
66
-
67
-
68
-
69
-
70
-
 71
71 -
 72
72 -
 73
73 -
 74
74 -
 75
75 -
 76
76 -
 77
77 -
 78
78 -
 79
79 -
 80
80 -
 81
81 -
82
-
83
-
84
-
85
-
86
-
87
-
88
-
89
-
90
-
91
-
92
-
93
-
94
-
95
-
96
-
97
-
98
-
99
-
100
-
101
-
102
-
103
-
104
-
105
-
106
-
107
-
108
-
109
-
110
-
111
-
112
-
113
-
114
-
115
-
116
-
117
-
118
-
119
-
120
-
121
-
122
-
123
-
124
-
125
-
126
-
127
-
128
-
129
-
130
-
131
-
132
-
133
-
134
-
135
-
136
 |
 |

4
25. Replacing the Projection Lamp
2-44
Scanner
Chapter 2
Insert a new Projection Lamp so that
the mark on its base is facing
upwards. Make sure that the new
Projection Lamp is inserted securely
so that there is no gap between the
Projection Lamp and the Lamp
Socket.
NOTE
Do not touch the reflector mirror surface
of the Projection Lamp. Fingerprints,
smudges or debris should be wiped clean
with a soft, dry cloth.
Mark
5
Insert the new Projection Lamp all
the way into the Lamp Holder.
6
Slide the Projection Unit back into
the scanner.
NOTE
If the Projection Unit is not properly
installed, power will not be supplied and
the
scanner
will not operate.
7
Turn the Power Switch ON.