Konica Minolta MS6000 MK II MS6000 MKII MSP3500 User Manual - Page 63
Using Manual Masking, Selecting Trimming, Defining the Print Area
 |
View all Konica Minolta MS6000 MK II manuals
Add to My Manuals
Save this manual to your list of manuals |
Page 63 highlights
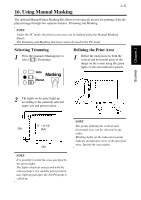
2-31 16. Using Manual Masking The optional Manual Frame Masking Kit allows you to specify an area for printing of the displayed image through two separate features, Trimming and Masking. NOTE Under the PC mode, the print (scan) area can be defined using the Manual Masking Panels. The Trimming and Masking functions cannot be used in the PC mode. Selecting Trimming 1 Press the (manual) Masking key to select (Trimming). Auto Masking Manual Defining the Print Area 1 Define the end points for both the vertical and horizontal areas of the image on the screen using the green lights on the area indication panels. Scanner Chapter 2 2 The lights on the panel light up according to the currently selected paper size and print position. 11" × 8-1/2" ON (A4) ON NOTE It is possible to print the area specified by the green lights. The lights which do not accord with the selected paper size and the print position may light up just after the Job Program is called up. NOTE The points defining the vertical and horizontal area can be selected in any order. Blinking lights on the indication panels indicate an improper entry of the specified area. Specify the area again.
-
 1
1 -
2
-
3
-
4
-
5
-
6
-
7
-
8
-
9
-
10
-
11
-
12
-
13
-
14
-
15
-
16
-
17
-
18
-
19
-
20
-
21
-
22
-
23
-
24
-
25
-
26
-
27
-
28
-
29
-
30
-
31
-
32
-
33
-
34
-
35
-
36
-
37
-
38
-
39
-
40
-
41
-
42
-
43
-
44
-
45
-
46
-
47
-
48
-
49
-
50
-
51
-
52
-
53
-
54
-
55
-
56
-
57
-
 58
58 -
 59
59 -
 60
60 -
 61
61 -
 62
62 -
 63
63 -
 64
64 -
 65
65 -
 66
66 -
 67
67 -
 68
68 -
69
-
70
-
71
-
72
-
73
-
74
-
75
-
76
-
77
-
78
-
79
-
80
-
81
-
82
-
83
-
84
-
85
-
86
-
87
-
88
-
89
-
90
-
91
-
92
-
93
-
94
-
95
-
96
-
97
-
98
-
99
-
100
-
101
-
102
-
103
-
104
-
105
-
106
-
107
-
108
-
109
-
110
-
111
-
112
-
113
-
114
-
115
-
116
-
117
-
118
-
119
-
120
-
121
-
122
-
123
-
124
-
125
-
126
-
127
-
128
-
129
-
130
-
131
-
132
-
133
-
134
-
135
-
136
 |
 |
