Konica Minolta bizhub 363 bizhub 423/363/283/223 Copy Operations User Guide - Page 87
Book Copy/Repeat], Book Copy]
 |
View all Konica Minolta bizhub 363 manuals
Add to My Manuals
Save this manual to your list of manuals |
Page 87 highlights
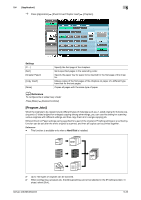
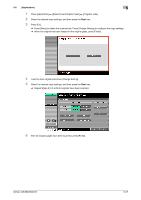
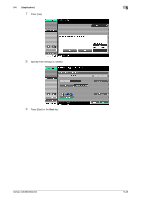
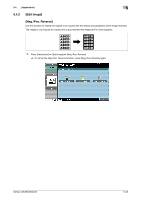
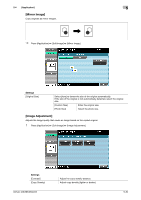
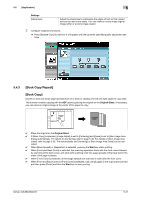
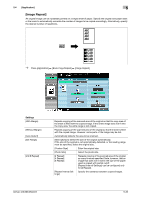
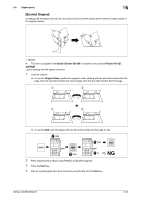
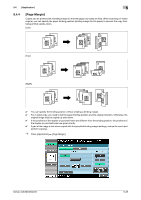
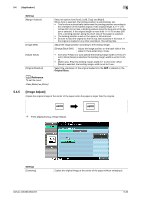
5.4 [Application] 5 Settings [Sharpness] Adjust the sharpness to emphasize the edges of text so that copied text can be read more easily. You can make an overly sharp original image softer or a blurry image clearer. 2 Configure respective functions. % Press [Sample Copy] to see how it will appear with the currently specified quality adjustment settings. 5.4.3 [Book Copy/Repeat] [Book Copy] Divides or does not divide page spreads (such as a book or catalog) into left and right pages to copy data. This function enables copying with the ADF open by placing the original on the Original Glass. If necessary, you can place an original image at the center of the paper to copy. SURVEYOR'S REPORT SURVEYOR'S REPORT 0 Place the original on the Original Glass. 0 If [Book Copy] is selected, [Image Adjust] is set to [Centering] and [Erase] is set to [Non-Image Area Erase] automatically. For details on [Centering], refer to page 5-36. For details on [Non-Image Area Erase], refer to page 5-38. The automatically set [Centering] or [Non-Image Area Erase] can be cancelled. 0 When [Book Spread] or [Separation] is selected, pressing the Start key starts printing. 0 When [Front and Back Cover] is selected, the scanning operation starts with the front cover followed by scanning of the back cover, and ends with scanning of all two-page spreads of the body text in the order of the page numbers. 0 When [Front Cover] is selected, all two-page spreads are scanned in order after the front cover. 0 When [Front and Back Cover] or [Front Cover] is selected, wait until all pages in the original are scanned and then press [Finish] and then the Start key to start printing. bizhub 423/363/283/223 5-31
-
 1
1 -
2
-
3
-
4
-
5
-
6
-
7
-
8
-
9
-
10
-
11
-
12
-
13
-
14
-
15
-
16
-
17
-
18
-
19
-
20
-
21
-
22
-
23
-
24
-
25
-
26
-
27
-
28
-
29
-
30
-
31
-
32
-
33
-
34
-
35
-
36
-
37
-
38
-
39
-
40
-
41
-
42
-
43
-
44
-
45
-
46
-
47
-
48
-
49
-
50
-
51
-
52
-
53
-
54
-
55
-
56
-
57
-
58
-
59
-
60
-
61
-
62
-
63
-
64
-
65
-
66
-
67
-
68
-
69
-
70
-
71
-
72
-
73
-
74
-
75
-
76
-
77
-
78
-
79
-
80
-
81
-
 82
82 -
 83
83 -
 84
84 -
 85
85 -
 86
86 -
 87
87 -
 88
88 -
 89
89 -
 90
90 -
 91
91 -
 92
92 -
93
-
94
-
95
-
96
-
97
-
98
-
99
-
100
-
101
-
102
-
103
-
104
-
105
-
106
-
107
-
108
-
109
-
110
-
111
-
112
-
113
-
114
-
115
-
116
-
117
-
118
-
119
-
120
-
121
-
122
-
123
-
124
-
125
-
126
-
127
-
128
-
129
-
130
-
131
-
132
-
133
-
134
-
135
-
136
-
137
-
138
-
139
-
140
-
141
-
142
-
143
-
144
-
145
-
146
-
147
-
148
-
149
-
150
-
151
-
152
-
153
-
154
-
155
-
156
-
157
-
158
-
159
-
160
-
161
-
162
-
163
-
164
-
165
-
166
-
167
-
168
-
169
-
170
-
171
-
172
-
173
-
174
-
175
-
176
-
177
-
178
-
179
-
180
-
181
-
182
-
183
-
184
-
185
-
186
-
187
-
188
-
189
-
190
-
191
-
192
-
193
-
194
-
195
-
196
-
197
-
198
-
199
-
200
-
201
-
202
-
203
-
204
-
205
-
206
-
207
-
208
-
209
-
210
-
211
-
212
-
213
-
214
-
215
-
216
-
217
-
218
-
219
-
220
-
221
-
222
-
223
-
224
-
225
-
226
-
227
-
228
-
229
-
230
-
231
-
232
-
233
-
234
-
235
-
236
-
237
-
238
-
239
-
240
-
241
-
242
-
243
-
244
-
245
-
246
-
247
-
248
-
249
-
250
-
251
-
252
-
253
-
254
-
255
-
256
-
257
-
258
-
259
-
260
-
261
-
262
-
263
-
264
-
265
-
266
 |
 |
