Konica Minolta bizhub C550 bizhub C550 Box Operations User Manual - Page 31
Guide [Network Scanner Operations]., key was pressed to save a document. - orange lights
 |
View all Konica Minolta bizhub C550 manuals
Add to My Manuals
Save this manual to your list of manuals |
Page 31 highlights
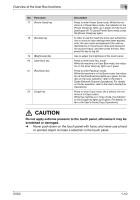
Overview of the User Box functions No. Part name 5 [Utility/Counter] key 6 [Reset] key 7 [Interrupt] key 8 [Stop] key 9 [Proof Copy] key 10 [Start] key 11 Data indicator 12 [C] (clear) key 13 Keypad 14 [Help] key 15 [Enlarge Display] key 16 [Accessibility] key 1 Description Press to display the Utility screen and the Meter Count screen. Press to clear all settings (except programmed settings) entered in the control panel and touch panel. Press to enter Interrupt mode. While the machine is in Interrupt mode, the indicator on the [Interrupt] key lights up in green and the message "Now in Interrupt mode." appears on the touch panel. To cancel Interrupt mode, press the [Interrupt] key again. Pressing the [Stop] key during scanning temporarily stops the scan operation. Press to print a single proof copy to be checked before printing a large number of copies. Press the [Proof Copy] key before scanning or copying, the result can be viewed on the touch panel. ! Detail This key cannot be used if the [User Box] key was pressed to save a document. To preview a document being saved in a user box, press the [Fax/Scan] key. For details on previewing, refer to the User's Guide [Network Scanner Operations]. Press to start scanning. When this machine is ready to begin to scan, the indicator on the [Start] key lights up in blue. If the indicator on the [Start] key lights up in orange, the operation cannot be started. Press to restart a stopped job. Flashes in blue while a print job is being received. Lights up in blue when data is being printed. Press to erase a value (such as the number of copies, a zoom ratio, or a size) entered using the keypad. Use to type in the number of sets to be copied. Use to type in the zoom ratio. Use to type in the various settings. Press to display the Help screen. From this screen, descriptions of the various functions and details of operations can be displayed. Press to enter Enlarge Display mode. If authentication is performed with PageScope Authentication Manager, it does not enter Enlarge Display mode. Press to display the screen for specifying settings for user accessibility functions. C550 1-9
-
 1
1 -
2
-
3
-
4
-
5
-
6
-
7
-
8
-
9
-
10
-
11
-
12
-
13
-
14
-
15
-
16
-
17
-
18
-
19
-
20
-
21
-
22
-
23
-
24
-
25
-
 26
26 -
 27
27 -
 28
28 -
 29
29 -
 30
30 -
 31
31 -
 32
32 -
 33
33 -
 34
34 -
 35
35 -
 36
36 -
37
-
38
-
39
-
40
-
41
-
42
-
43
-
44
-
45
-
46
-
47
-
48
-
49
-
50
-
51
-
52
-
53
-
54
-
55
-
56
-
57
-
58
-
59
-
60
-
61
-
62
-
63
-
64
-
65
-
66
-
67
-
68
-
69
-
70
-
71
-
72
-
73
-
74
-
75
-
76
-
77
-
78
-
79
-
80
-
81
-
82
-
83
-
84
-
85
-
86
-
87
-
88
-
89
-
90
-
91
-
92
-
93
-
94
-
95
-
96
-
97
-
98
-
99
-
100
-
101
-
102
-
103
-
104
-
105
-
106
-
107
-
108
-
109
-
110
-
111
-
112
-
113
-
114
-
115
-
116
-
117
-
118
-
119
-
120
-
121
-
122
-
123
-
124
-
125
-
126
-
127
-
128
-
129
-
130
-
131
-
132
-
133
-
134
-
135
-
136
-
137
-
138
-
139
-
140
-
141
-
142
-
143
-
144
-
145
-
146
-
147
-
148
-
149
-
150
-
151
-
152
-
153
-
154
-
155
-
156
-
157
-
158
-
159
-
160
-
161
-
162
-
163
-
164
-
165
-
166
-
167
-
168
-
169
-
170
-
171
-
172
-
173
-
174
-
175
-
176
-
177
-
178
-
179
-
180
-
181
-
182
-
183
-
184
-
185
-
186
-
187
-
188
-
189
-
190
-
191
-
192
-
193
-
194
-
195
-
196
-
197
-
198
-
199
-
200
-
201
-
202
-
203
-
204
-
205
-
206
-
207
-
208
-
209
-
210
-
211
-
212
-
213
-
214
-
215
-
216
-
217
-
218
-
219
-
220
-
221
-
222
-
223
-
224
-
225
-
226
-
227
-
228
-
229
-
230
-
231
-
232
-
233
-
234
-
235
-
236
-
237
-
238
-
239
-
240
-
241
-
242
-
243
-
244
-
245
-
246
-
247
-
248
-
249
-
250
-
251
-
252
-
253
-
254
-
255
-
256
-
257
-
258
-
259
-
260
-
261
-
262
-
263
-
264
-
265
-
266
-
267
-
268
-
269
-
270
-
271
-
272
-
273
-
274
-
275
-
276
-
277
-
278
-
279
-
280
-
281
-
282
-
283
-
284
-
285
-
286
-
287
-
288
-
289
-
290
-
291
-
292
-
293
-
294
-
295
-
296
-
297
-
298
-
299
-
300
-
301
-
302
-
303
-
304
-
305
-
306
-
307
-
308
-
309
-
310
-
311
-
312
-
313
-
314
-
315
-
316
-
317
-
318
-
319
-
320
-
321
-
322
-
323
-
324
-
325
-
326
-
327
-
328
-
329
-
330
-
331
-
332
-
333
-
334
-
335
-
336
-
337
-
338
-
339
-
340
-
341
-
342
-
343
-
344
-
345
-
346
-
347
-
348
-
349
-
350
-
351
-
352
-
353
-
354
-
355
-
356
-
357
-
358
-
359
 |
 |
