Konica Minolta bizhub PRO 1200/1200P bizhub PRO 1051/1200 Network Scanner User - Page 104
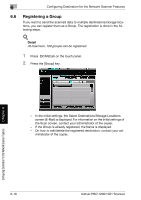
Registering the SMB server
 |
View all Konica Minolta bizhub PRO 1200/1200P manuals
Add to My Manuals
Save this manual to your list of manuals |
Page 104 highlights
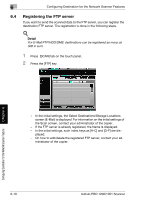
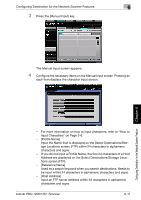
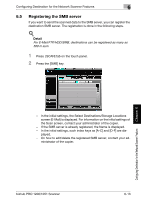
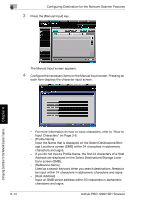
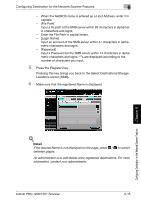
Configuring Destination for the Network Scanner Features 6 6.5 Registering the SMB server If you want to send the scanned data to the SMB server, you can register the destination SMB server. The registration is done in the following steps. ! Detail For E-Mail/FTP/HDD/SMB, destinations can be registered as many as 500 in sum. 1 Press [SCAN] tab on the touch panel. 2 Press the [SMB] key. Configuring Destination for the Network Scanner Features Chapter 6 - In the initial settings, the Select Destinations/Storage Locations screen (E-Mail) is displayed. For information on the initial settings of the Scan screen, contact your administrator of the copier. - If the SMB server is already registered, the Name is displayed. - In the initial settings, such index keys as [A-C] and [D-F] are dis- played. - On how to edit/delete the registered SMB server, contact your ad- ministrator of the copier. bizhub PRO 1200/1051 Scanner 6-13
-
 1
1 -
2
-
3
-
4
-
5
-
6
-
7
-
8
-
9
-
10
-
11
-
12
-
13
-
14
-
15
-
16
-
17
-
18
-
19
-
20
-
21
-
22
-
23
-
24
-
25
-
26
-
27
-
28
-
29
-
30
-
31
-
32
-
33
-
34
-
35
-
36
-
37
-
38
-
39
-
40
-
41
-
42
-
43
-
44
-
45
-
46
-
47
-
48
-
49
-
50
-
51
-
52
-
53
-
54
-
55
-
56
-
57
-
58
-
59
-
60
-
61
-
62
-
63
-
64
-
65
-
66
-
67
-
68
-
69
-
70
-
71
-
72
-
73
-
74
-
75
-
76
-
77
-
78
-
79
-
80
-
81
-
82
-
83
-
84
-
85
-
86
-
87
-
88
-
89
-
90
-
91
-
92
-
93
-
94
-
95
-
96
-
97
-
98
-
 99
99 -
 100
100 -
 101
101 -
 102
102 -
 103
103 -
 104
104 -
 105
105 -
 106
106 -
 107
107 -
 108
108 -
 109
109 -
110
-
111
-
112
-
113
-
114
-
115
-
116
-
117
-
118
-
119
-
120
-
121
-
122
-
123
-
124
-
125
-
126
-
127
-
128
-
129
-
130
-
131
-
132
-
133
-
134
-
135
-
136
-
137
-
138
-
139
-
140
-
141
-
142
-
143
-
144
-
145
-
146
-
147
-
148
-
149
-
150
-
151
-
152
-
153
-
154
-
155
-
156
-
157
-
158
-
159
-
160
-
161
-
162
-
163
-
164
-
165
-
166
-
167
-
168
-
169
-
170
 |
 |
