Konica Minolta bizhub PRO 1200/1200P bizhub PRO 1051/1200 Network Scanner User - Page 22
CAUTION, Before Using the Scanning Features
 |
View all Konica Minolta bizhub PRO 1200/1200P manuals
Add to My Manuals
Save this manual to your list of manuals |
Page 22 highlights
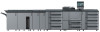
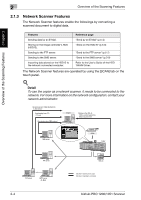
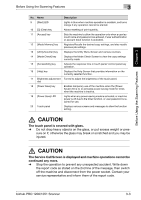
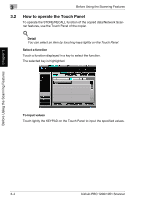
Before Using the Scanning Features Chapter 3 Before Using the Scanning Features 3 No. Name Description 9 [Start] LED Lights in blue when machine operation is available, and turns orange if any operation cannot be started. 10 [C] (Clear) key Allows resetting of print quantity. 11 [Access] key Sets the machine to allow the operation only when a user/account name and password are entered, if user authentication or account track function is activated. 12 [Mode Memory] key Registers/Recalls the desired copy settings, and also recalls previous job settings. 13 [Utility/Counter] key Displays the Utility Menu Screen and various counters. 14 [Mode Check] key Displays the Mode Check Screen to view the copy settings currently made. 15 [Accessibility] key Adjusts the response time in touch panel/ control panel key operation. 16 [Help] key Displays the Help Screen that provides information on the currently selected function. 17 Brightness adjustment Turned to adjust the brightness of the touch panel. dial 18 [Power Save] key Enables temporary use of the machine when the [Power Save] LED is lit, or activates power-saving mode for times when the machine is inactive. 19 [Power Save] LED Lights when any power-saving mode is activated, or machine power is off due to the timer function, or user password is required for use. 20 Touch panel Displays various screens and messages to allow the function setting. 7 CAUTION The touch panel is covered with glass. % Do not drop heavy objects on the glass, or put excess weight or pres- sure on it; otherwise the glass may break or scratched and you may be injured. 7 CAUTION The Service Call Screen is displayed and machine operations cannot be continued any more. % Stop the operation to prevent any unexpected accident. Write down the report code as stated on the 2nd line of the message, then switch off the machine and disconnect from the power socket. Contact your service representative and inform them of the report code. bizhub PRO 1200/1051 Scanner 3-3
-
 1
1 -
2
-
3
-
4
-
5
-
6
-
7
-
8
-
9
-
10
-
11
-
12
-
13
-
14
-
15
-
16
-
 17
17 -
 18
18 -
 19
19 -
 20
20 -
 21
21 -
 22
22 -
 23
23 -
 24
24 -
 25
25 -
 26
26 -
 27
27 -
28
-
29
-
30
-
31
-
32
-
33
-
34
-
35
-
36
-
37
-
38
-
39
-
40
-
41
-
42
-
43
-
44
-
45
-
46
-
47
-
48
-
49
-
50
-
51
-
52
-
53
-
54
-
55
-
56
-
57
-
58
-
59
-
60
-
61
-
62
-
63
-
64
-
65
-
66
-
67
-
68
-
69
-
70
-
71
-
72
-
73
-
74
-
75
-
76
-
77
-
78
-
79
-
80
-
81
-
82
-
83
-
84
-
85
-
86
-
87
-
88
-
89
-
90
-
91
-
92
-
93
-
94
-
95
-
96
-
97
-
98
-
99
-
100
-
101
-
102
-
103
-
104
-
105
-
106
-
107
-
108
-
109
-
110
-
111
-
112
-
113
-
114
-
115
-
116
-
117
-
118
-
119
-
120
-
121
-
122
-
123
-
124
-
125
-
126
-
127
-
128
-
129
-
130
-
131
-
132
-
133
-
134
-
135
-
136
-
137
-
138
-
139
-
140
-
141
-
142
-
143
-
144
-
145
-
146
-
147
-
148
-
149
-
150
-
151
-
152
-
153
-
154
-
155
-
156
-
157
-
158
-
159
-
160
-
161
-
162
-
163
-
164
-
165
-
166
-
167
-
168
-
169
-
170
 |
 |
