Kyocera FS 920 FS-820/920 Operation Guide
Kyocera FS 920 - B/W Laser Printer Manual
 |
View all Kyocera FS 920 manuals
Add to My Manuals
Save this manual to your list of manuals |
Kyocera FS 920 manual content summary:
- Kyocera FS 920 | FS-820/920 Operation Guide - Page 1
FS-820 FS-920 Operation Guide - Kyocera FS 920 | FS-820/920 Operation Guide - Page 2
- Kyocera FS 920 | FS-820/920 Operation Guide - Page 3
Software 13 5 Printing 15 Printing a Document 15 Manual Duplex 16 6 Maintenance 17 Toner Container 18 Cleaning the Printer 20 Prolonged Non-Use and Moving the Printer 22 7 Troubleshooting 23 General Guide 23 Print Quality Problems 24 Paper Jams 24 8 Options 29 9 Specifications 31 - Kyocera FS 920 | FS-820/920 Operation Guide - Page 4
ii OPERATION GUIDE - Kyocera FS 920 | FS-820/920 Operation Guide - Page 5
Safety Information FCC statement (for users in the United States) This device complies with Part 15 of the FCC Rules. and, if not installed and used in accordance with the instructions, may cause harmful interference to radio communications. However, there prohibited. OPERATION GUIDE iii - Kyocera FS 920 | FS-820/920 Operation Guide - Page 6
the protective cap supplied. NOTE: Use shielded interface cable. Safety information Laser safety This printer is certified as a Class 1 laser product under the U.S. Department of Health and Human Services (DHHS) Radiation Performance Standard according to Radiation Control for Health and Safety - Kyocera FS 920 | FS-820/920 Operation Guide - Page 7
the printer (Laser radiation laser products on August 2, 1976. These regulations apply to laser products manufactured after August 1, 1976. Compliance is mandatory for products marketed in the United States. A label indicating compliance with the CDRH regulations must be attached to laser - Kyocera FS 920 | FS-820/920 Operation Guide - Page 8
they may touch dangerous voltage points or short out parts that could result in a risk of fire or electric shock. Never spill liquid of any kind on the product. 10 Except as explained elsewhere in the Operation Guide, do not attempt to service this product yourself. Removing covers may expose you to - Kyocera FS 920 | FS-820/920 Operation Guide - Page 9
and 73/23/EEC Manufacturer's name: Kyocera Mita Corporation, Tamaki Plant Manufacturer's address: 704-19 Nojino, Tamaki-Cho, Watarai-Gun, Mie Ken 519-0497, Japan Declares that the product: Product name: Model number: Page Printer FS-820 / FS-920 Conforms to the following product specifications - Kyocera FS 920 | FS-820/920 Operation Guide - Page 10
that the product: Product name: Model number: Description of device: Page Printer FS-820 / FS-920 This Page Printer Model FS-820 is the 16 ppm (FS-920 is the 18 ppm); A4 size and utilized plain paper; laser; dry toner etc. Conforms to the following product specifications. - AS/NZS 3548: 1995 - Kyocera FS 920 | FS-820/920 Operation Guide - Page 11
number: Laser Printer FS-820 / FS-920 Kyocera Kyocera Mita America Kyocera Mita Corporation, Tamaki Plant Manufacturer's address: 704-19 Nojino, Tamaki-Cho, Watarai-Gun, Mie-Ken 519-0497, Japan This device complies with Part - User's instruction that , any interruption of service, loss of business - Kyocera FS 920 | FS-820/920 Operation Guide - Page 12
manufacture and sale of equipment that uses energy more efficiently. This printer is equipped instruction manual provided with the printer. Initial Sleep Mode Setting 5 minutes (15 minutes) Power Consumption in Sleep Mode FS-820: 4.5W (20W) [220 to 240V, 50Hz/60Hz] 4.0W (20W) [120V, 60Hz] FS-920 - Kyocera FS 920 | FS-820/920 Operation Guide - Page 13
Group, Redondo Beach, CA 90278, U.S.A. This product was developed using the Tornado™ Real Time Operating System and Tools from up to three printers. If you need to have access to the fonts on more than three printers, you need to acquire a multi-user license agreement which . OPERATION GUIDE xi - Kyocera FS 920 | FS-820/920 Operation Guide - Page 14
the Software is free from all bugs, errors and omissions. THE PARTIES AGREE THAT ALL the Software and Typefaces is repair or replacement of defective parts, upon their return to Agfa Japan. IN NO EVENT 9 New York, U.S.A. law governs this Agreement. 10 You shall not sublicense, sell, lease, or GUIDE - Kyocera FS 920 | FS-820/920 Operation Guide - Page 15
the exclusion of implied warranties, so the above exclusion may not apply to you. SUPPLEMENT TO AGREEMENT FOR SOFTWARE BUNDLING AND DISTRIBUTION FOR ALDC. OPERATION GUIDE xiii - Kyocera FS 920 | FS-820/920 Operation Guide - Page 16
This limitation of remedies also applies to any developer of Programs supplied to IBM. IBM's and the developer's limitations of remedies are not cumulative. Such developer is an intended beneficiary of this Section. Some the laws of the country in which you acquired the Program. xiv OPERATION GUIDE - Kyocera FS 920 | FS-820/920 Operation Guide - Page 17
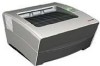
1 Machine Overview Indicators Top Cover Go Key Cancel Key Output Tray Rear Cover Paper Stopper Power Switch Paper Cassette Manual Feed Tray Parallel Interface USB Interface Power Cord OPERATION GUIDE 1 - Kyocera FS 920 | FS-820/920 Operation Guide - Page 18
, call for service. KM-NET for Clients (a software included in the CD-ROM) will provide more detailed information about the printer status. Key Status Key Go Cancel Status Operation At Ready Press momentarily Press for 3 to 10 seconds Press for 10 seconds or more At Error Press momentarily - Kyocera FS 920 | FS-820/920 Operation Guide - Page 19
Letter, Legal, Folio, Oficio II, Statement, Executive, A6, B6, B5 (ISO), Envelope #10, Envelope #9, Envelope Monarch, Envelope #6, Envelope C5, Envelope DL and 16K Paper Cassette - 250 Specification Cassette: 60 - 105 g/m2 (16 to 28 lb/ream) Manual Feed Tray: 60 - 163 g/m2 (16 to 43 lb/ream) - Kyocera FS 920 | FS-820/920 Operation Guide - Page 20
Paper into a Cassette 1 Pull the cassette completely out of the printer. IMPORTANT: When pulling the cassette out of the printer, ensure it is supported and does not fall out. 2 Press the release button and adjust the paper length guide to the paper size required. 3 Adjust the position of the - Kyocera FS 920 | FS-820/920 Operation Guide - Page 21
avoid skewed paper feed and/or a paper jam. Do not load paper above the triangle mark located on the width guide. Ensure the side to be printed is facing down and the paper is not folded, curled, or damaged. 5 Push the cassette back into the printer until it stops. Loading Paper OPERATION - Kyocera FS 920 | FS-820/920 Operation Guide - Page 22
Paper placed on the Manual Feed Tray is automatically fed and overrides the paper cassette. 1 Pull out the cassette to access the Manual Feed Tray. 2 Pull the Manual Feed Tray up and out. 3 Pull out the front of the Manual Feed Tray. 4 Push the cassette back into the printer. 6 OPERATION GUIDE - Kyocera FS 920 | FS-820/920 Operation Guide - Page 23
Loading Paper NOTE: Prior to purchasing envelopes, print a sample to check quality Start printing after loading the Manual Feed Tray. 6 After use, move the width guides fully outwards and close the Manual Feed Tray. NOTE: For further information about the sizes and types of media that can be used - Kyocera FS 920 | FS-820/920 Operation Guide - Page 24
Loading Paper 8 OPERATION GUIDE - Kyocera FS 920 | FS-820/920 Operation Guide - Page 25
the printer close to the computer. The connection cable should be shielded and no longer than 3 meters (10 feet) long. 2 Close the clips on both sides to fix the connector in place. 3 Connect the other end of the printer cable to the computer's parallel interface connector. OPERATION GUIDE 9 - Kyocera FS 920 | FS-820/920 Operation Guide - Page 26
should be 5 meters (16 feet) or less. NOTE: Ensure the printer's power switch is off. Only use the power cord supplied with the printer. 1 Connect the power cord to the Power Cord Connector at the rear of the printer. 2 Connect the other end of the power cord to a power outlet. 10 OPERATION GUIDE - Kyocera FS 920 | FS-820/920 Operation Guide - Page 27
on the power, two indicators will start fast flashing. When the printer is first switched on after toner installation, there will be a delay of approximately 15 minutes before the printer gets ready to print. Once the Ready indicator lights, printer installation is complete. OPERATION GUIDE 11 - Kyocera FS 920 | FS-820/920 Operation Guide - Page 28
Connections 12 OPERATION GUIDE - Kyocera FS 920 | FS-820/920 Operation Guide - Page 29
fails to launch, use Windows Explorer to access the CD-ROM and select Setup.exe. 4 Select Install KX Driver and follow the on-screen instructions to complete the software installation. 5 Once the installation is complete, the Printer Installed Successfully dialog box displays. OPERATION GUIDE 13 - Kyocera FS 920 | FS-820/920 Operation Guide - Page 30
Loading Software 14 OPERATION GUIDE - Kyocera FS 920 | FS-820/920 Operation Guide - Page 31
Manual KX Printer Drivers guide. Printing a Document 1 Ensure the paper required is loaded in the printer. 2 From the application File menu, select Print. The Print dialog box displays. 3 Select the drop down list of printer names. All the printers installed are listed. Select the FS-820 or FS-920 - Kyocera FS 920 | FS-820/920 Operation Guide - Page 32
order. NOTE: Ensure Print Instructions is selected to receive the instruction sheet. Continue to use the printer. NOTE: Nothing will be printed on the instruction sheet. If the paper is curled, straighten it out before loading the paper in the cassette. 5 Select OK on the Manual Duplex instruction - Kyocera FS 920 | FS-820/920 Operation Guide - Page 33
toner container is replaced. Drum Unit The drum unit should be removed to allow for printer cleaning tasks. The charger wire should be cleaned using the Charger Cleaner every time the toner container is replaced. Maintenance task instructions are provided on the following pages. OPERATION GUIDE - Kyocera FS 920 | FS-820/920 Operation Guide - Page 34
Container To replace the Toner Container use the instructions below. CAUTION: Do not attempt to incinerate the Toner Container. Dangerous sparks may cause burns. Do not attempt to force open or destroy the Toner Container. 1 Open the Top Cover. 2 Turn Lock Lever A to the unlock B position, push - Kyocera FS 920 | FS-820/920 Operation Guide - Page 35
Toner Container in the printer. Push firmly on the top of the container at the positions marked PUSH HERE, until you hear a click. Turn Lock Lever A to the lock position and close the Top Cover. A Toner Container Capacity There are two different Toner Menu tab. 3 Select Toner and then Black. 4 - Kyocera FS 920 | FS-820/920 Operation Guide - Page 36
replacement. 1 Open the Top Cover. 2 Lift the Developer Unit together with the Toner Container out of the printer. 3 Using the green handles lift the Drum Unit out of the machine. NOTE: The Drum Unit is sensitive to light. Never expose the Drum Unit to light for more than five minutes. 4 Place the - Kyocera FS 920 | FS-820/920 Operation Guide - Page 37
it to its original position. Maintenance c 7 When cleaning is complete, return the Drum Unit to its position, aligning the guides at both ends with the slots in the printer. 8 Insert the Developer Unit together with the Toner Container, back into the machine. Close the Top Cover. OPERATION - Kyocera FS 920 | FS-820/920 Operation Guide - Page 38
toner inside the printer. - Be sure to consult a service technician before attempting long- distance transportation of the printer. WARNING: If you ship the printer, remove and pack the developer unit and drum unit in a plastic bag and ship them separately from the printer. 22 OPERATION GUIDE - Kyocera FS 920 | FS-820/920 Operation Guide - Page 39
Troubleshooting General Guide There are a number of printer problems which can be corrected by a user. Use the table below to identify a problem and perform the corrective action. Symptom Check Items Corrective Action The printer 10 for the On (I) position. information. The printer prints - Kyocera FS 920 | FS-820/920 Operation Guide - Page 40
for information. Check the developer unit and drum unit are installed correctly. Refer to page 21 for information. Dirt on the top edge or back of the Check the registration roller is not paper soiled with toner. Refer to page 21 for information. Paper Jams The printer will stop when a paper - Kyocera FS 920 | FS-820/920 Operation Guide - Page 41
Cover and remove the jammed paper by pulling it out. Troubleshooting 2 Open and close the Top Cover to clear the error. The printer warms up and resumes printing. Paper Cassette 1 Pull out and close the Top Cover to clear the error. The printer warms up and resumes printing. OPERATION GUIDE 25 - Kyocera FS 920 | FS-820/920 Operation Guide - Page 42
step 2. 2 Open the top cover and lift the Developer Unit together with the Toner Container out of the printer. 3 Using the green handles lift the Drum Unit out of the machine. NOTE: The Drum Unit is sensitive to light. Never expose the Drum Unit to light for more than five minutes. 4 If the jammed - Kyocera FS 920 | FS-820/920 Operation Guide - Page 43
with the Toner Container, back into the machine. Close the Top Cover. 7 Reload the Manual Feed Tray. The printer warms up and resumes printing. Printer 1 Open the top cover and lift the Developer Unit together with the Toner Container out of the printer. Troubleshooting OPERATION GUIDE 27 - Kyocera FS 920 | FS-820/920 Operation Guide - Page 44
to be pinched by rollers, pull it along the normal running direction of the paper. 4 Return the Drum Unit to its position, aligning the guides at both ends with the slots in the printer. 5 Insert the Developer Unit together with the Toner Container, back into the machine. Close the Top Cover. The - Kyocera FS 920 | FS-820/920 Operation Guide - Page 45
memory can be increased to a maximum of 272 MB (FS-820) or 288 MB (FS-920). Memory (CompactFlash) Card Slot A Memory Card is a microchip card that may contain option fonts, macros, forms etc. The printer reads the contents of the card into its internal memory when switched on. OPERATION GUIDE 29 - Kyocera FS 920 | FS-820/920 Operation Guide - Page 46
Options 30 OPERATION GUIDE - Kyocera FS 920 | FS-820/920 Operation Guide - Page 47
Feed Tray Paper Feed Source Capacity - Cassette - Manual Feed Tray Output Tray Capacity Warm-up Time First Print Resolution Monthly Duty Controller Description Electrophotography using laser scan FS-820: A4 16 pages per minute / Letter 17 pages per minute FS-920: A4 18 pages per minute / Letter 19 - Kyocera FS 920 | FS-820/920 Operation Guide - Page 48
FS-920: 32 MB FS-820: 272 MB FS-920: 288 MB 1 (IEEE 1284) 1 10 - 32.5 °C 20 - 80 % 2,000 m maximum 1,500 lux maximum 380 × 245 × 390 mm 15 × 9.6 × 15.4" Approx. 9.2 kg / 20.3 lbs During printing: LpA = 49 dB (A) During standby: LpA = 28 dB (A) During sleep mode: Immeasurably low 32 OPERATION GUIDE - Kyocera FS 920 | FS-820/920 Operation Guide - Page 49
MEMO A1 - Kyocera FS 920 | FS-820/920 Operation Guide - Page 50
- Kyocera FS 920 | FS-820/920 Operation Guide - Page 51
©2004 is a trademark of Kyocera Corporation - Kyocera FS 920 | FS-820/920 Operation Guide - Page 52
Revision 1.1 2004.10
-
 1
1 -
 2
2 -
 3
3 -
 4
4 -
 5
5 -
 6
6 -
 7
7 -
8
-
9
-
10
-
11
-
12
-
13
-
14
-
15
-
16
-
17
-
18
-
19
-
20
-
21
-
22
-
23
-
24
-
25
-
26
-
27
-
28
-
29
-
30
-
31
-
32
-
33
-
34
-
35
-
36
-
37
-
38
-
39
-
40
-
41
-
42
-
43
-
44
-
45
-
46
-
47
-
48
-
49
-
50
-
51
-
52
 |
 |
Operation Guide
FS-820
FS-920