LG HMC030KD1 Service Manual - Page 28
conductor.
 |
View all LG HMC030KD1 manuals
Add to My Manuals
Save this manual to your list of manuals |
Page 28 highlights
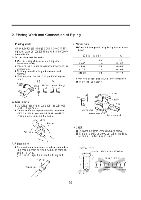
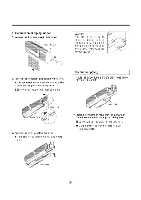
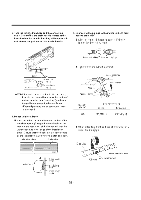
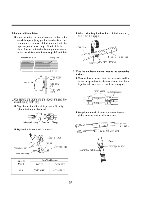
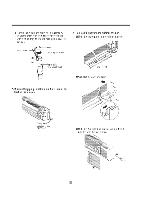
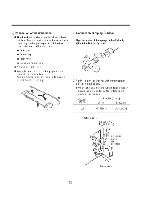
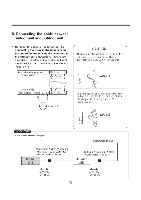
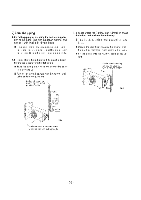
■ Bundle the piping and drain hose together by wrapping them with cloth tape over the range within which they fit into the rear piping housing section. ❑rain hose Pipe Vinyl tape(narrow) 9. Reinstall the parts to the original position. ■ Refix the lower panel to the original position. 4 Wrap with vinyl tape(wide) Lower panel • Connect display conductor. 8. Reroute the pipings and the drain hose across the back of the chassis. 2W Main PCB Piping for passage through piping hole ■ Refix the front right side panel to the original position with the two screws. - 28 -
-
 1
1 -
2
-
3
-
4
-
5
-
6
-
7
-
8
-
9
-
10
-
11
-
12
-
13
-
14
-
15
-
16
-
17
-
18
-
19
-
20
-
21
-
22
-
 23
23 -
 24
24 -
 25
25 -
 26
26 -
 27
27 -
 28
28 -
 29
29 -
 30
30 -
 31
31 -
 32
32 -
 33
33 -
34
-
35
-
36
-
37
-
38
-
39
-
40
-
41
-
42
-
43
-
44
-
45
-
46
-
47
-
48
-
49
-
50
-
51
-
52
-
53
-
54
-
55
-
56
-
57
-
58
-
59
-
60
-
61
-
62
-
63
-
64
 |
 |

■
Bundle
the
piping
and
drain
hose
together
by
wrapping
them
with
cloth
tape
over
the
range
within
which
they
fit
into
the
rear
piping
housing
section.
❑rain
hose
Pipe
Vinyl
tape(narrow)
9.
Reinstall
the
parts
to
the
original
position.
■
Refix
the
lower
panel
to
the
original
position.
Wrap
with
vinyl
tape(wide)
Lower
panel
8.
Reroute
the
pipings
and
the
drain
hose
across
the
back
of
the
chassis.
Piping
for
passage
through
piping
hole
-
28
-
•
Connect
display
conductor.
2W
4
Main
PCB
■
Refix
the
front
right
side
panel
to
the
original
position
with
the
two
screws.