LG HMC030KD1 Service Manual - Page 35
ThErcral:Ethe
 |
View all LG HMC030KD1 manuals
Add to My Manuals
Save this manual to your list of manuals |
Page 35 highlights
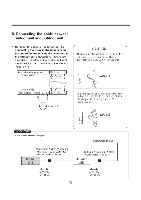
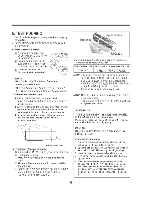
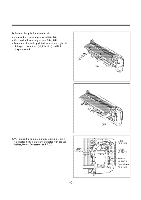
soap water method (1)-Remove the caps from the gas side and liquid side valves. wove the=service-port cap from the tide valve. 13) To-open-the gas side valve turn the valve stern-counter- cloc vi7 approximately 90°, wait for about and close it. (4)-Apply a soap waterlwa liquid neutral detergent on t indoor unit connectien er eutdoof-u t-sonnections by soft brush to chesk-iggage ot-the-Gonnecting points of the piping. (5) If bubbles-eenie-out, the pipes-have-leakage. 3. Evacuation • Connect the chargei escribed In the preceding stepElmthe vacuum pump to eVelLU the tubing and indoor unit. Confirm tl:-Lo" knob of the anifold valve is open. ThErcral:Ethe vacuumtpomp The oper n time for evacuation varies with tubing length and-capacity the pump. The following table shows the time required for evemation -Required time for evacuation when 30 gaUh vacuum pump is used tubing length is less If tubing length is longe than 10m (33 ft.),_ than (33 10 min. or more 15 min or more When the desired vacuum is h dclose th "Lo" knob of the manifold valvc a vacuum pump. ling the j • With a service valve wrench, turolhe_valve_ste of liquid side valve counter-clockwise to full open the-valve- IN Turn thesalweztwatt gas_side_valve counterclockwise to fully open the ve ■ Loosen the charge nose-connected to the ga side seatice4vat slightly_taxelease the pressure, then remove the hose. • Replace the flare nut and its bonnet on the gas side service port and fasten_the flare nut securely lealixe_Ladjustable wrench-This process is very important to prevent leakage from the system. • Replace the valve caps at both gas and liquid side service valowancrfasten thenitight. This completes -auurging with altizuum pump. The air conditioner is now ready to test run. 3 way valve ay qu sine Cap Indoor unit 30K Outdoor unit Pressure gauge ./: ./: Lo HI Vacuum ou - 35
-
 1
1 -
2
-
3
-
4
-
5
-
6
-
7
-
8
-
9
-
10
-
11
-
12
-
13
-
14
-
15
-
16
-
17
-
18
-
19
-
20
-
21
-
22
-
23
-
24
-
25
-
26
-
27
-
28
-
29
-
 30
30 -
 31
31 -
 32
32 -
 33
33 -
 34
34 -
 35
35 -
 36
36 -
 37
37 -
 38
38 -
 39
39 -
 40
40 -
41
-
42
-
43
-
44
-
45
-
46
-
47
-
48
-
49
-
50
-
51
-
52
-
53
-
54
-
55
-
56
-
57
-
58
-
59
-
60
-
61
-
62
-
63
-
64
 |
 |
