LG HMC036KDT1 Service Manual - Page 48
Connecting, Pipings, cable, Outdoor
 |
View all LG HMC036KDT1 manuals
Add to My Manuals
Save this manual to your list of manuals |
Page 48 highlights
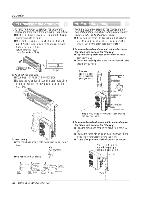
Installation (3) Connecting Pipings and the cable to Outdoor unit 1) Connecting the pipings to the Outdoor unit 1. Align the center of the pipings and sufficiently tighten the flare nut with fingers. 2. Finally, tighten the flare nut with torque wrench until the wrench clicks. ■ When tightening the flare nut with torque wrench, ensure the direction for tightening follows the arrow on the wrench. Pipe Size Liquid Side (1/4") Gas Side (3/8") Gas Side (1/2") Torque 1.8kg.m 4.2kg•m 5.5kg.m Outdoor unit A-UNIT Gas side piping B-UNIT Evaporator side piping Torque wrench C-UNIT Gas side piping Evaporator side piping 48 MPS Multi Air Conditioner
-
 1
1 -
2
-
3
-
4
-
5
-
6
-
7
-
8
-
9
-
10
-
11
-
12
-
13
-
14
-
15
-
16
-
17
-
18
-
19
-
20
-
21
-
22
-
23
-
24
-
25
-
26
-
27
-
28
-
29
-
30
-
31
-
32
-
33
-
34
-
35
-
36
-
37
-
38
-
39
-
40
-
41
-
42
-
 43
43 -
 44
44 -
 45
45 -
 46
46 -
 47
47 -
 48
48 -
 49
49 -
 50
50 -
 51
51 -
 52
52 -
 53
53 -
54
-
55
-
56
-
57
-
58
-
59
-
60
-
61
-
62
-
63
-
64
-
65
-
66
 |
 |

Installation
(3)
Connecting
Pipings
and
the
cable
to
Outdoor
unit
1)
Connecting
the
pipings
to
the
Outdoor
unit
1.
Align
the
center
of
the
pipings
and
sufficiently
tighten
the
flare
nut
with
fingers.
2.
Finally,
tighten
the
flare
nut
with
torque
wrench
until
the
wrench
clicks.
■
When
tightening
the
flare
nut
with
torque
wrench,
ensure
the
direction
for
tightening
follows
the
arrow
on
the
wrench.
Pipe
Size
Torque
Liquid
Side
(1/4")
1.8kg.m
Gas
Side
(3/8")
4.2kg•m
Gas
Side
(1/2")
5.5kg.m
Outdoor
unit
A
-UNIT
Gas
side
piping
B
-UNIT
Evaporator
side
piping
Torque
wrench
C
-UNIT
Gas
side
piping
Evaporator
side
piping
48
MPS
Multi
Air
Conditioner