LG HMC036KDT1 Service Manual - Page 58
Disassembly, parts, Indoor, Multi, Conditioner
 |
View all LG HMC036KDT1 manuals
Add to My Manuals
Save this manual to your list of manuals |
Page 58 highlights
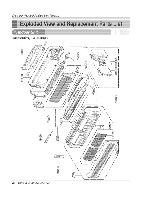
Disassembly of the parts (Indoor unit) Pr Disassembly of the parts (Indoor unit) Warning : Disconnect the unit from power supply before making any checks. Be sure the power switch is set to "OFF". To remove the Grille from the Chassis. • Set the up-and-down air discharge louver to open position (horizontally) by finger pressure. • Remove the securing screws • To remove the Grille, pull the lower left and right side of the grille toward you (slightly tilted) and lift it straight upward. Up-and-down air direction louver Screw 1. To remove the sensor, housing connect, step motor conductor with sensor holder, Motor, Evaporator & P.C.B. Motor Conductor ciT7111 Sensor Conductor Step Motor Conductor 58 MPS Multi Air Conditioner
-
 1
1 -
2
-
3
-
4
-
5
-
6
-
7
-
8
-
9
-
10
-
11
-
12
-
13
-
14
-
15
-
16
-
17
-
18
-
19
-
20
-
21
-
22
-
23
-
24
-
25
-
26
-
27
-
28
-
29
-
30
-
31
-
32
-
33
-
34
-
35
-
36
-
37
-
38
-
39
-
40
-
41
-
42
-
43
-
44
-
45
-
46
-
47
-
48
-
49
-
50
-
51
-
52
-
 53
53 -
 54
54 -
 55
55 -
 56
56 -
 57
57 -
 58
58 -
 59
59 -
 60
60 -
 61
61 -
 62
62 -
 63
63 -
64
-
65
-
66
 |
 |

Disassembly
of
the
parts
(Indoor
unit)
P
r
Disassembly
of
the
parts
(Indoor
unit)
Warning
:
Disconnect
the
unit
from
power
supply
before
mak-
ing
any
checks.
Be
sure
the
power
switch
is
set
to
"OFF".
To
remove
the
Grille
from
the
Chassis.
•
Set
the
up-and-down
air
discharge
louver
to
open
position
(horizontally)
by
finger
pressure.
•
Remove
the
securing
screws
•
To
remove
the
Grille,
pull
the
lower
left
and
right
side
of
the
grille
toward
you
(slightly
tilted)
and
lift
it
straight
upward.
1.
To
remove
the
sensor,
housing
connect,
step
motor
conductor
with
sensor
holder,
Motor,
Evaporator
&
P.C.B.
Up-and-down
air
direction
louver
Screw
ciT7111
Motor
Conductor
Sensor
Conductor
Step
Motor
Conductor
58
MPS
Multi
Air
Conditioner