LG HMC036KDT1 Service Manual - Page 55
running
 |
View all LG HMC036KDT1 manuals
Add to My Manuals
Save this manual to your list of manuals |
Page 55 highlights
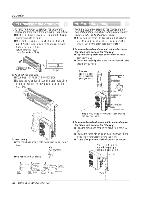
(8) Test running 1) Connection of power supply 1. Connect the power supply cord to the inde- pendent power supply. 2. Prepare the remote control. • Insert two batteries provided. Remove the battery cover from the remote controller. • Slide the cover according to the arrow direction. Insert the two batteries. (Two "R03" or "AAA" dry-cell batteries or equivalent.) • Be sure that the (+) and (-) directions are correct. - Be sure that both batteries are new. Re-attach the cover. • Slide it back into position. 3. Operate the unit at cooling operation mode for fifteen minutes or more. Battery Cover Settlement of Outdoor Unit Bolt • Anchor the outdoor unit with a bolt and nut (2110cm) tightly and horizontally on a concrete or rigid mount. • When installing on the wall, roof ❑r rooftop, anchor the mounting base securely with a nail or wire assuming the influence of wind and earthquake. • In the case when the vibration of the unit is conveyed to the house, settle the unit with an antivibration rubber. 2) Evaluation of the performance 1. Measure the temperature of the intake and discharge air. 2. Ensure the difference between the intake temperature and the discharge one is more than 8°C. NOTICE : Heating capacity decreases as outdoor temperature decreases. The unit can work below to 14F without unit out or system shut down. Installation 0 Tubing connection Discharge air Service Manual 55
-
 1
1 -
2
-
3
-
4
-
5
-
6
-
7
-
8
-
9
-
10
-
11
-
12
-
13
-
14
-
15
-
16
-
17
-
18
-
19
-
20
-
21
-
22
-
23
-
24
-
25
-
26
-
27
-
28
-
29
-
30
-
31
-
32
-
33
-
34
-
35
-
36
-
37
-
38
-
39
-
40
-
41
-
42
-
43
-
44
-
45
-
46
-
47
-
48
-
49
-
 50
50 -
 51
51 -
 52
52 -
 53
53 -
 54
54 -
 55
55 -
 56
56 -
 57
57 -
 58
58 -
 59
59 -
 60
60 -
61
-
62
-
63
-
64
-
65
-
66
 |
 |
