LG LMCN185HV Installation Instructions - Page 28
Installation of Wired Remote ControllerOptional
 |
View all LG LMCN185HV manuals
Add to My Manuals
Save this manual to your list of manuals |
Page 28 highlights
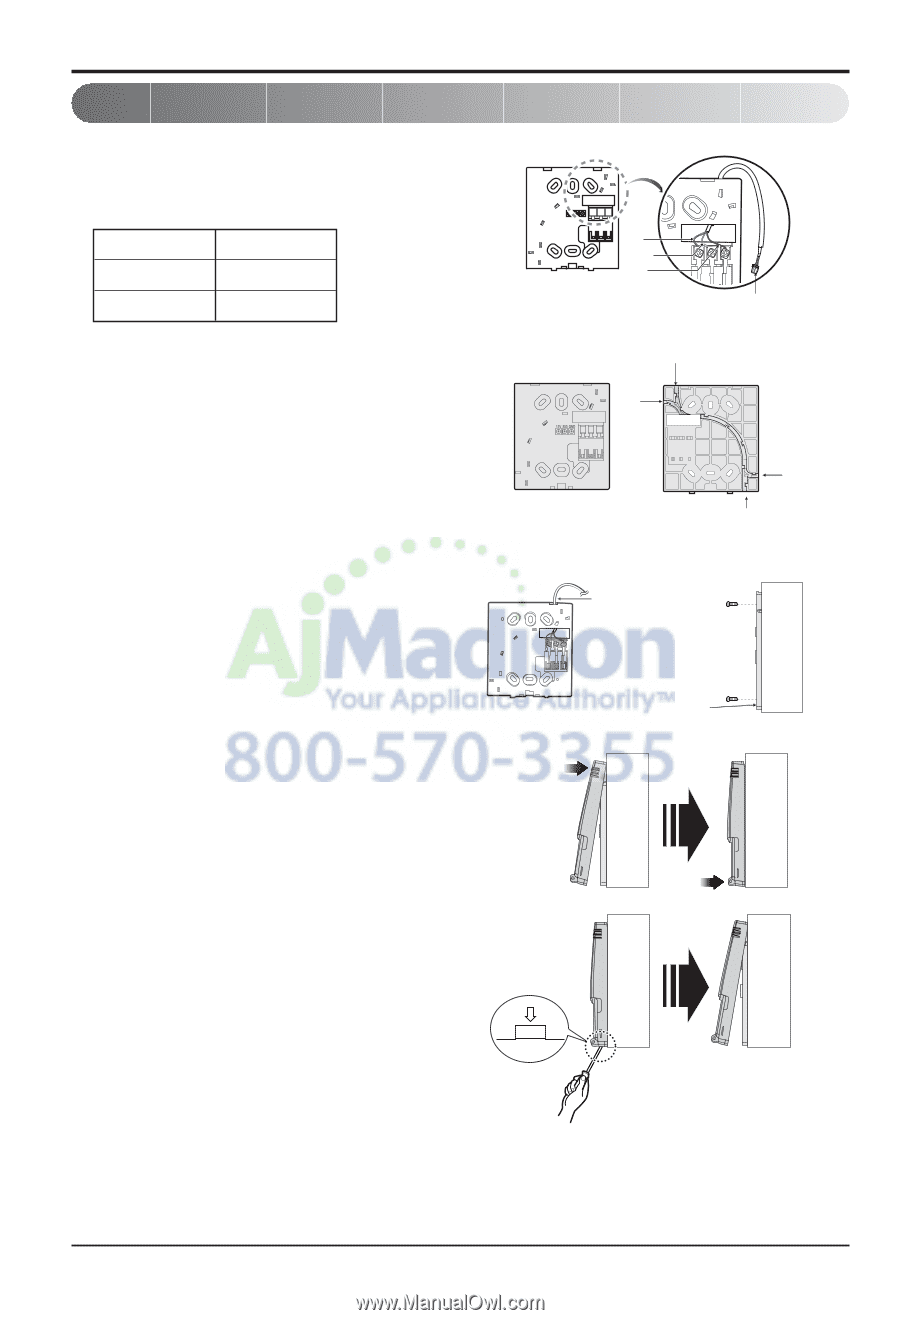
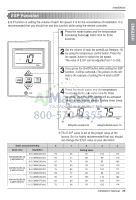
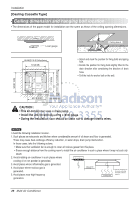
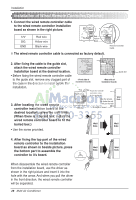
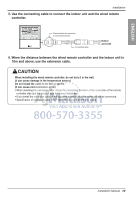
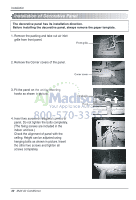
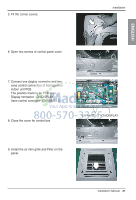
Installation Installation of Wired Remote Controller(Optional) 1. Connect the wired remote controller cable to the wired remote controller installation board as shown in the right picture. 12V SIG GND 12V SIG GND Red wire Yellow wire Black wire Red Yellow Black ❊ The wired remote controller cable is connected as factory default. Remote Controller Cable 2. After fixing the cable to the guide slot, attach the wired remote controller installation board at the desired location. • Before fixing the wired remote controller cable to the guide slot, remove any clogged part of the case in the direction to install before the installation. 3. After locating the wired remote controller installation board at the desired location, screw the unit firmly. (When there is a buried box, install the wired remote controller board to fit the buried box.) • Use the screw provided. Guide slot Top Bottom Fixate the remote controller cable to the guide slot. Use the screws for fixate the unit firmly on the wall. Installation board Wall Side Wall Side Wall Side 4. After fixing the top part of the wired remote controller to the installation board as shown in beside picture, press the bottom part to assemble the controller to it's board. When disassemble the wired remote controller from the installation board, use the driver as shown in the right picture and insert it into the hole with the arrow. And when you pull the driver in the front direction, the wired remote controller will be separated. 28 Multi Air Conditioner Wall Side Wall Side
-
 1
1 -
2
-
3
-
4
-
5
-
6
-
7
-
8
-
9
-
10
-
11
-
12
-
13
-
14
-
15
-
16
-
17
-
18
-
19
-
20
-
21
-
22
-
 23
23 -
 24
24 -
 25
25 -
 26
26 -
 27
27 -
 28
28 -
 29
29 -
 30
30 -
 31
31 -
 32
32 -
 33
33 -
34
-
35
-
36
-
37
-
38
-
39
-
40
-
41
-
42
-
43
-
44
-
45
-
46
-
47
-
48
-
49
-
50
-
51
-
52
-
53
-
54
-
55
-
56
-
57
-
58
-
59
-
60
-
61
-
62
-
63
-
64
-
65
-
66
-
67
-
68
-
69
-
70
-
71
-
72
-
73
-
74
-
75
-
76
-
77
-
78
-
79
-
80
-
81
-
82
-
83
-
84
-
85
-
86
-
87
-
88
-
89
-
90
-
91
-
92
-
93
-
94
-
95
-
96
-
97
-
98
-
99
-
100
-
101
-
102
-
103
-
104
-
105
-
106
-
107
-
108
-
109
-
110
-
111
-
112
-
113
-
114
-
115
-
116
-
117
-
118
-
119
-
120
-
121
-
122
-
123
-
124
-
125
-
126
-
127
-
128
-
129
-
130
-
131
-
132
-
133
-
134
-
135
-
136
-
137
 |
 |