LG VX9100 Owner's Manual (English) - Page 33
Alignment/ Font Size/ Font Style, Customizing the Message Using - color
 |
View all LG VX9100 manuals
Add to My Manuals
Save this manual to your list of manuals |
Page 33 highlights
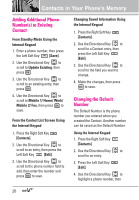
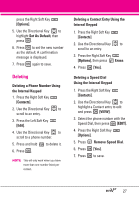
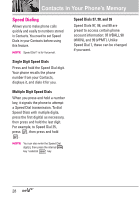
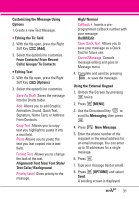
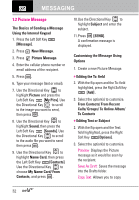
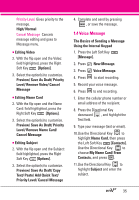
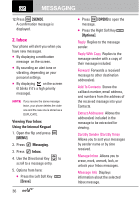
Customizing the Message Using Options 1. Create a new Text Message. G Editing the To: field 2. With the flip open, press the Right Soft Key [Add]. 3. Select the option(s) to customize. From Contacts/ From Recent Calls/ Groups/ To Contacts G Editing Text 2. With the flip open, press the Right Soft Key [Options]. 3. Select the option(s) to customize. Save As Draft Saves the message into the Drafts folder. Add Allows you to add Graphic, Animation, Sound, Quick Text, Signature, Name Card, or Address From Contacts. Copy Text Allows you to copy text you highlight to paste it into a text field. Paste Allows you to paste the text you last copied into a text field. Format Text Allows you to change the look of the text. Alignment/ Font Size/ Font Style/ Text Color/ Background Priority Level Gives priority to the message. High/ Normal Callback # Inserts a preprogrammed callback number with your message. On/Off/Edit Save Quick Text Allows you to save your message as a Quick Text for future use. Cancel Message Cancels message editing and goes to Message menu. 4. Complete and send by pressing , or save the message. Using the External Keypad 1. Unlock the Screen by pressing twice. 2. Press [MENU]. 3. Use the Directional Key to scroll to Messaging, then press . 4. Press New Message. 5. Enter the phone number of the recipient or the email address for an email message. You can enter up to 10 addresses for a single message. 6. Press . 7. Type your message (text or email). 8. Press [OPTIONS] and select Send. A sending screen is displayed. 31
-
 1
1 -
2
-
3
-
4
-
5
-
6
-
7
-
8
-
9
-
10
-
11
-
12
-
13
-
14
-
15
-
16
-
17
-
18
-
19
-
20
-
21
-
22
-
23
-
24
-
25
-
26
-
27
-
 28
28 -
 29
29 -
 30
30 -
 31
31 -
 32
32 -
 33
33 -
 34
34 -
 35
35 -
 36
36 -
 37
37 -
 38
38 -
39
-
40
-
41
-
42
-
43
-
44
-
45
-
46
-
47
-
48
-
49
-
50
-
51
-
52
-
53
-
54
-
55
-
56
-
57
-
58
-
59
-
60
-
61
-
62
-
63
-
64
-
65
-
66
-
67
-
68
-
69
-
70
-
71
-
72
-
73
-
74
-
75
-
76
-
77
-
78
-
79
-
80
-
81
-
82
-
83
-
84
-
85
-
86
-
87
-
88
-
89
-
90
-
91
-
92
-
93
-
94
-
95
-
96
-
97
-
98
-
99
-
100
-
101
-
102
-
103
-
104
-
105
-
106
-
107
-
108
-
109
-
110
-
111
-
112
-
113
-
114
-
115
-
116
-
117
-
118
-
119
-
120
-
121
-
122
-
123
-
124
-
125
-
126
-
127
-
128
-
129
-
130
-
131
-
132
 |
 |
