Lenovo M55e User Manual - Page 35
Installing, external, options, Locating, controls, connectors, front, computer
 |
UPC - 883609167608
View all Lenovo M55e manuals
Add to My Manuals
Save this manual to your list of manuals |
Page 35 highlights
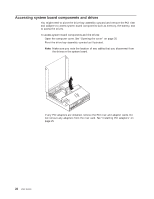
v When possible, remove the option and install it directly in the computer without setting the option down. When this is not possible, place the static-protective package that the option came in on a smooth, level surface and place the option on it. v Do not place the option on the computer cover or other metal surface. Installing external options This section shows the various external connectors on your computer to which you can attach external options, such as external speakers, a printer, or a scanner. For some external options, you must install additional software in addition to making the physical connection. When adding an external option, use the information in this section to identify the required connector, and then use the instructions that come with the option to help you make the connection and install any software or device drivers that are required for the option. Locating controls and connectors on the front of your computer The following illustration shows the locations of the controls and connectors on the front of your computer. 1 Optical drive 5 USB connectors (2) 2 Hard disk drive activity indicator 6 Microphone connector 3 Power-on indicator 7 Headphone connector 4 Power button 8 Diskette drive Chapter 3. Installing options 17
-
 1
1 -
2
-
3
-
4
-
5
-
6
-
7
-
8
-
9
-
10
-
11
-
12
-
13
-
14
-
15
-
16
-
17
-
18
-
19
-
20
-
21
-
22
-
23
-
24
-
25
-
26
-
27
-
28
-
29
-
 30
30 -
 31
31 -
 32
32 -
 33
33 -
 34
34 -
 35
35 -
 36
36 -
 37
37 -
 38
38 -
 39
39 -
 40
40 -
41
-
42
-
43
-
44
-
45
-
46
-
47
-
48
-
49
-
50
-
51
-
52
-
53
-
54
-
55
-
56
-
57
-
58
-
59
-
60
-
61
-
62
-
63
-
64
-
65
-
66
-
67
-
68
-
69
-
70
-
71
-
72
-
73
-
74
-
75
-
76
-
77
-
78
-
79
-
80
-
81
-
82
-
83
-
84
-
85
-
86
-
87
-
88
-
89
-
90
-
91
-
92
-
93
-
94
-
95
-
96
 |
 |
