Lenovo M55e User Manual - Page 46
Installing, drive
 |
UPC - 883609167608
View all Lenovo M55e manuals
Add to My Manuals
Save this manual to your list of manuals |
Page 46 highlights
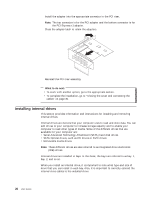
Installing a drive in bay 2 To install an optical drive or an additional hard disk drive in bay 2, do the following: 1. Open the computer cover. See "Opening the cover" on page 20. 2. Pivot the drive bay assembly upward to gain access to the cable connections. 3. Remove the front bezel by releasing the tab as shown and pivoting the bezel outward from the bottom. 28 User Guide 4. Lower the drive bay assembly. 5. Remove the metal shield from the drive bay by using a flat-blade screwdriver to gently pry it loose. 6. If you are installing a drive with accessible media, such as an optical drive, remove the plastic panel in the bezel by squeezing the plastic tabs that secure the panel on the inside of the bezel.
-
 1
1 -
2
-
3
-
4
-
5
-
6
-
7
-
8
-
9
-
10
-
11
-
12
-
13
-
14
-
15
-
16
-
17
-
18
-
19
-
20
-
21
-
22
-
23
-
24
-
25
-
26
-
27
-
28
-
29
-
30
-
31
-
32
-
33
-
34
-
35
-
36
-
37
-
38
-
39
-
40
-
 41
41 -
 42
42 -
 43
43 -
 44
44 -
 45
45 -
 46
46 -
 47
47 -
 48
48 -
 49
49 -
 50
50 -
 51
51 -
52
-
53
-
54
-
55
-
56
-
57
-
58
-
59
-
60
-
61
-
62
-
63
-
64
-
65
-
66
-
67
-
68
-
69
-
70
-
71
-
72
-
73
-
74
-
75
-
76
-
77
-
78
-
79
-
80
-
81
-
82
-
83
-
84
-
85
-
86
-
87
-
88
-
89
-
90
-
91
-
92
-
93
-
94
-
95
-
96
 |
 |

Installing
a
drive
in
bay
2
To
install
an
optical
drive
or
an
additional
hard
disk
drive
in
bay
2,
do
the
following:
1.
Open
the
computer
cover.
See
“Opening
the
cover”
on
page
20.
2.
Pivot
the
drive
bay
assembly
upward
to
gain
access
to
the
cable
connections.
3.
Remove
the
front
bezel
by
releasing
the
tab
as
shown
and
pivoting
the
bezel
outward
from
the
bottom.
4.
Lower
the
drive
bay
assembly.
5.
Remove
the
metal
shield
from
the
drive
bay
by
using
a
flat-blade
screwdriver
to
gently
pry
it
loose.
6.
If
you
are
installing
a
drive
with
accessible
media,
such
as
an
optical
drive,
remove
the
plastic
panel
in
the
bezel
by
squeezing
the
plastic
tabs
that
secure
the
panel
on
the
inside
of
the
bezel.
28
User
Guide