Lenovo ThinkPad 600E User's Reference Guide for TP 600 - Page 87
External, Display, PS2 SC BOTH, Using PS2 Command
 |
View all Lenovo ThinkPad 600E manuals
Add to My Manuals
Save this manual to your list of manuals |
Page 87 highlights
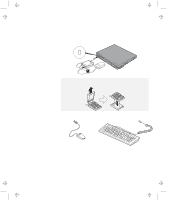
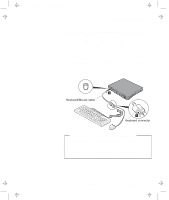
Title: C79EGMST CreationDate: 02/10/98 09:24:42 Attaching an External Monitor You can also change the display output location as follows: Using the Fn key function: Press and hold the Fn key; then press the F7 key. The output is displayed sequentially as follows: External Display Both LCD Using PS2 Command: For DOS, use the PS2 command to change the display output location. - Type PS2 SC BOTH to display information on both the LCD and external monitor. - Type PS2 SC CRT to display information only on the external monitor. - Type PS2 SC LCD to display information only on the LCD. Important If you are using OS/2 Warp, do not use System in the System Setup folder to change the resolution or color depth. Use the ThinkPad Configuration program to configure the monitor. Do not disconnect the external monitor while the computer is in suspend mode or hibernation mode. If no external monitor is attached when the computer resumes, the LCD remains blank and output is not displayed. This restriction does not depend on the resolution value. Chapter 2. Extending the Features of Your Computer 69
-
 1
1 -
2
-
3
-
4
-
5
-
6
-
7
-
8
-
9
-
10
-
11
-
12
-
13
-
14
-
15
-
16
-
17
-
18
-
19
-
20
-
21
-
22
-
23
-
24
-
25
-
26
-
27
-
28
-
29
-
30
-
31
-
32
-
33
-
34
-
35
-
36
-
37
-
38
-
39
-
40
-
41
-
42
-
43
-
44
-
45
-
46
-
47
-
48
-
49
-
50
-
51
-
52
-
53
-
54
-
55
-
56
-
57
-
58
-
59
-
60
-
61
-
62
-
63
-
64
-
65
-
66
-
67
-
68
-
69
-
70
-
71
-
72
-
73
-
74
-
75
-
76
-
77
-
78
-
79
-
80
-
81
-
 82
82 -
 83
83 -
 84
84 -
 85
85 -
 86
86 -
 87
87 -
 88
88 -
 89
89 -
 90
90 -
 91
91 -
 92
92 -
93
-
94
-
95
-
96
-
97
-
98
-
99
-
100
-
101
-
102
-
103
-
104
-
105
-
106
-
107
-
108
-
109
-
110
-
111
-
112
-
113
-
114
-
115
-
116
-
117
-
118
-
119
-
120
-
121
-
122
-
123
-
124
-
125
-
126
-
127
-
128
-
129
-
130
-
131
-
132
-
133
-
134
-
135
-
136
-
137
-
138
-
139
-
140
-
141
-
142
-
143
-
144
-
145
-
146
-
147
-
148
-
149
-
150
-
151
-
152
-
153
-
154
-
155
-
156
-
157
-
158
-
159
-
160
-
161
-
162
-
163
-
164
-
165
-
166
-
167
-
168
-
169
-
170
-
171
-
172
-
173
-
174
-
175
-
176
-
177
-
178
-
179
-
180
-
181
-
182
-
183
-
184
-
185
-
186
-
187
-
188
-
189
-
190
-
191
-
192
-
193
-
194
-
195
-
196
-
197
-
198
-
199
-
200
-
201
-
202
-
203
-
204
-
205
-
206
-
207
-
208
 |
 |
