Lexmark 12N0004 User's Guide - Page 115
Resetting the maintenance counter
 |
UPC - 734646560047
View all Lexmark 12N0004 manuals
Add to My Manuals
Save this manual to your list of manuals |
Page 115 highlights
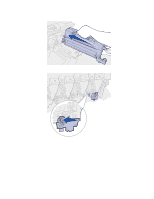
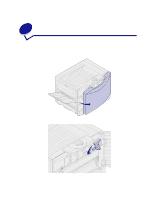
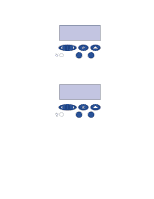
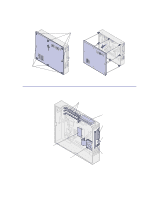
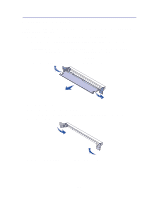
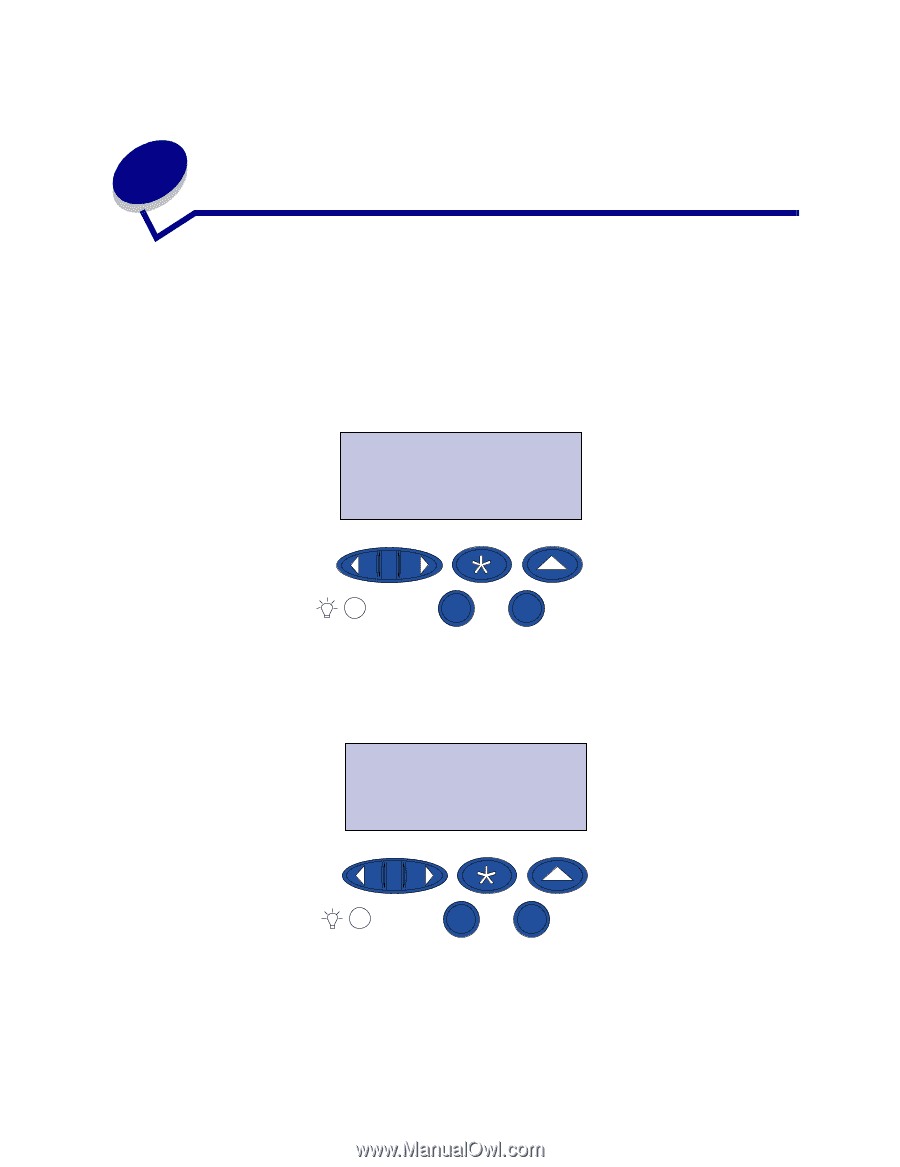
33 Resetting the maintenance counter After replacing the fuser or transfer belt, you must reset the maintenance counter. If the message Did you replace Fuser? or Did you replace Belt? appears, press Go. Otherwise, use the following steps to reset the fuser or transfer belt counter. Note: Although the fuser is shown, the same procedure is used to clear the transfer belt. 1 Press Menu until Supplies Menu appears on the second line of the display. SUPPLIES MENU 1 Menu 2 Select 3 Return 4 Go 5 Stop 6 2 Press Select to open the Supplies Menu. 3 Press Menu until Replace Supplies appears on the second line of the display. SUPPLIES MENU REPLACE SUPPLIES 1 Menu 2 Select 3 Return 4 Go 5 Stop 6 4 Press Select to open Replace Supplies. 113
-
 1
1 -
2
-
3
-
4
-
5
-
6
-
7
-
8
-
9
-
10
-
11
-
12
-
13
-
14
-
15
-
16
-
17
-
18
-
19
-
20
-
21
-
22
-
23
-
24
-
25
-
26
-
27
-
28
-
29
-
30
-
31
-
32
-
33
-
34
-
35
-
36
-
37
-
38
-
39
-
40
-
41
-
42
-
43
-
44
-
45
-
46
-
47
-
48
-
49
-
50
-
51
-
52
-
53
-
54
-
55
-
56
-
57
-
58
-
59
-
60
-
61
-
62
-
63
-
64
-
65
-
66
-
67
-
68
-
69
-
70
-
71
-
72
-
73
-
74
-
75
-
76
-
77
-
78
-
79
-
80
-
81
-
82
-
83
-
84
-
85
-
86
-
87
-
88
-
89
-
90
-
91
-
92
-
93
-
94
-
95
-
96
-
97
-
98
-
99
-
100
-
101
-
102
-
103
-
104
-
105
-
106
-
107
-
108
-
109
-
 110
110 -
 111
111 -
 112
112 -
 113
113 -
 114
114 -
 115
115 -
 116
116 -
 117
117 -
 118
118 -
 119
119 -
 120
120 -
121
-
122
-
123
-
124
-
125
-
126
-
127
-
128
-
129
-
130
-
131
-
132
-
133
-
134
-
135
-
136
-
137
-
138
-
139
-
140
-
141
-
142
-
143
-
144
-
145
-
146
-
147
-
148
-
149
-
150
-
151
-
152
-
153
-
154
-
155
-
156
-
157
-
158
-
159
-
160
-
161
-
162
-
163
-
164
-
165
-
166
-
167
-
168
-
169
-
170
-
171
-
172
-
173
-
174
-
175
-
176
-
177
-
178
-
179
-
180
-
181
-
182
-
183
-
184
-
185
-
186
-
187
-
188
-
189
-
190
-
191
-
192
-
193
-
194
-
195
-
196
-
197
-
198
-
199
-
200
-
201
-
202
-
203
-
204
-
205
-
206
-
207
-
208
-
209
-
210
-
211
-
212
-
213
-
214
-
215
-
216
-
217
-
218
-
219
-
220
-
221
-
222
-
223
-
224
-
225
-
226
-
227
-
228
-
229
-
230
-
231
-
232
-
233
-
234
-
235
-
236
-
237
-
238
-
239
-
240
-
241
-
242
-
243
-
244
-
245
-
246
-
247
-
248
-
249
-
250
-
251
-
252
-
253
-
254
-
255
-
256
-
257
-
258
-
259
-
260
-
261
-
262
-
263
-
264
-
265
-
266
-
267
-
268
-
269
-
270
-
271
-
272
-
273
-
274
-
275
-
276
-
277
-
278
-
279
-
280
-
281
-
282
-
283
-
284
-
285
-
286
-
287
-
288
-
289
-
290
-
291
-
292
-
293
-
294
-
295
-
296
-
297
-
298
-
299
-
300
-
301
-
302
-
303
-
304
-
305
-
306
-
307
-
308
-
309
-
310
-
311
-
312
-
313
-
314
-
315
-
316
-
317
-
318
-
319
-
320
-
321
-
322
-
323
 |
 |
113
33
Resetting the maintenance counter
After replacing the fuser or transfer belt, you must reset the maintenance counter.
If the message
Did you replace Fuser?
or
Did you replace Belt?
appears, press
Go
.
Otherwise, use the following steps to reset the fuser or transfer belt counter.
Note:
Although the fuser is shown, the same procedure is used to clear the transfer belt.
1
Press
Menu
until
Supplies Menu
appears on the second line of the display.
2
Press
Select
to open the Supplies Menu.
3
Press
Menu
until
Replace Supplies
appears on the second line of the display.
4
Press
Select
to open
Replace Supplies
.
1
Menu
2
Select
3
Go
5
Return
4
Stop
6
SUPPLIES MENU
1
Menu
2
Select
3
Go
5
Return
4
Stop
6
SUPPLIES MENU
REPLACE SUPPLIES