Lexmark 12N0009 Setup Guide - Page 25
Set up the printer and paper handling options, click, spacers
 |
UPC - 734646560092
View all Lexmark 12N0009 manuals
Add to My Manuals
Save this manual to your list of manuals |
Page 25 highlights
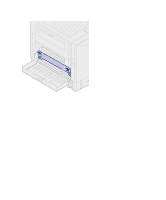
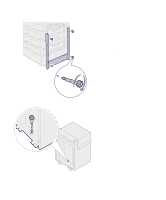
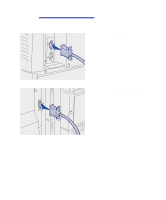
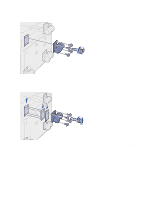
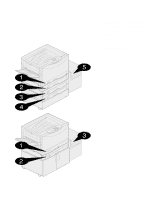
4 Roll the high-capacity feeder toward the printer and check the alignment of the pins with the holes in the docking frame. If the pins do not align with the holes in the docking frame, see "Installing height adjustment spacers" on page 21. 5 Roll the high-capacity feeder toward the printer until the feeder locks to the docking frame. When the feeder is in the correct position, you hear a click when it locks. Set up the printer and paper handling options 19
-
 1
1 -
2
-
3
-
4
-
5
-
6
-
7
-
8
-
9
-
10
-
11
-
12
-
13
-
14
-
15
-
16
-
17
-
18
-
19
-
 20
20 -
 21
21 -
 22
22 -
 23
23 -
 24
24 -
 25
25 -
 26
26 -
 27
27 -
 28
28 -
 29
29 -
 30
30 -
31
-
32
-
33
-
34
-
35
-
36
-
37
-
38
-
39
-
40
-
41
-
42
-
43
-
44
-
45
-
46
-
47
-
48
-
49
-
50
-
51
-
52
-
53
-
54
-
55
-
56
-
57
-
58
-
59
-
60
-
61
-
62
-
63
-
64
-
65
-
66
-
67
-
68
-
69
-
70
-
71
-
72
-
73
-
74
-
75
-
76
-
77
-
78
-
79
-
80
-
81
-
82
-
83
-
84
-
85
-
86
-
87
-
88
-
89
-
90
-
91
-
92
 |
 |

19
Set up the printer and paper handling options
4
Roll the high-capacity feeder
toward the printer and check the
alignment of the pins with the
holes in the docking frame.
If the pins do not align with the
holes in the docking frame, see
“Installing height adjustment
spacers” on page 21.
5
Roll the high-capacity feeder
toward the printer until the feeder
locks to the docking frame.
When the feeder is in the correct
position, you hear a
click
when it
locks.