Lexmark C540 User's Guide - Page 40
Setting the paper size and type, Configuring Universal paper settings, Specify a unit of measure
 |
View all Lexmark C540 manuals
Add to My Manuals
Save this manual to your list of manuals |
Page 40 highlights
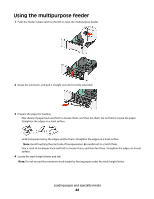
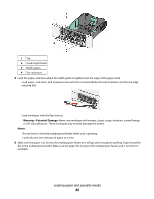
7 Press . 8 Press the arrow buttons until Custom Type or another custom name appears, and then press . Submitting changes appears, followed by Paper Menu. 9 Press , and then press to return to the Ready state. Setting the paper size and type 1 Make sure that the printer is on and Ready appears. 2 From the printer control panel, press . 3 Press the arrow buttons until Paper Menu appears, and then press . 4 Press the arrow buttons until Size/Type appears, and then press . 5 Press the arrow buttons until the correct tray appears, and then press . 6 Press when Size appears. 7 Press the arrow buttons until the correct size appears, and then press . Submitting changes appears, followed by Size. 8 Press the arrow buttons until Type appears, and then press . 9 Press the arrow buttons until the correct type appears, and then press . Submitting changes appears, followed by Type. Configuring Universal paper settings The Universal Paper Size is a user-defined setting that lets you print on paper sizes that are not preset in the printer menus. Set the Paper Size for the specified tray to Universal when the size you want is not available from the Paper Size menu. Then, specify all of the following Universal size settings for your paper: • Units of Measure (inches or millimeters) • Portrait Height and Portrait Width • Feed Direction Note: The smallest supported Universal size is 76 x 127 mm (3 x 5 in.); the largest is 216 x 356 mm (8.5 x 14 in.). Specify a unit of measure 1 Make sure the printer is on and Ready appears. 2 From the printer control panel, press . 3 Press the arrow buttons until Paper Menu appears, and then press . 4 Press the arrow buttons until Universal Setup appears, and then press . 5 Press the arrow buttons until Units of Measure appears, and then press . Loading paper and specialty media 40
-
 1
1 -
2
-
3
-
4
-
5
-
6
-
7
-
8
-
9
-
10
-
11
-
12
-
13
-
14
-
15
-
16
-
17
-
18
-
19
-
20
-
21
-
22
-
23
-
24
-
25
-
26
-
27
-
28
-
29
-
30
-
31
-
32
-
33
-
34
-
 35
35 -
 36
36 -
 37
37 -
 38
38 -
 39
39 -
 40
40 -
 41
41 -
 42
42 -
 43
43 -
 44
44 -
 45
45 -
46
-
47
-
48
-
49
-
50
-
51
-
52
-
53
-
54
-
55
-
56
-
57
-
58
-
59
-
60
-
61
-
62
-
63
-
64
-
65
-
66
-
67
-
68
-
69
-
70
-
71
-
72
-
73
-
74
-
75
-
76
-
77
-
78
-
79
-
80
-
81
-
82
-
83
-
84
-
85
-
86
-
87
-
88
-
89
-
90
-
91
-
92
-
93
-
94
-
95
-
96
-
97
-
98
-
99
-
100
-
101
-
102
-
103
-
104
-
105
-
106
-
107
-
108
-
109
-
110
-
111
-
112
-
113
-
114
-
115
-
116
-
117
-
118
-
119
-
120
-
121
-
122
-
123
-
124
-
125
-
126
-
127
-
128
-
129
-
130
-
131
-
132
-
133
-
134
-
135
-
136
-
137
-
138
-
139
-
140
-
141
-
142
-
143
-
144
-
145
-
146
-
147
-
148
-
149
-
150
-
151
-
152
-
153
-
154
-
155
-
156
-
157
-
158
-
159
-
160
-
161
-
162
-
163
-
164
-
165
-
166
-
167
-
168
-
169
-
170
-
171
 |
 |
