Lexmark C540 User's Guide - Page 41
Loading the standard 250-sheet tray, Specify the paper height and width
 |
View all Lexmark C540 manuals
Add to My Manuals
Save this manual to your list of manuals |
Page 41 highlights
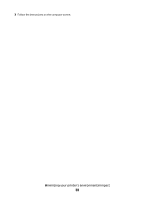
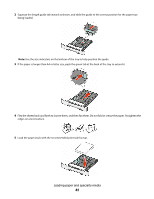
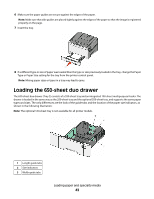
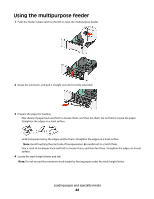
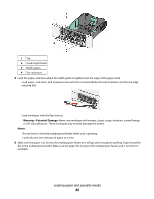
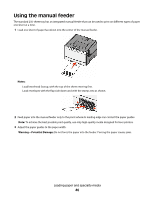
6 Press the arrow buttons until the correct unit of measure appears, and then press . Submitting changes appears, followed by the Universal Setup menu. 7 Press , and then press to return to the Ready state. Specify the paper height and width Defining a specific height and width measurement for the Universal paper size (in the portrait orientation) allows the printer to support the size, including support for standard features such as duplex printing and printing multiple pages on one sheet. 1 From the Universal Setup menu, press the arrow buttons until Portrait Width or Portrait Height appears, and then press . Note: Select Portrait Height to adjust the paper height setting or Paper Width to adjust the paper width setting. 2 Press the arrow buttons to decrease or increase the setting, and then press . Submitting changes appears, followed by the Universal Setup menu. 3 Press , and then press to return to the Ready state. Loading the standard 250-sheet tray The printer has one standard 250-sheet tray (Tray 1) with an attached manual feeder. The 250-sheet tray, the 650-sheet duo drawer, and the optional 550-sheet tray support the same paper sizes and types and are loaded in the same way. Note: The optional 550-sheet tray is not available for all printer models. 1 Pull the tray out. Note: Do not remove trays while a job prints or while Busy appears on the display. Doing so may cause a jam. Loading paper and specialty media 41
-
 1
1 -
2
-
3
-
4
-
5
-
6
-
7
-
8
-
9
-
10
-
11
-
12
-
13
-
14
-
15
-
16
-
17
-
18
-
19
-
20
-
21
-
22
-
23
-
24
-
25
-
26
-
27
-
28
-
29
-
30
-
31
-
32
-
33
-
34
-
35
-
 36
36 -
 37
37 -
 38
38 -
 39
39 -
 40
40 -
 41
41 -
 42
42 -
 43
43 -
 44
44 -
 45
45 -
 46
46 -
47
-
48
-
49
-
50
-
51
-
52
-
53
-
54
-
55
-
56
-
57
-
58
-
59
-
60
-
61
-
62
-
63
-
64
-
65
-
66
-
67
-
68
-
69
-
70
-
71
-
72
-
73
-
74
-
75
-
76
-
77
-
78
-
79
-
80
-
81
-
82
-
83
-
84
-
85
-
86
-
87
-
88
-
89
-
90
-
91
-
92
-
93
-
94
-
95
-
96
-
97
-
98
-
99
-
100
-
101
-
102
-
103
-
104
-
105
-
106
-
107
-
108
-
109
-
110
-
111
-
112
-
113
-
114
-
115
-
116
-
117
-
118
-
119
-
120
-
121
-
122
-
123
-
124
-
125
-
126
-
127
-
128
-
129
-
130
-
131
-
132
-
133
-
134
-
135
-
136
-
137
-
138
-
139
-
140
-
141
-
142
-
143
-
144
-
145
-
146
-
147
-
148
-
149
-
150
-
151
-
152
-
153
-
154
-
155
-
156
-
157
-
158
-
159
-
160
-
161
-
162
-
163
-
164
-
165
-
166
-
167
-
168
-
169
-
170
-
171
 |
 |